Authors
Publication
Pub Details
Date
Pages
IMPORTANT NOTE: The following article describes method of testing for, and repairing a Timex Sinclair 2068 with bad RAM chips. Though it is a simple project that most people with basic soldering skills are capable of completing, and the information presented here is believed to be correct, the author and publisher take no responsibility for any damage done to hobbyist) the computer (or hobbyist) as a result of, or while using this information.
The most common cause of a Timex Sinclair 2068 not working is burnt-out RAM chips, The chip(s) are usually destroyed when turning on the computer with a printer or disk interface attached. Though I have no way of proving it, the most likely cause is a high voltage “glitch” produced by the switching regulator when it is “powered-up” under a heavy load. Note that one or all of the chips can burn out, and in any combination.
There are three symptoms that may indicate bad RAM chips. The first is a blank screen when the computer is turned on. This suggests either a “brain dead” 2068 (the SCLD…or “square chip” is destroyed, and is VERY difficult to replace, IF you can get one). or that most of the RAM chips have burnt out. The second symptom is a display that consists of a white border around a screen of “garbage”. This indicates that at least one of the RAM chips in the first 16K bank is bad. The last and most obvious symptom is the free memory after power up is less than 38652 bytes (using the PRINT FREE command). If a Spectrum ROM is installed in the computer, the original Timex ROM will have to be replaced to use the FREE command.
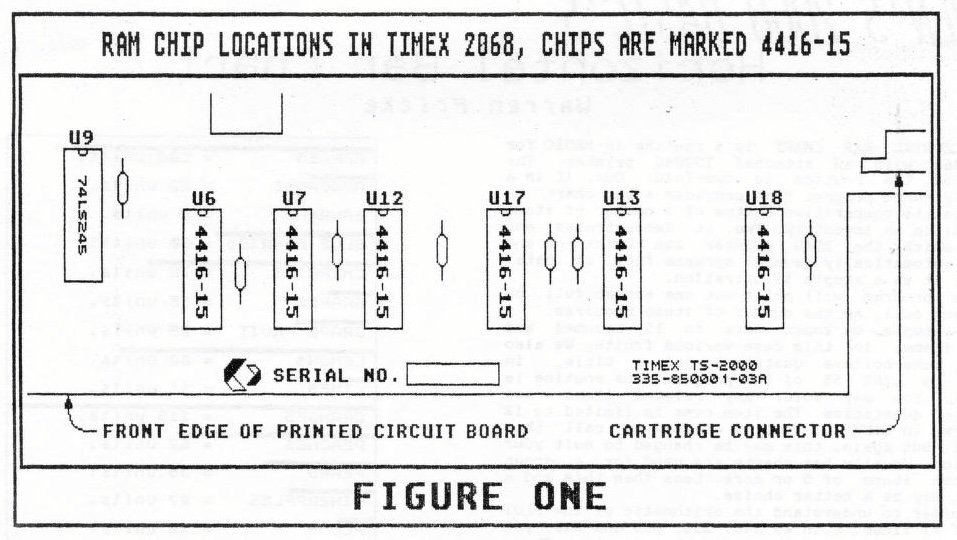
If your machine exhibits any of these symptoms, there is a chance it can be easily repaired. First, the computer’s PC board must be completely removed from it’s case. Save all the screws and be careful to avoid damaging the keyboard ribbon cable. Place the PC board on a non-conductive work surface and plug it in. Leave it turned on for a few minutes and then check each of the RAM chips for overheating (see Figure One for the chip locations). If any of the chips are hot to the touch, they are bad and need replacing. Mark them for removal. If none of the chips are hot and the computer still displays a black screen, the problem is probably not with the RAM chips. Consider sending the machine out for repair (to Dan Elliott of Promise Land Electronics–see May/June ’88 issue of TDM for address listing). If the computer displays a border around a screen of garbage, chips U6 and/or U7 may have gone bad. If a normal sign on the screen is displayed, but only 22268 bytes are “free”, chips U16 and/or U17 may have gone bad. If 5884 bytes are free, chips U12 and/or U13 and possibly U16 and/or U17 may have gone bad.
The chips that are hot to the touch should now be removed. Don’t bother trying to remove them in one piece. Just cut or clip pins near the body of the chip. and remove the remaining pins from the PC board with a hot soldering iron and tweezers. If the chips are suspected to be bad but are not getting hot, a more difficult problem exists. The chips can be clipped off the board and discarded, or removed in one piece. If the chip is clipped off, you will never know if it was good or bad, and it will have to be replaced. If the chip is removed in one piece (a very difficult task), the chip can be saved for testing and possible re-use … but only at the risk of possibly damaging the PC board. Make your own decision.
Once the chips have been removed, the computer should be tested again. Connect it to a monitor and turn it on. If any of the remaining RAM chips are now getting hot, they should also be removed. If the display was formerly black, and now displays the normal copyright message, but with reduced RAM availabie, the chips can be replaced and computer should work fine. If a border is displayed around a screen of garbage, and chips U6 and U7 are still on the board, one or both of them may also be bad. Remove them for replacement or testing.
New RAM chips for the computer will have to be purchased. The 2068 uses 4416-15’s, which are 16K*4 RAM chips. The 15 in the chip number designates speed. In this case 150 ns (nano seconds). Purchase either 120 or 150 ns chips, as the slower 200 ns chips will not work. Radio Shack does not sell them, so they must be mail-ordered (suppliers listed at the end of the article). Consider purchasing extra RAM chips, so that if one of the RAM chips left on the board is bad, you won’t have to re-order. Don’t even think about soldering the chips in. Purchase IC sockets along with the chips. Sockets make it easy to remove a chip for cents each, are lot than cutting a $4.00 RAM chip off the board.
The sockets should now be soldered in place where the RAM chips once were. If the holes on the PC board are filled with solder, they will first have to be cleared. The best method I have found is to hold the PC board vertically in a vice, melt the solder from one side of the board with a soldering iron and use a solder pump to suck the molten solder out from the other side. Remove any solder splashes or excess flux from the PC board and solder the sockets into place using rosin core solder.
Insert the new RAM chips into the sockets with the notch end of the chip pointing to the back of the PC board. Test the computer out of the case once again as described in paragraphs two and three. If everything checks out fine, the computer can be re-installed in the case and used as normal. If the computer still does not work or has reduced RAM available, there are two possible reasons. Either there is yet another bad RAM chip (new or old), or another chip in the computer is damaged, but still operates. Re-test the computer for bad RAM chips, and if none can be found, consider having the computer professionally repaired.
Image Gallery