RGB on the 2068 is probably one of the most gratifying additions you can get. The problem is that there is no simple way to do it and few companies (if any) have any to sell. E. Arthur Brown at 1702 Oak Knoll Dr, Alexandria, MN 56308 did have one they were selling for $19.95 which installed inside the machine, stripped the sync from the video, and provided for RGB connections. The Timex Technical Manual also shows a way to add RGB by building a three transistor circuit to strip syne from the video for RGB operation.
The problem with stripping the sync from the video is that you don’t always get a clean sync signal. Some of the video gets into the sync and causes tearing of the video. Performance also changes if you have something plugged into the video out jack of the computer, loading down the errcurt.
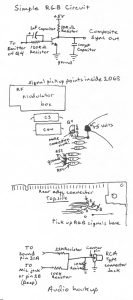
The best way is to get the sync at the source before any video is added – like the TC 2068 does (or did?). Inverted low level sync can be found on the emitter of transistor Q4 in the video circuit. All that is needed is to invert and amplify the sync to a peak to peak voltage of 5 volts which can be accomplished by a simple one transistor circuit.
WARNING: You must be very careful while going inside your computer to do any type of work to it. Be sure and disconnect the power before going inside. This is not recommended for a first time project.
This circuit will provide the type of sync that most RGB monitors require such as the Sears 14 inch RGB monitor, the Magnavox (NAP) model 40 and model 80 RGB monitors, or any monitor that accepts negative-going composite (or horizontal) sync.
The RGB signals are available on the rear edge connector at B27, B28, & B29, and ground at B32. For internal connections, see diagrams. Because the circuit is so simple, they can be mounted freestyle on the printed circuit board. Just take care that they stay close to the board to prevent accidental shorting against the top cover or other components.
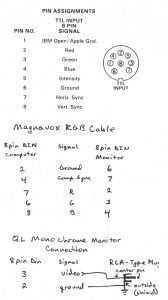
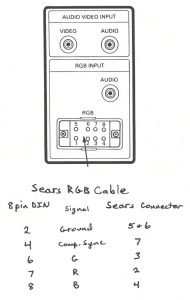
To keep this compatible with other Sinclair computers such as the QL and the Spectrum 128 which both have built-in RGB interfaces, an eight-pin “DIN” plug and socket should be used with connections as shown. The eight-pin “DIN” socket can be easily mounted on the rear plastic casing by notching the top and bottom case with wire clippers till the cases will fit back together with the connector between the two.
Shown are three cables, one for the Sears RGB/TV monitor combo, one for the Magnavox, and one for using the QL with a monochrome monitor. All the plugs and sockets should be numbered. Follow the diagram and wire the ends of the cable so that they match up to each other. On the Magnavox cable, you need to mark the ends so that they are not reversed (both ends will have an eight-pin “DIN” plug on it).
An audio jack can also be mounted and connected as shown in the diagram for SOUND and BEEP to be heard through the monitor’s audio amp if available.
Keep all leads as short as possible, use a shielded cable to the monitor particularly if you make it very long. Once you have everything hooked up, turn on the computer. It should come up with a white screen and no rolling. Try BORDER with all the colors to make sure they are wired in the right order. If you got everything right, you can now enter the new world of sharp, brilliant displays, and less eye strain!
We had quite a few inquiries as to where to purchase the Magnavox (NAP) RGB Monitors as mentioned in the December issue. They can be found at Service Merchandise which is a chain of catalog showrooms throughout the US. We have also learned that Best Products Co. Inc. also carries them. They both have had the model 40 on sale for $199.95.
Service Merchandise also now has a higher resolution RGB monitor called the Magnavox RGB 80 for $277. The Magnavox 40 works quite well with the 2068 with OS-64 though. They also have a nice Amber monitor for $99 which also works well with OS-64.