
Formats – Formatting IBM disks – Sector reader – Renaming – Listings included.
Playing with disks.
After reading Bryan Davies’ remarks about disk formatting using an ED drive and Gold Card in his trouble shooter column in the May ’93 issue of QL World I decided to play about a bit myself. As I explored I found myself writing a number of little SuperBASIC routines to help me, and copies of these are being send to Hugh for inclusion in the Toronto User Group QL Library.
In my language, a “routine” is a short piece of rough and ready code designed for a specific job. It works, but to turn it into a “program” I would need a lot of work on things like pretty screens, foolproofing, user friendliness etc. You are supposed to get into EDIT (or ED) and adapt them to suit your own purposes and systems. I have tried to put most of the things that might need changing into the first PROCedure, Set_up, with REMs indicating the changes you might want to make. Since there is not much error trapping, (in fact I cannot work out how to reliably trap the no-disk-in-drive error for direct sector reading,) if you do create an error, or BREAK the program for any reason you may leave the disk OPEN, so enter “close” or “finish” at the keyboard before running the routine again. The routines are: disk_sector_reader, disk_PC_formatter, and disk_rename (two versions)
Bryan Davies mentioned drilling a HD hole in a DD disk, so I took a copy of each format to my workshop, selected a drill bit of about the same size of the square hole in the HD disk and made a round hole in the same place on my DD disk. Back to the old QL, and sure enough 2880 sectors appeared when I formatted it. He mentions an undocumented GG command “flp_density D” to impose DD format (H for HD and E for ED), when I tried this on my doctored disk my experience was the same as his: “format failed”. “So”, I thought, “the disk drive is detecting the hole in some way, perhaps it’s shining a light through?” I put a bit of sticky paper over the top of the hole and still got 2880. Holding it up to the window I could see that the paper wasn’t totally opaque, so I tried filling the hole with a blob of “blu-tack” (An opaque blue substance a bit like sticky plasticene which is available in the UK and has all sorts of uses.) Result 1440: but then I thought, “there’s another way to test for the presence of holes, and that’s to try to poke a solid object through it. Perhaps it’s poking its fingers up from the bottom.” and sure enough the piece of paper stuck on the bottom also gave 1440 sectors. At this point reason got the better of empiricism and I realised that since the holes are near the outer edge of the disc case I could probably see the mechanism if I lifted up the drive’s dust flap, and sure enough, there were three strategically placed brass pins: one on the left for the write protect tab, and two on the right for ED and HD disk testing. (According to a note in the latest International QL Report you can set the jumpers on your drive so that it doesn’t physically test the disk, but believes what the software tells it, and FLP_DENSITY seems to work under these conditions.)
The next thing to try, obviously, was an ED hole in a DD disk. This worked almost through to the center giving me about 5900 sectors – how do I know where it failed? – you can hear when a cylinder fails to format since the regular sequence of roughly 1 sec “thunks” from the disk drive breaks up into a quicker pattern. The centre, where the sectors are physically shorter, is obviously the most challenging place for the magnetic medium.
It is of course possible that some other drive manufacturers use the optical method, but a bit of opaque paper on the bottom should cope with both systems. This is so that you can use the disk in it’s original format if you don’t trust the new one or if it doesn’t format properly.
In practise, I wouldn’t recommend formatting a DD disk as ED, you are pushing things a bit to close to the limit, and the result is likely to be unreliable. On the other hand I have heard it said that the only difference between some manufacturers DD and HD disks is the hole, the label and the price – it’s not worth their while to have two different grades of magnetic material. If this is correct the only problem I can see here is the danger of getting bits of plastic turnings inside the sleeve.
Disk Formats
While I am on the subject of disks I should add a bit about the three different formats of 3.5″ disks available to Gold Card users. For the absolute beginner I should explain the terms as I understand them. Firstly we have the “tracks”, these are a series of concentric circles on which the data are recorded magnetically. You cannot see them, the material is uniform, you depend upon your disk drive mechanism moving the heads to exactly the right place. According to the words on the side of my disk box there are 135 tracks per inch, and since there are a total of 80 of them on a side the total width used is only about 0.6 of an inch. Most 3.5″ disks are double sided, two heads read the corresponding tracks on both side of the disks at the same time, this combination is called a “cylinder”. Since computers generally start counting at zero rather than one the tracks are numbered from 0 to 79 from the outside in, and the sides are numbered 0 and 1.
Each track is divided into a number of sectors, and this is where the formats differ. In DD (double density) format each track is divided into 9 sectors, each capable of holding 512 bytes (or 0.5 kbyte – the same as a microdrive sector)) so the whole disk has 9*2*80 = 1440 sectors (or 720 kbytes).
High density (HD) disks squeeze every thing up closer fitting 18 x 512 kbyte sectors into the same space, thus doubling the capacity. But this doesn’t mean that you can have 1440 or 2880 files on each disk since in both these formats the sectors are assigned to files in blocks of three, generally interweaving them as 1-4-7, 2-5-8, 3-6-9 etc – but other formats are possible, it’s all to do with the time it takes to perform the saving operations. This means that if you save only one byte there are immediately 1536 fewer bytes available for other files. A few sectors in track zero are also reserved for disk information, such as format information and the disk directory. So you can have about 500 and 1000 small files on DD and HD disks repectively. Apart from the reserved information these formats are exactly the same as those used by IBM PCs, and you can in fact read the information from an IBM disk on your QL, although not in a very convenient form! Disk_sector_reader, will enable you to explore the contents of a QL disk (& IBM – DD & HD only) sector by sector.
However, when Miracle went to ED (Extra high density) format they decided to squeeze every bit onto them that they could and adopted a non-IBM format. Each track is split into 10 sectors, and each sector now contains 2048 bytes, so when it tells you that it is formatted to 6400 sectors it is telling a lie – it’s really only 1600, but since they are four times as big as the standard QL sector size the total amount of memory available is the same. Now, however, sectors are assigned to files individually, so you can put over 1500 small files onto one disk. Since disk rotation speed is the same whatever the format this means that the QL has to be able to read ED disks at over four times the speed of a DD disk. Hard disks are faster still.
As an exception to the rule of counting from zero, tracks are numbered from 1 to 9, 18 or 10 for DD, HD or ED respectively.
Formatting IBM disks on your QL
As I mentioned above, the magnetic format of QL and IBM DD and HD disks is the same. In each disk drive interface software there is a toolkit of commands and functions specifically directed to disk operations (these are sometimes thought of as part of Toolkit 2, but they are really quite separate.) One of these enables you to read and write disk sectors directly, irrespective of the disk’s filing system, and it is this that enables you to copy the vital sectors from a ready formatted IBM disk into your QL and then copy them back onto a preformatted QL disk, so that it will behave exactly as though it had been formatted on one of the original IBoMinables. Don’t think that you will then be able to read your QL files off it with a PC though, you only get an empty formatted disk, any files on the disk will be lost. It also only produces a data disk, not a system disk.
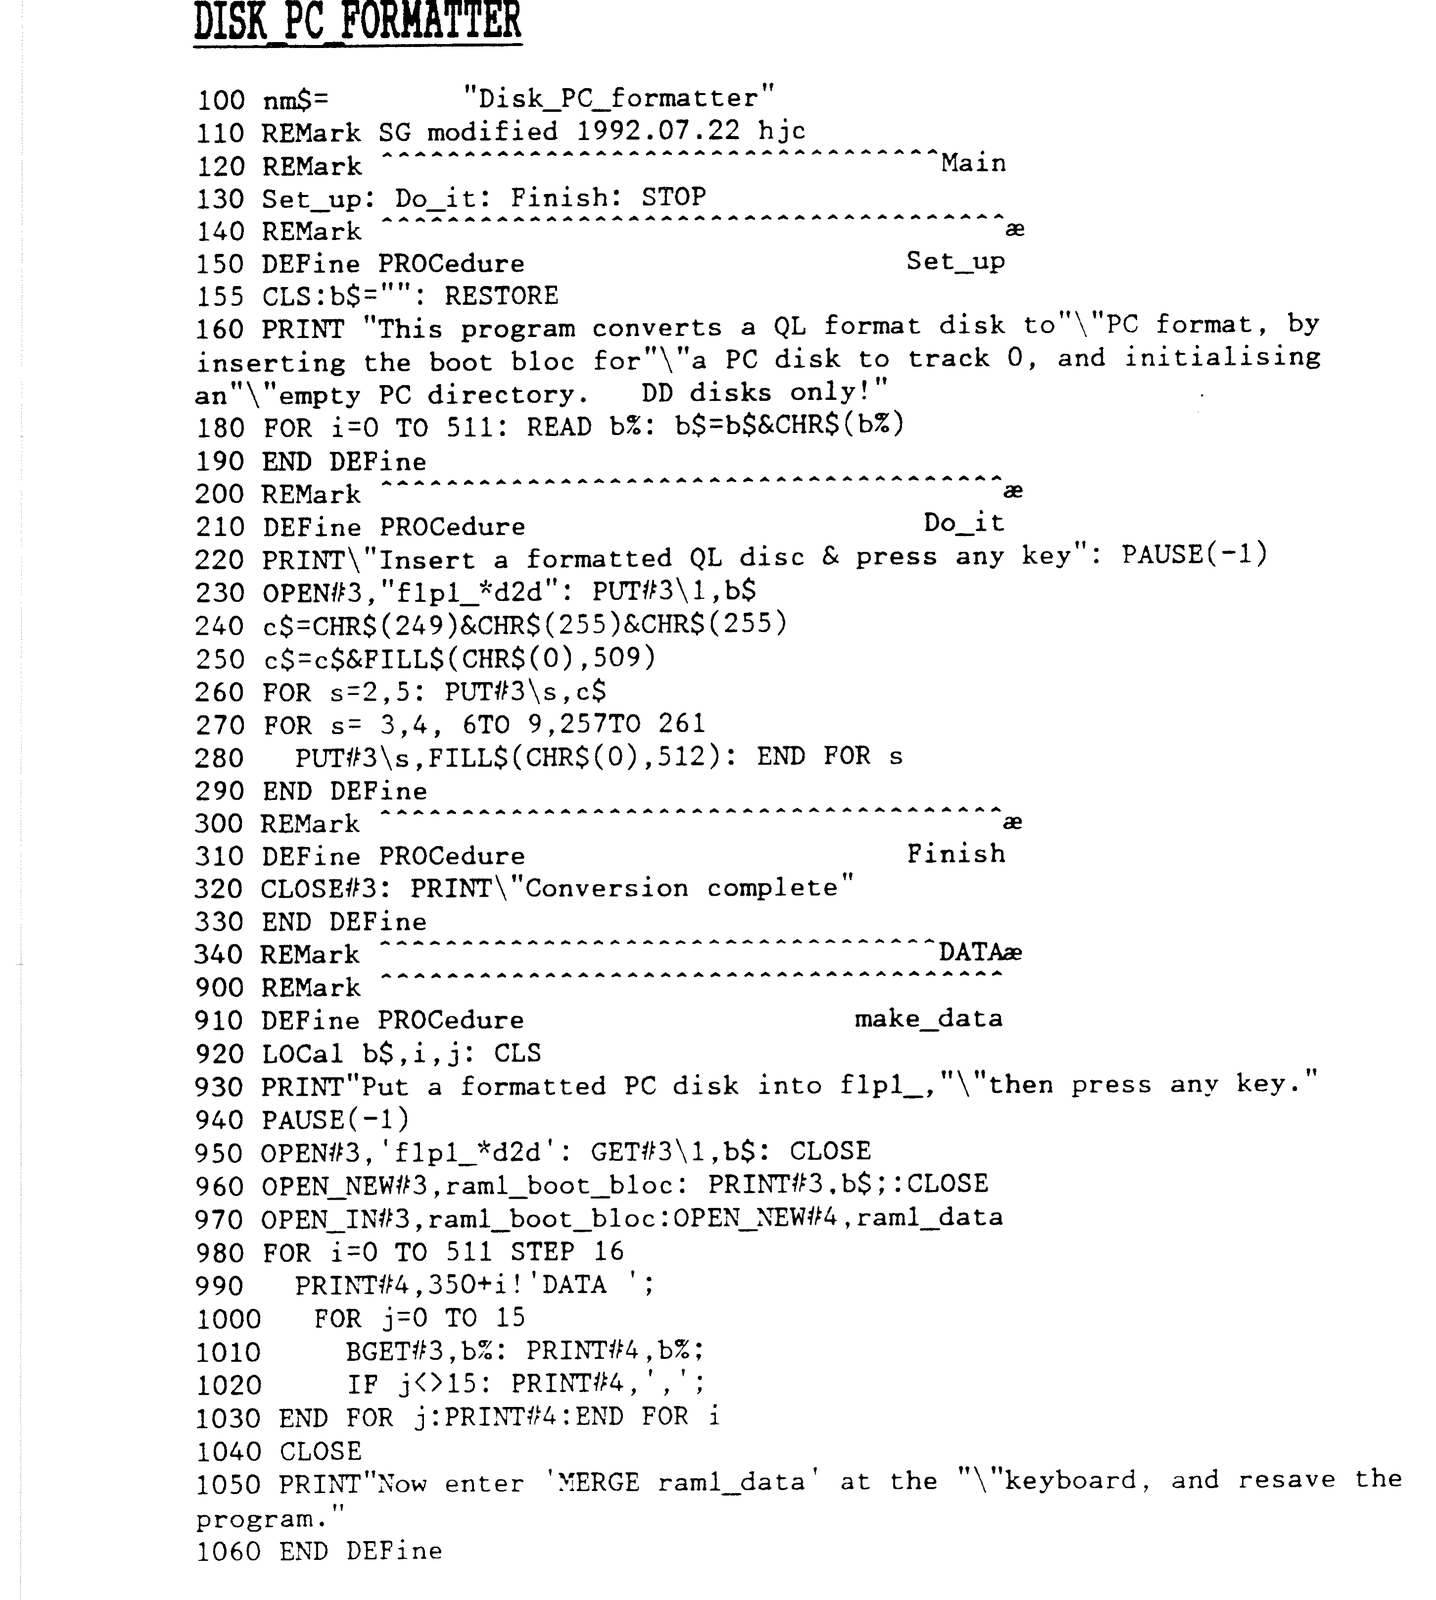
I got the basic idea from a little routine that Simon Goodwin sent me, but I’ve modified it quite a bit. The program as listed is incomplete, it needs a set of data statements, but since it also contains a procedure to create these there’s no need to worry. The first time you use the program as supplied you should have ram1_ available (if not use flp2_ or mdv1_ making sure that you have a disk or tape available and change all references to ram1_ to flp2_ or mdv1_ in the program.) Put an empty, but formatted PC disk into flp1_, and then enter “make_data” at the keyboard and follow instructions to create the necessary DATA statements in a file called ram1_data. (Make_data is a stand alone procedure – really a separate program since it is not invoked at all when you RUN the main program, it can only be called directly from the keyboard.) Then type “MERGE ram1_data” to add its lines to the program and save it in its expanded form. It can then be used to change the format of a QL disk without further reference to a genuine IBM disk. I’ve done it this way so as not to risk infringing anyone’s copyright.
How it works: 1. Make_data.
The vital information on the format of the disk (QL or IBM) is found in sector 1, track 0, side 0; this can always be read whatever the format, otherwise we would be in a catch 22 situation. It is known as the boot bloc and is read into a string variable b$ – all 512 bytes of it – in line 925 of the program. The first statement of this line is one of those disk toolkit specials. Instead of just OPENing a specific file on the disk it opens the whole disk at once – a dangerous procedure if you aren’t sure what you are doing! The parameter, which must be in quotes, opens the disk on flp1 as a double density (second d) disk with 512 kbyte sectors (the 2) – you need to know this in advance – but all QL and IBM DD disks use this format. When a disk is OPENed like this all you can do is to read and write (that’s what makes it dangerous) whole sectors, each individual sector is identified by a number (the sector id) made up as follows: (sector + 256*side + 65536*track). Since the first side and the first track are both numbered 0, 1 always refers to the boot bloc sector. The GET function is next used to read the sector into b$; the syntax is:
GET[channel number]sector_id,string_variableonly the channel number is optional, but you will almost always need to put it in, since it is very unlikely that you will ever use the command with the default channel, #1! The effect then in line 925 is to dump all 512 bytes of the boot bloc sector from the sector into b$. Since that is all that is required from the disk it is immediately closed again.
The next line, 930, OPENs a conventional file in a ram disk (you could use flp2 or mdv1 here remember), dumps the sector bloc from b$ into that, and closes it again. It is immediately reOPENed in line 935, but for input only, and another new file, ram1_data, created. The loop from 940 to 965 copies the 512 bytes from the boot bloc into ram1_data, changing the format as it goes. It first prints a line number and the word DATA to the file (945), takes the bytes one at a time from channel 3 (using BGET) as integers this time not characters (b% – the % sign declares the variable an integer) and prints them to channel 4 followed by a comma except for the last one (960). The program has automatically written a line of BASIC for you: a DATA statement with sixteen numbers. This is repeated 15 more times, and everything CLOSEd (970).
(Those readers with a bit of programing experience will have asked themselves why I used the intermediate file ram1_boot_bloc rather than just read the characters back out of b$ and convert them to integers using coersion. I wondered that too later; but I left it as it is since it illustrates more of the file handling commands.)
You merge this set of DATA statements in to complete the program and you can save it for future use. The line numbers for the DATA statements are carefully chosen so as not to conflict with other lines in the program, so don’t RENUMBER until it is complete. (I couldn’t make the MERGEing automatic since MERGE will not work from within a PROCedure)
How it works: 2. The Formatter
This is basically make_data in reverse. The integers are READ back from the DATA lines into b$ as the corresponding characters (180) and PUT back into the first sector. (PUT is just like GET except that the information goes the other way). When I examined the rest of the sectors in the first cylinder of a freshly IBM formatted, virgin disk I found that most of them were filled with zeros, (byte 0 not character 0) except that 2 and 5 had 249,255,255 as their first three bytes, so lines 240 to 280 duplicate this on the new disk, this is also true of a preformatted IBM disk I have checked. Simon’s routine did something different here which didn’t work for me, so I suspect there may be other formats around. If this routine doesn’t work for you have a look at the contents of these sectors on a newly formatted virgin disk, and duplicate them (disk_sector_reader will help here.) I have no idea what any any of these codes do, I’m just a copycat. Once again, disk_sector_reader will help if you want to explore the details.
Changing the name of a QL disk.
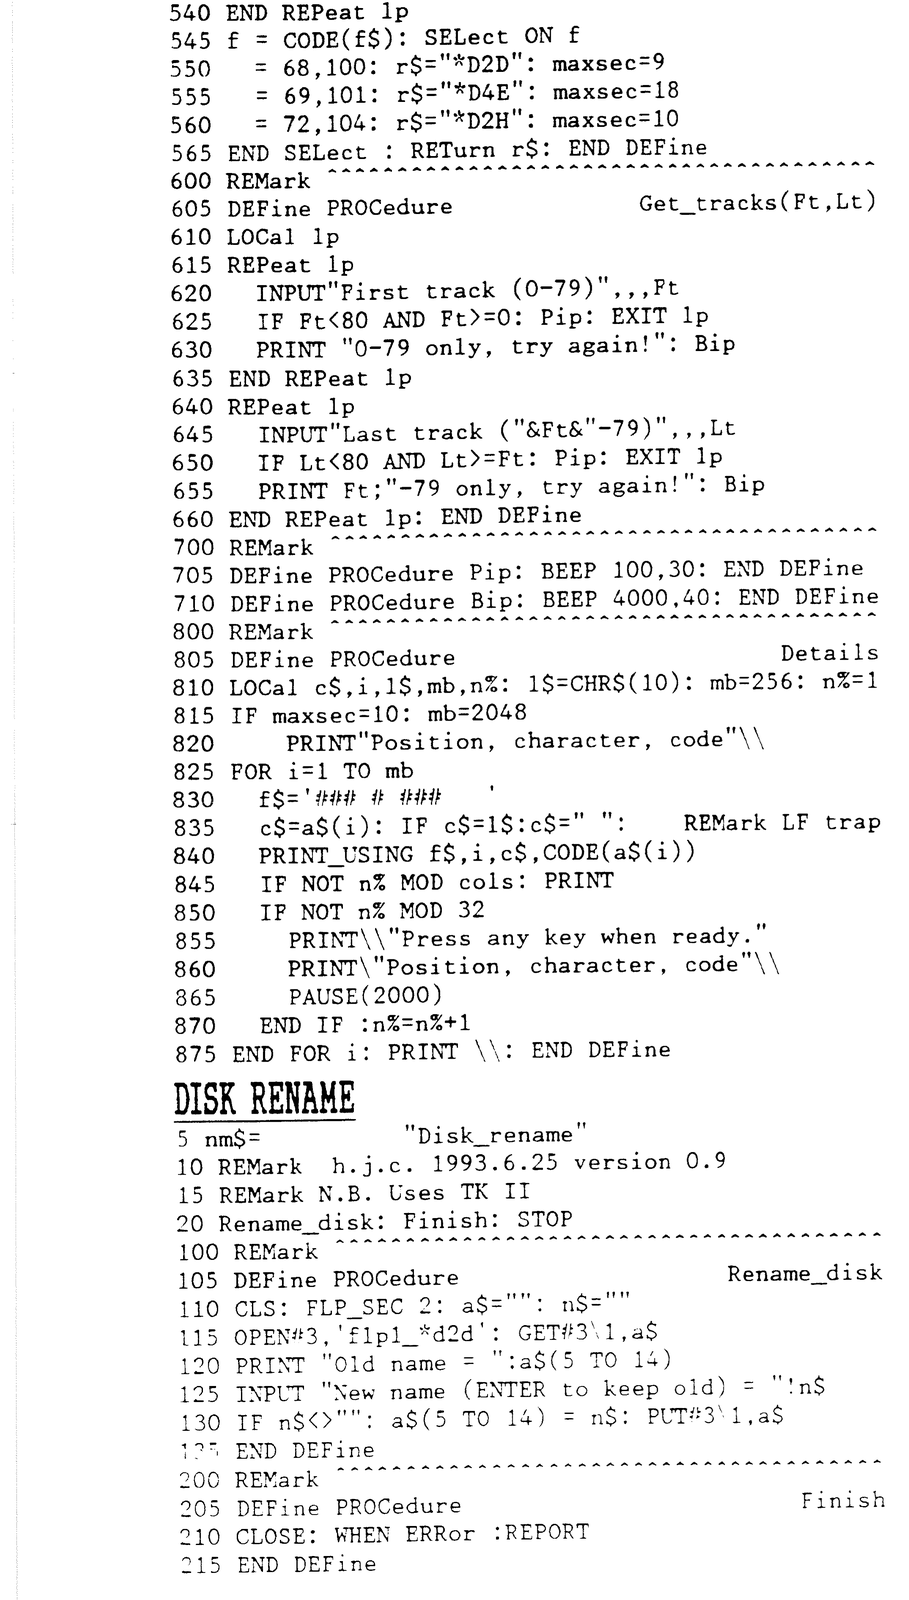
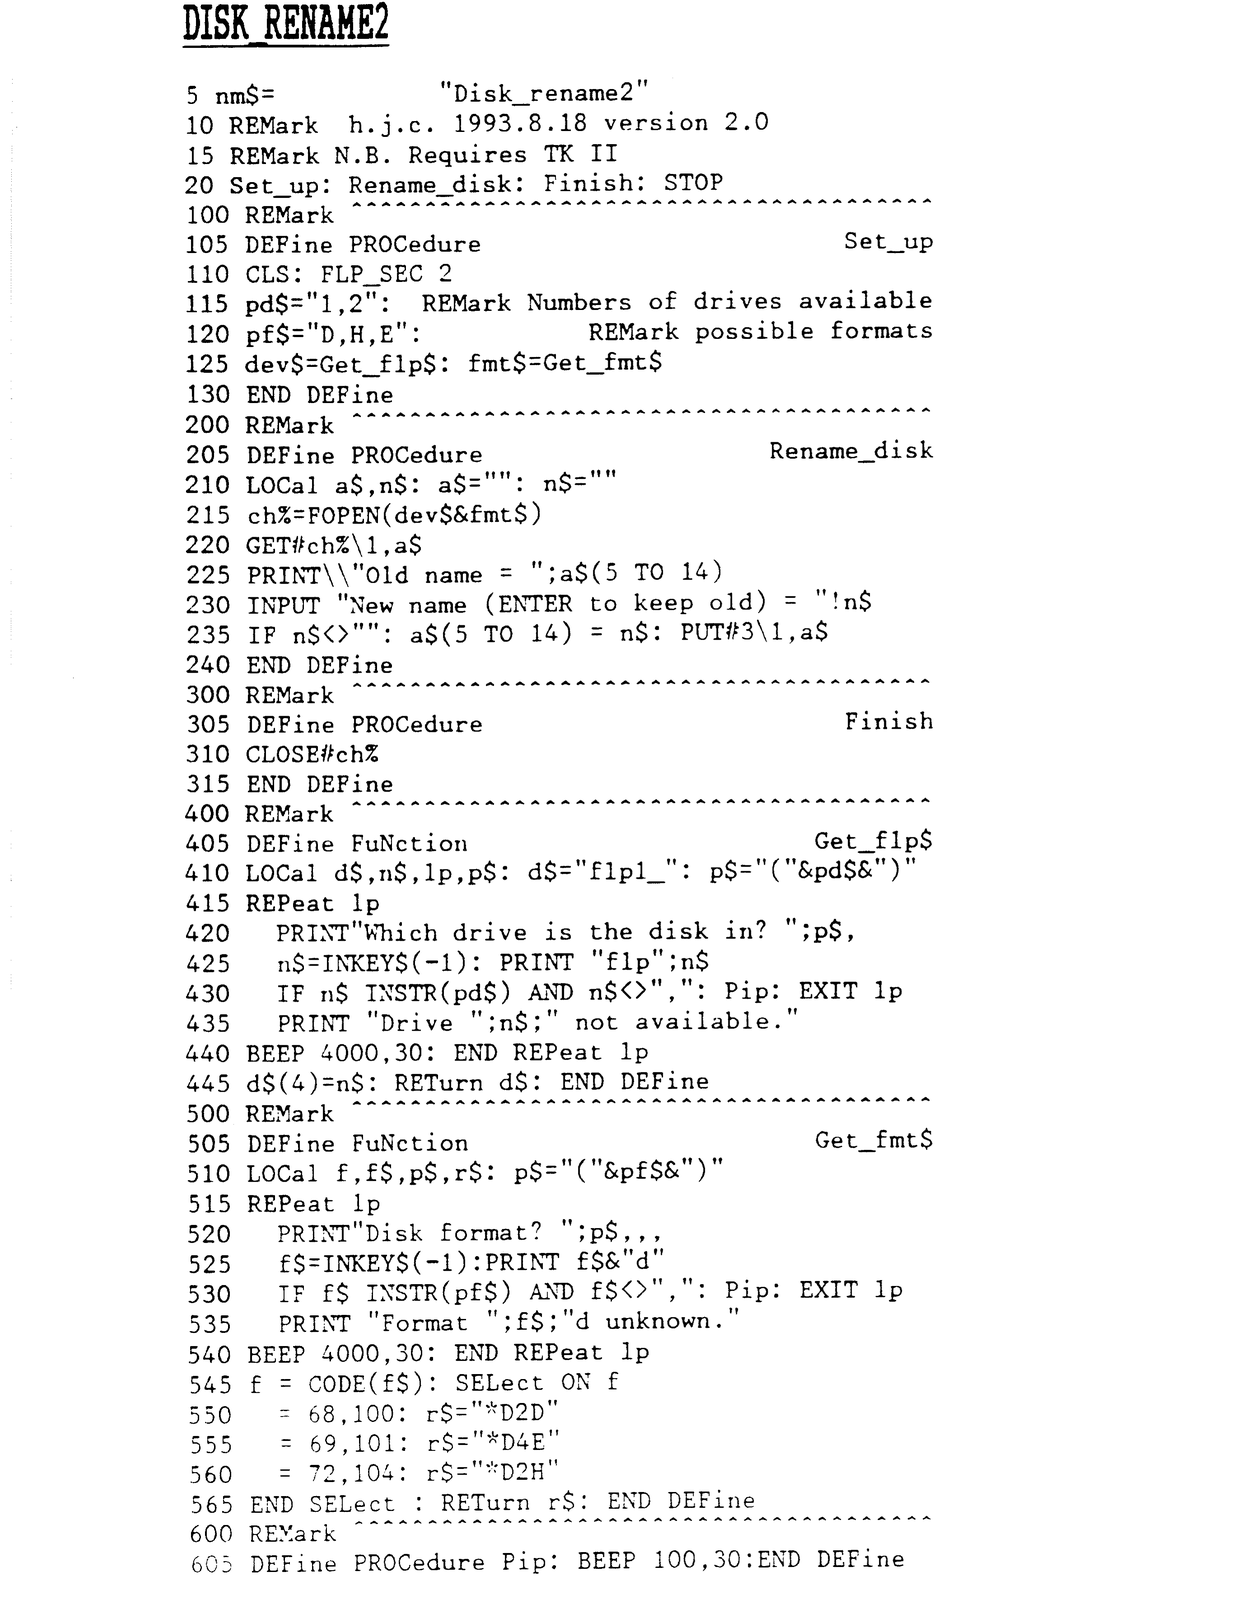
If you alter the above program to print out b$ (or use “disk_sector_reader”) you will find that the name of a QL format disk occurs fairly early along the string – actually in bytes 5 to 15 (counting from zero remember!). As I wrote these notes I was reminded of a routine I had once written to change the name on a disk see “disk_name”. As it stands it will only cope with a DD disk in flp1_, but it was easily extended to deal with the other formats and as many drives as you have. This extended version is also being sent to the QL Library, and should be available from Hugh. If you have understood my explanations of “PC_formatter” you should be able to work out how these work for yourself, the principle is very similar, it just reads the boot bloc, alters it a bit, and then writes the modified version back onto the disk.
Disk sector reader
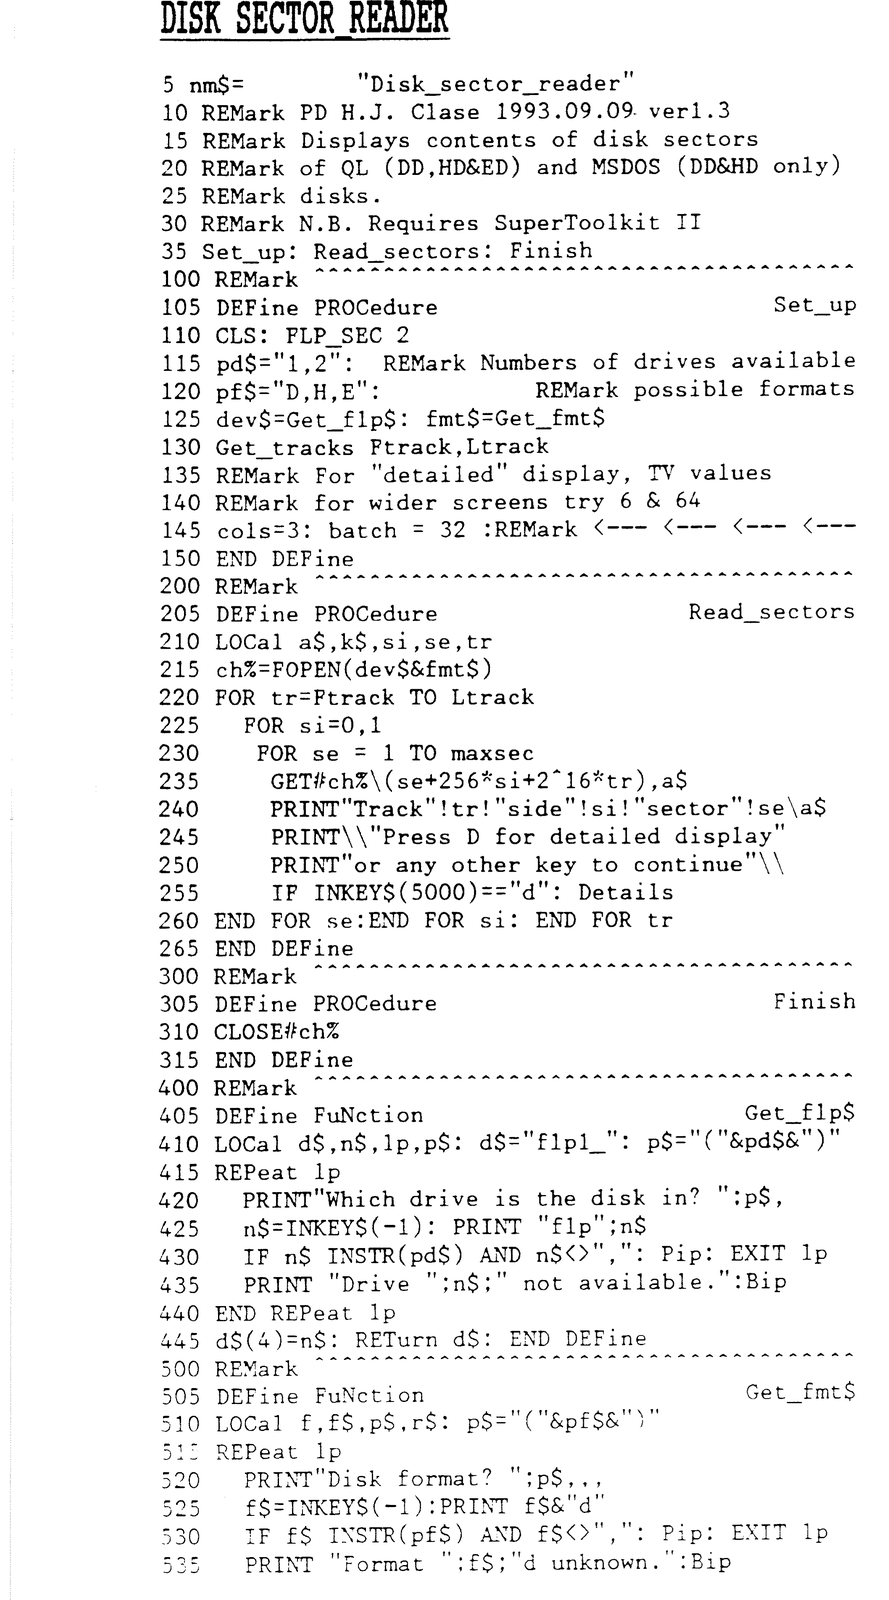
This is probably too long to be printed in the magazine. It will deal with all three QL formats and the two compatible PC ones (DD and HD). It first asks for the drive and disk format (on your own head be it if you give wrong information here!) and then which track(s) you want to examine. It then dumps the contents of each sector in order onto the screen, if you want to examine it in more detail press “D” and it will display the sector byte by byte giving the byte’s position in the sector, its normal character (if printable) and its ASCII code. As supplied it is designed to work on a TV, if you use a monitor and want to see more at once alter the values of “cols” and “batch” to suit your set up in PROCedure Set_up. (Batch should divide nicely into 512.) This program may work even on a partially corrupted disk and could be adapted to act as a file rescue program.
Howard Clase
[phone number omitted]
[address omitted]
e-mail [e-mail address omitted]
Note: Type-in program listings on this website use ZMAKEBAS notation for graphics characters.