Authors
Publication
Pub Details
Date
Pages
Happy Birthday to us… Happy Birthday to us! This column marks the first anniversary of the Survival Column here in Computer Shopper. Twelve months ago we were just getting over the shock of Timex’s shattering announcement, SYNC and Timex Sinclair User ceasing publication, and many of our favorite support companies giving up on the Sinclair computers. Only Stan Veit, Computer Shopper editor, recognized the fact that thousands of Sinclair computerists now needed a place to turn more than ever, and this column was born. From all of us, Stan, thanks.
When Timex pulled the plug, probably the first thought that came to many of us was, “What about the Microdrives?’’ Especially to those of us who suffered with the 250 baud cassette interface of the ZX-81 and T/S 1000 computers, the thought of low cost, fast, dedicated mass storage devices was an over-powering consideration in the purchase of the new T/S 2068. We had read about the Sinclair ZX Microdrives for the Spectrum, and many of us had actually seen a prototype Timex microdrive running at the BCS Timex Celebration in October, 1983. True, the T/S 2068 had an improved, faster cassette interface but it still was slow and inconvenient as compared to the disk drives the other computers utilized. In fact, the T/S 2068 even has a number of BASIC commands included specifically for the operation of the proposed microdrives.
While the Timex microdrives are not to be, there is now available a microdrive system for the Sinclair computers. Notice that I did not specify the T/S 2068, since the A & J Microdrive Company (1050 East Duane Avenue; Suite I; Sunnyvale, CA 94086; (408) 732-9292) has a unit for each of the Timex/Sinclair computers. Actually, they are not new to this market since the microdrive for the T/S 1000/1500 has been available since well before the introduction of the T/S 2068 (or 1500 for that matter), however, with the introduction of the model 2000 the A & J Microdrive Company has gained widespread recognition in the Sinclair community. This review is based on the model 2000 (for the T/S 2068) but I will mention some of the features of the T/S 1000/1500 model as well.
The basic starter kit consists of the interface, one microdrive, an owners manual, five micro wafers one of each available size – and one wafer organizer – a folder which holds up to 16 wafers. Set up is extremely simple, all you do is attach the interface to the T/S 2068’s expansion bus. It has a 64 pin connector and through connector. You will probably want to have this closest to the computer if you use any other add-ons as most others (T/S 2040 printer, modem, etc.) have a shorter connector. You will notice a short connector at the top of the interface marked PRINTER PORT. This is a parallel interface which, when the proper cable and software are added, will allow you to run a full size printer. The two remaining ports on the rear of the A & J interface are marked DRIVE 0 and DRIVE 1. The starter kit has the drive properly connected to the DRIVE 0 port, and when you purchase a second drive it goes into the DRIVE 1 port. The drive itself is at the end of an 18 inch cable, long enough to place the drive in a position convenient to your set up. The drive measures seven inches X three inches X five inches, is matte black, has a slot on the front in which the micro wafer is inserted and two red lights which indicate that the drive is working and/or writing data to the wafer. No external power supply is necessary since the drive(s) take the power directly from the T/S 2068 expansion bus. (Note: This is not the same drive as is used for the T/S 1000/1500.) The wafers measure 2 5/8” x 1 3/4” x 1/8” and come in five sizes:
Tape Length    Capacity
10 feet        14K
20 feet        28 K
35 feet        49K
50 feet        70K
65 feet        85K
The access time is dependent upon where on the tape you happen to be when you start LOADing a file.
The current version (2.0) has the entire operating system in the TIMEX EX-ROM thus leaving available all memory which would be available without the microdrive(s) attached. The earlier version had part of the operating system at the top of RAM and reset RAMTOP down to accommodate it. There were also situations where problems existed due to the fact that older model T/S 2068s have a slightly longer initialization period. Version 2.0 eliminates these problems, and allows use of the full RAM for program use.
Once you have attached the system, you only have to turn your computer on to activate the Stringy Operating System (SOS). The system patches into the audio cassette routine (without disabling it) so that all of the commands (SAVE, LOAD, VERIFY) are the same as with a cassette with only minor differences. When using any of the SAVE commands, the first character of your file name must be @. This is a flag which indicates that the file will be written to the microdrive rather than to cassette. The second character must designate a file number which corresponds to the position on the wafer. The SOS SAVEs the files in numerical order, one after the other. Even though this must be a single digit designation, the user’s manual describes how to SAVE well over one hundred files on a wafer, provided there is room on the tape. Finally, a comma followed by an actual filename of up to seven characters directs the SAVE to the microdrive. The proper form to SAVE a program nam¬ ed “test” to the first file position on a wafer would b;
SAVE “@l,test”
This can be issued as either a command in immediate mode, or as a line in a program.
You will notice a few differences once you start the SAVEing procedure as well. Unlike the normal cassette SAVE, you will not be prompted to Start tape then press any key since there is no need to start the microdrive. Instead, the microdrive immediately starts whirring, and a red light goes on as it searches for the correct spot to SAVE the file. (You cannot SAVE a #2 file unless there is already a #1 file on the wafer.) When it finds the right spot, the second red light goes on as the file is written to the wafer. You will also notice that the SAVEing pattern you are used to seeing on the border does not occur. When it is done, the drive stops, and, if you are running a program, execution continues just as it would during a normal cassette SAVE.
LOADing a file is even simpler. Neither a file number or a comma is necessary. In fact, you must not use them. To reLOAD a file just place the @ flag immediately followed by the filename. In the case of the earlier test file, the form the LOAD statement would take is;
LOAD “@test”
The VERIFY command works in the same manner as the LOAD command. Unlike the normal cassette command, however, you cannot use a null filename to LOAD the first file found. Since the T/S 2068 will continue to list all file names as the headers are read, if the worst should happen and you forget what you named the file, you can check it against the listing as it appears on your screen. To avoid this you should pencil in the file names on the label included with each wafer.
Most commercial cassettes can be transferred to wafers and the tape stored as a master copy. If you are able to use the BREAK command to stop the program, you will have no problem making the transfer. Machine code routines require that you know the starting address and length. There are methods you can use on programs which you are not able to BREAK into, but since these methods might be used to make pirate copies, I will not print them here. In cases where this is the situation, try contacting the publisher (or distributor) and you may find a solution. If you are unsuccessful in this attempt, send the name of the program and its publisher to me with a SASE and I will try to find an answer to your problem.
The major drawback to this system comes about with programs which don’t utilize the normal SAVEing routines, but rather rely on their own machine code routines to accomplish the SAVE. My personal familiarity with this is a result of using MSCRIPT as my wordprocessing software. It was quite easy to place the MSCRIPT loader, logo and machine code onto a wafer, but the program uses its own SAVE routine which cannot be routed to the microdrive. I am interested to hear if any of you who have encountered the same problem have found a way to solve it. If so, write to me (c/o COMPUTER SHOPPER; P.O. Box F; Titusville, FL 32781) and let me know what your solution is so that I may share it with others having the same problem. Also, if you know of any other programs which have similar problems, let me know and I will print any solutions I am able to obtain.
Be aware, however, that the A & J Microdrive does not utilize the Sinclair microdrive commands found on both the Spectrum and the T/S 2068 (FORMAT, CAT, ERASE, MOVE, OPEN# & CLOSE#). Except for ERASE though, all of these commands have their equivalent procedures in the SOS, and while you cannot ERASE a file, it can be overwritten. This brings me to a word of caution. If you SAVE a file (or a program) which you plan on enlarging and reSAVING you must not SAVE any other files after it as these files will be overwritten by the enlarged file, as it will now require more of the tape.
The T/S 1000/1500 version works in a slightly different manner, but SAVEs your data at the same rate that the model 2000 does. It is invoked via USR calls, and has two versions depending on how much memory is available to LOAD the machine code operating system. The condensed version, for use when extra memory is at a premium, gives the user access to SAVE PROGRAM, LOAD PROGRAM, RETURN TO BASIC & CERTIFY. If you have 1K available, you can use the full version which, when the USR call is invoked will present you with this menu:
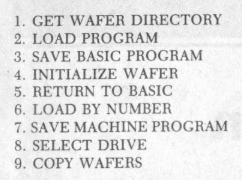
The wafer directory will show you what programs are on the wafer as well as showing how many bytes are still available to store data. Selection 7 allows you to SAVE and self-start machine code programs.
As with the model 2000, you must be able to stop the execution of the program to make use of these drives. The USR calls may be made in either command mode, or added to the program itself. With machine code programs you will need to do the starting address of the program, its length & the entry address.
When you consider the greatly improved speed of this system as compared to the standard cassette system, you see the usefulness of the system. (32K would take almost 12 minutes to LOAD from tape, and about 45 seconds to LOAD from the microdrive.)
Why purchase the A & J Microdrive system when there are now floppy disk interfaces available for the Timex computers, and interfaces are starting to appear which allow you to use the Sinclair Interface 1 and ZX Microdrives on your T/S 2068? First of all the price. When you add the cost of the floppy disk interface, power supply, drive and case it comes to between $400.00 and $500.00. The A & J basic kit which includes everything you need sells for about $150.00 for the T/S 1000/1500 model, and $200.00 for the T/S 2000 model. The Sinclair microdrives will not work on the Timex operating system, but require some form of Spectrum ROM to operate. This causes you to be unable to use much of your T/S 2068 software with the microdrives. Also, availability of the cartridges in this country is suspect at the moment so you must order from England. The A & J drives are available for a number of computers (including the Commodore 64) and the wafers are easily obtainable from a number of sources here. The A & J units do not operate in Spectrum mode at the present, but the most recent flyer from the E. Arthur Brown Company says that this may be remedied shortly, producing a system which will operate on just about any program you can run on your T/S 2068.
Speaking of Spectrum mode I have recently received the ROMSWITCH from G. Russell Electronics (RD 1; Box 539; Centre Hall, PA 16828; (814)364-1325). This is a very clever device which gets permanently installed within the case of your T/S 2068 and allows you to switch between either Timex or Spectrum operating systems. Many dealers who sell the ROMSWITCH offer to install it for a slight fee, but you should consider doing it yourself as it is very simple and can be accomplished in a matter of minutes. To install the device, you must remove the screws which hold the case together and carefully lift the top off. The instructions clearly illustrate where the Timex ROM is located, and you remove it from its socket and insert it into the empty socket in the ROMSWITCH. The entire device then gets placed in the socket from which you have just removed the Timex ROM. You replace the top of the case and stick the selfadhesive magnetic switch on the keyboard to the right of the 0 Key. And that’s all there is to it. You are now able to simply move the switch from the Spectrum to the TS 2068 position to choose the proper mode. The ROMSWITCH itself consists of a small board with two IC holders. One contains an issue three Spectrum ROM, the other will contain the Timex ROM which you remove from your computer. A magnetic switch at the top of the board selects the appropriate operating system. The external keyboard switch is just a plastic channel in which a magnet travels. As I said, it is quite simple to install, even if you have never opened your case before (I hadn’t) and are unfamiliar with electronics (I am). From the time I started to remove the screws until I was running a program in Spectrum mode was under five minutes! The only tool required is a screwdriver. The current version has been improved for even more Spectrum compatibility. Owners of the older model should contact G. Russell Electronics for their upgrade kit if necessary. Remember to mention COMPUTER SHOPPER and this column whenever you contact any Sinclair dealer.
G. Russell Electronics also produces the Winky Boards which fit inline between your cassette player and your Sinclair computer and improve your LOADING of programs. The Winky Board 2000 will work on all models of Sinclair computers. Using it, I have been able to LOAD a number of programs which would not LOAD previously no matter what I did. They also produce a model which works on the Commodore 64.
To reply to those of you who asked about the inverse screen modification which I mentioned that I made to my ZX-81 a few months ago, I have discovered a source of the necessary module which, when soldered inside your computer, will invert both the program area as well as the border. For information contact the E. Arthur Brown Co. (3404 Pawnee Drive, Alexandria, VA 56308, (612) 763-6393).
In the upcoming months you can look forward to looks at the Sinclair bookshelf, Forth, Pascal, the QL (I hope) and more for the Sinclair computers. (Don’t expect to find much at local computer shows. I was at the Ken Gordon Computer Show in NYC this morning and the only booth – of more than 150 – which recognized that we still exist was, of course, COMPUTER SHOPPER.) As always, I will continue to try to respond to your questions if you enclose a SASE. Our second year promises to be even better than the first so stick around.