Your own custom graphics for less than $10? With just three IC chips, and a few extra parts, you can add a modification that allows you to change all 64 of the standard ZX/TS characters. To better understand the modification, we need to take a look at how the ZX/TS displays characters.
To generate a display with a minimum of parts, the ZX/TS uses a complex interaction of hardware and software. For our purposes however, we just need to know how a character is generated. Character pattern data is stored in the system ROM in locations 7680 to 8191. These 512 bytes are divided into 64, eight-byte sections, i.e., one character per 8 bytes. This pattern data is like an 8×8 matrix with the rows being the memory locations, and the columns, the bit locations. For example, the bit pattern for the graphic character on key one is shown below:
Location    Byte    Decimal
7688      11110000    240
7689      11110000    240
7690      11110000    240
7691      11110000    240
7692      00000000     0
7693      00000000     0
7694      00000000     0
7695      00000000     0
If you PEEK these locations, you will get the decimal number. To convert from binary to decimal, add the proper weighting if a one is found. For example, decimal 240=1*2^7 + 1*2^6 + 1*2^5 + 1*2^4.
This pattern of 1’s representing dots holds except for the shaded characters (codes 8, 9, and 10). Shading is indicated by a decimal 170 in the pattern location. Inverse characters (codes 128 to 191) are derived from the first 64 characters.
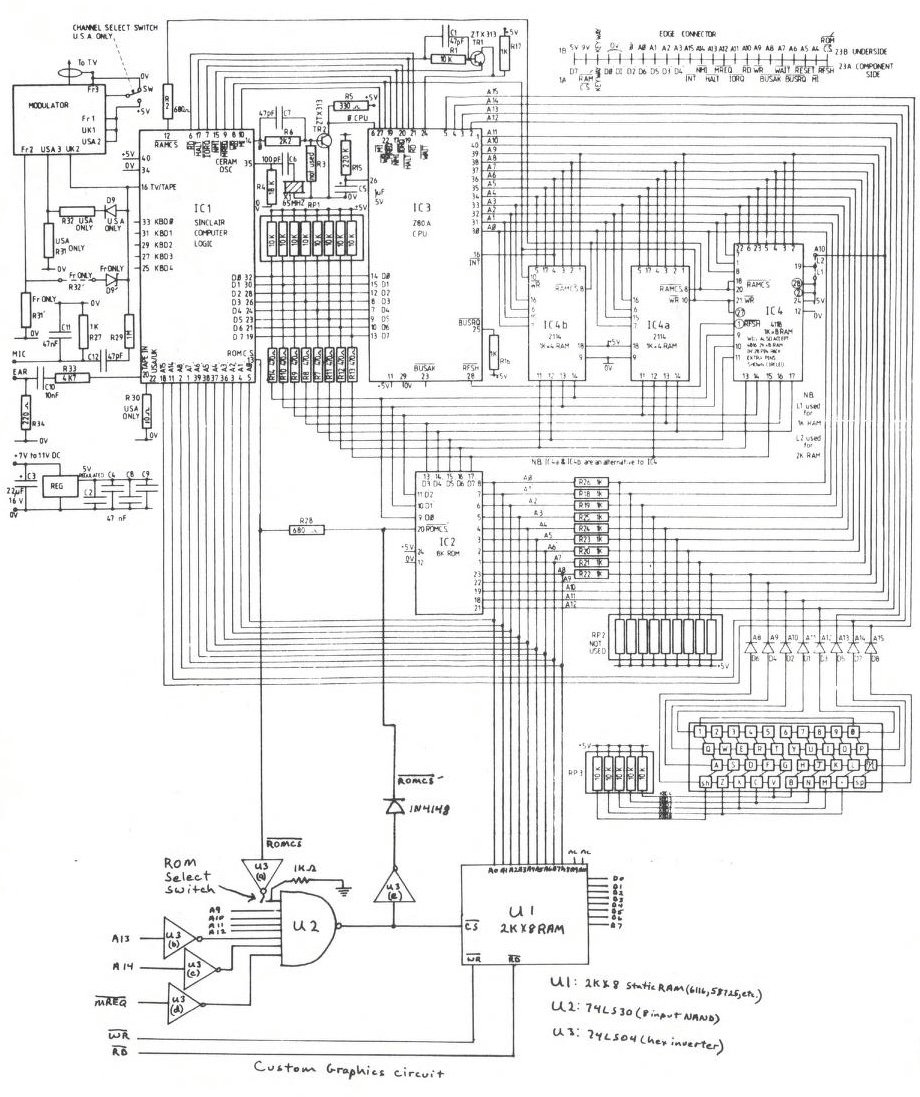
While in the display mode, the Sinclair logic chip (ULA) addresses the system ROM directly to obtain the pattern data. This is the reason for the nine 1k ohm series resistors (R18 – R26) on the ROM address lines. Because of the resistors, we must use these lines (AO’ – A8′), and not the address lines found the rear edge connector. When the ULA wants pattern data, it pulls ROMCS 1ow. This line is connected through 680 ohm resistor (R28) to ROMCS’, which is connected to pin 20 of the ROM. ROMCS’ is also available on the rear edge connector.
When our custom graphics circuit is switched in, and addresses 7680 to 8191 are used, the output of the 74LS30 goes low and enables the 2K X 8 custom graphics RAM. This also pulls ROMCS’ high, through the inverter and diode, to disable the system ROM. With the RAM switched in, we can change the contents to create our own pattern data.
I built the custom graphics circuit on a small Vector board. A 24-pin wire wrap IC socket was used with the pins sticking through the board. This way, the vector board can be plugged into the ROM socket, and the ROM plugged into the wire wrap socket. If you have space limitations from other modifications, ribbon cable brought out of the rear edge connector slot will work as well. Don’t get ROMCS from the ULA confused with ROMCS’ found on the other side of R28. Care should be used when handling the IC chips, and when soldering on the computer circuit board.
When the circuit is built and checked for proper connections, turn on the ZX/TS. With the custom graphics off, the computer should work normally. When the graphics RAM is switched in, the screen should fill with black verticle bars. This is because the RAM needs to be initialized. With the custom graphics off, type in:
  10 LET Y=18000
  20 FOR X=7680 TO 8191
  30 POKE Y, PEEK X
  40 LET Y=Y+1
  50 NEXT X
  FAST
  RUN
Note that this is for 16K users. Now edit line 30 to read:
30 POKE x, PEEK ySwitch in the graphics and then RUN. When finished, you should be able to switch the custom graphics in and out and see no difference on the screen. The custom graphics is now ready for use. As an example, replace the graphic character on the 1 key with a right triangle. The pattern location for any character will from 7680 + (CODE”n”) * 8 be to 7680 + (CODE”n”) *8+7, where n is any character you wish to replace.
7690 00000111 7
7691 00001111 15
7692 00011111 31
7693 00111111 63
7694 01111111 127
7695 11111111 255
Just POKE in the decimal numbers at the specified locations. In this way, any character can be made. Two or more characters can be used next to each other to create many more new patterns. Note that when you turn the computer off, you will lose your new characters. You can save your new characters by storing them in a REM statement, or in variables.
Next month I will list a program that will allow you to build your characters on an 8 X 8 grid and then automatically convert them down to a single character.
Products
Media
Image Gallery
Source Code
Note: Type-in program listings on this website use ZMAKEBAS notation for graphics characters.