Timex is still in the home computer market—in Europe! When Timex bowed out here in early 1984, their computer manufacturing facilities in Portugal continued their work, primarily, so everyone believed, manufacturing for Sinclair in England. Apparently, this was only partly true. Their research and development department was still at work, perfecting the products only hinted at before Timex bowed out.
This issue of SUM is partly devoted to reviews of these new products. It is our understanding that Timex in Portugal is currently selling the computer in Portugal, and has the disk drive system for sale in both England (for the : Spectrum) and in Portugal. We do not presently have any undisputed indication that they will come to the American market. There is also no connection with the coming QL computer from Sinclair.
Through the courtesy of Timex in Portu- gal and the invaluable help and persistence of Bob Dyl of English Micro Connection in Newport, Rhode Island, SUM has been able to acquire the following computer equipment for evaluation: a Timex single disk drive system, a new version of the Timex 2068 computer, and a Timex Emulator Cartridge. None of these products are presently for sale in the U.S. They are expected in the future. More details will given further on in this article.
THE HARDWARE
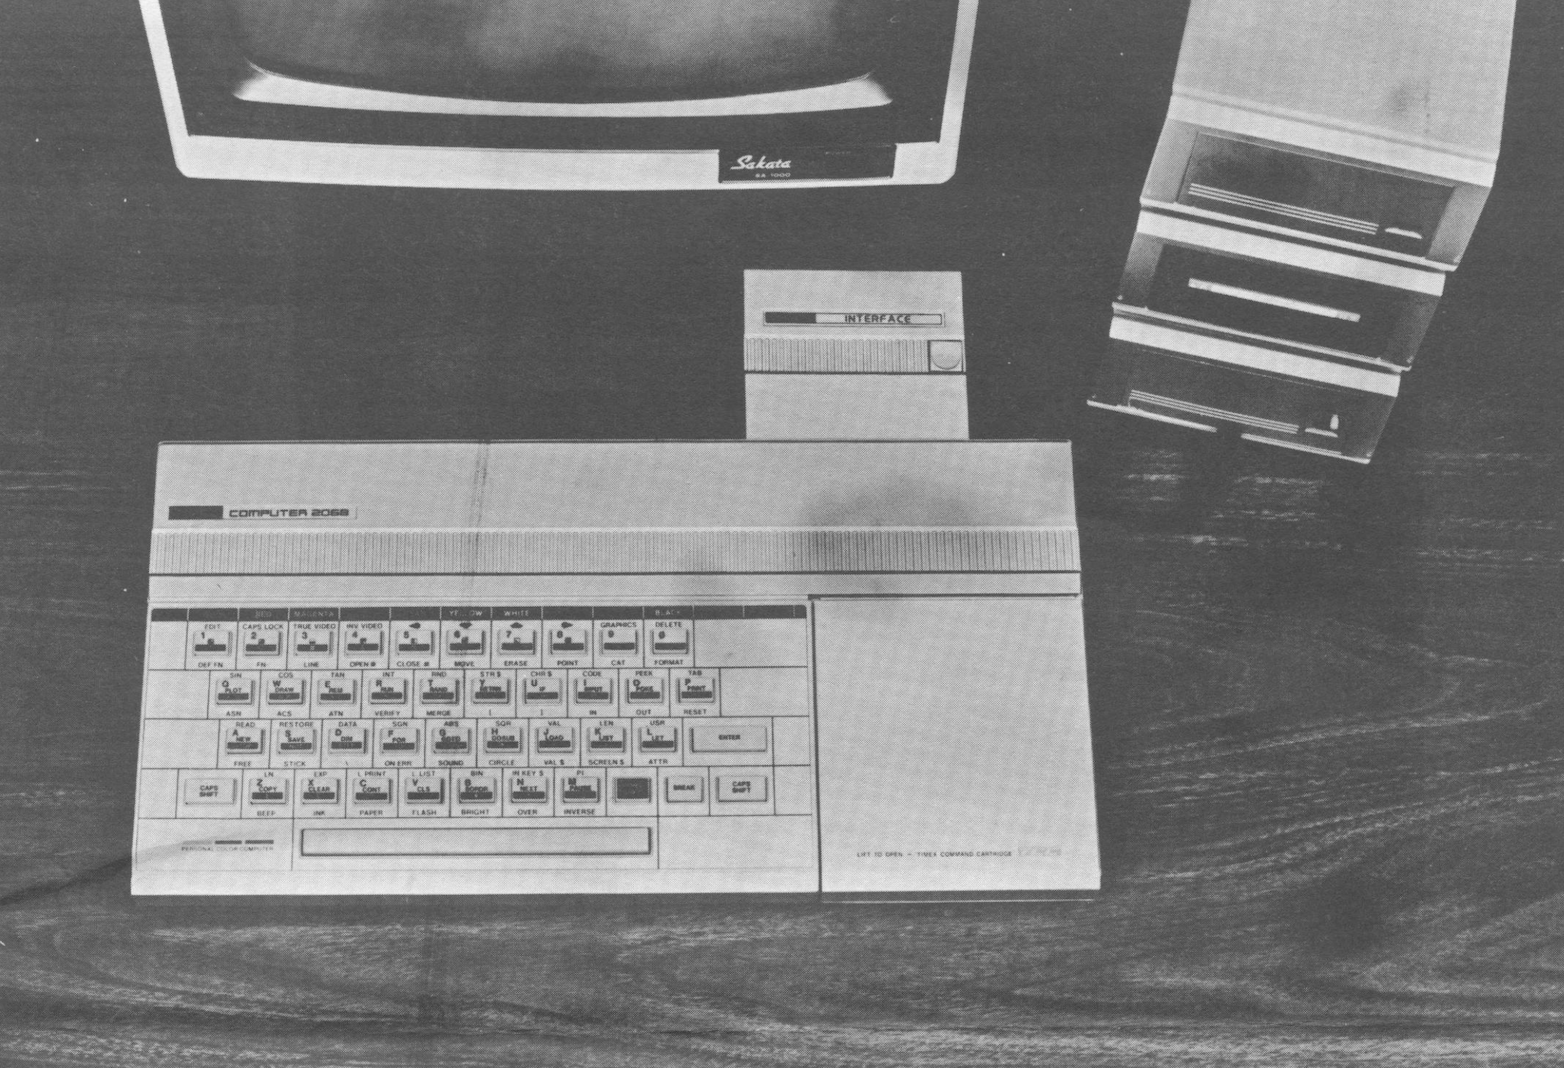
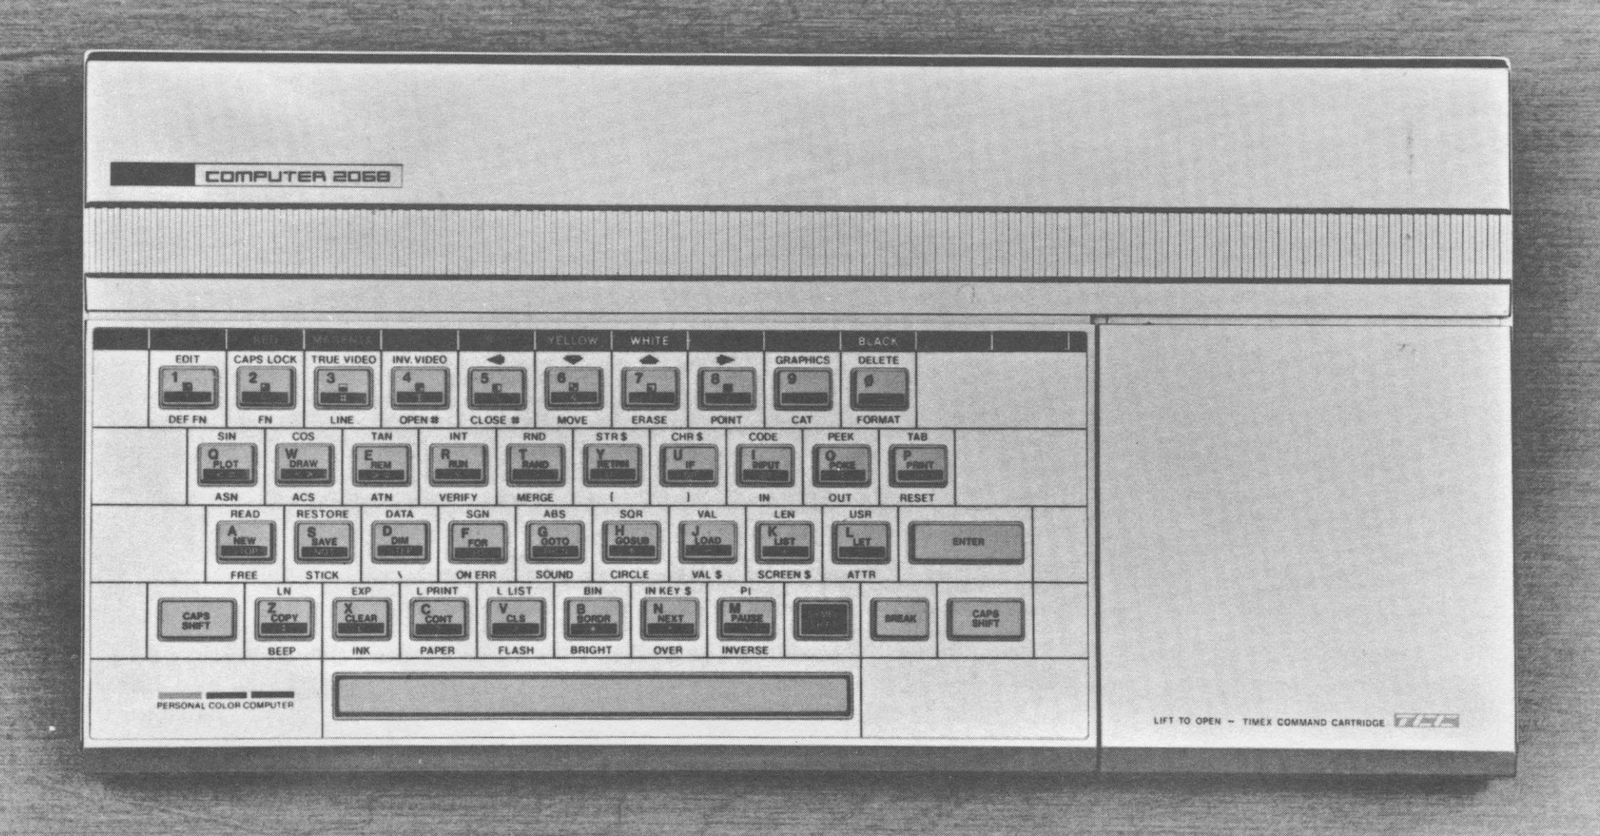
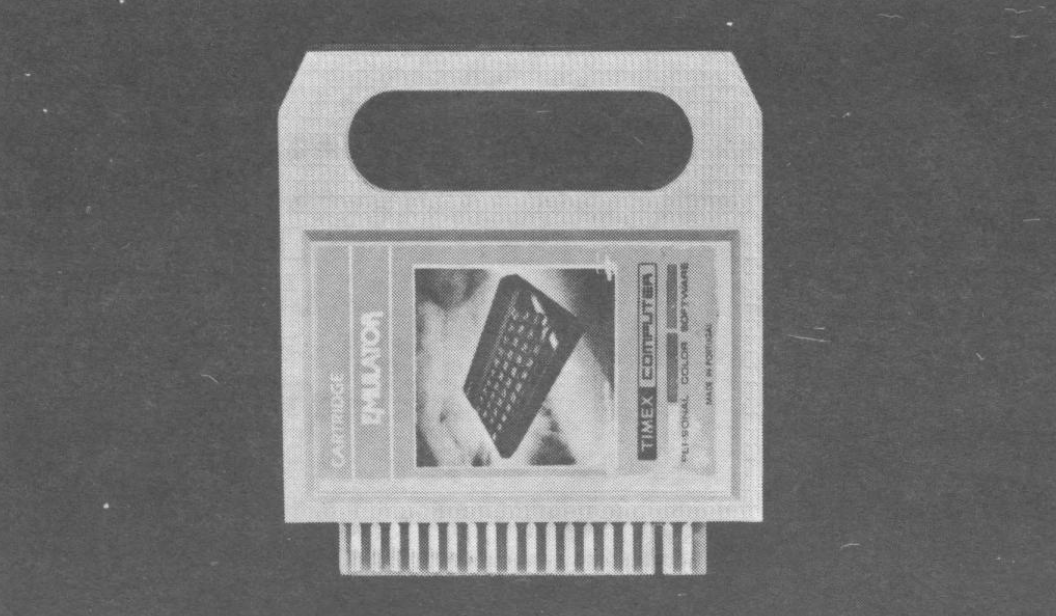
The Timex 2068 computer appears to be a Timex/Sinclair 2068 with only the name in the upper left corner changed. I say, “appears” because, in fact, it is a different computer in several ways. First is the fact that the rear edge connector is not TS-2068 compatible; it is a Sinclair Spectrum pin-out. Shipped with the computer is one of Timex’s small plug-in cartridges (goes under the Timex Command Cartridge door on the right hand side of the computer) which makes the Timex 2068 highly compatible with the Spectrum when it is plugged in. When removed, the T-2068 runs TS-2068 software.
Visions of running the Emulator cartridge on my TS-2068 ran through my head as well, but investigation shows that the emulator cartridge has been made tall enough that it won’t fit into the slot of the American machine; it’s just as well as it turns out, since the Emulator does not work with American machines.
The case and keyboard are identical other than the taller slot for the Emulator cartridge. Opening the Portuguese computer also reveals major differences. The circuit board is much smaller, and is dominated by a few large scale integrated circuits which must incorporate many of the discreet resistors and capacitors and other parts on the American machine. The RF modulator is of a different design, and the output on our monitors and television was much “cleaner” and steady. The one machine we tested did seem to have a slightly weaker output signal on the monitor than the TS-2068. The Portuguese computer uses a 9 volt power supply instead of the 15 volt sold in America.
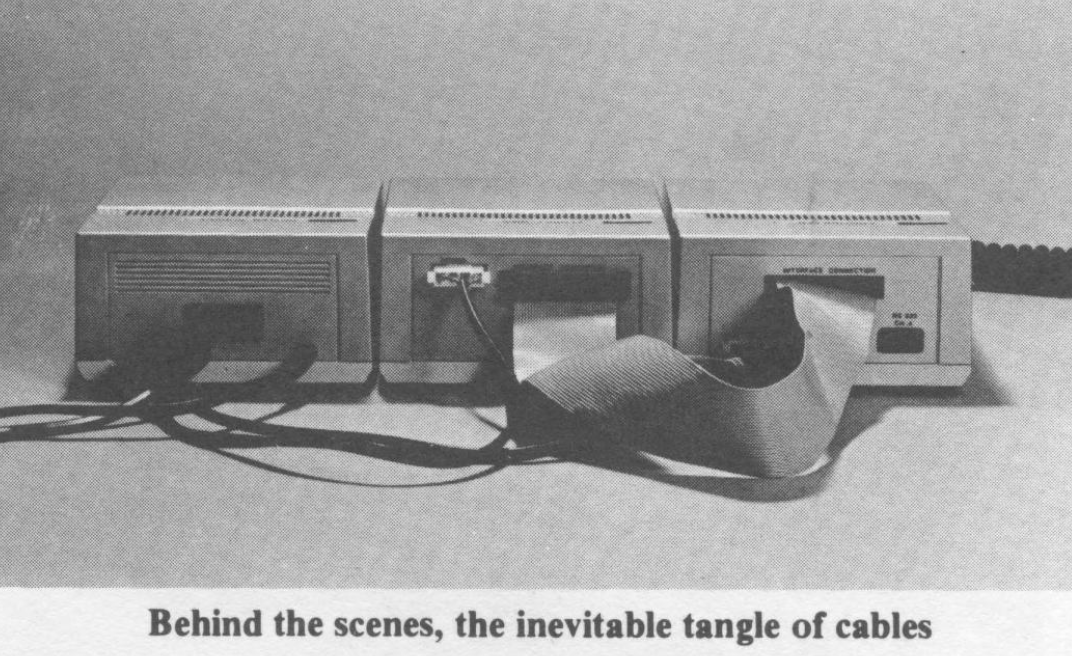
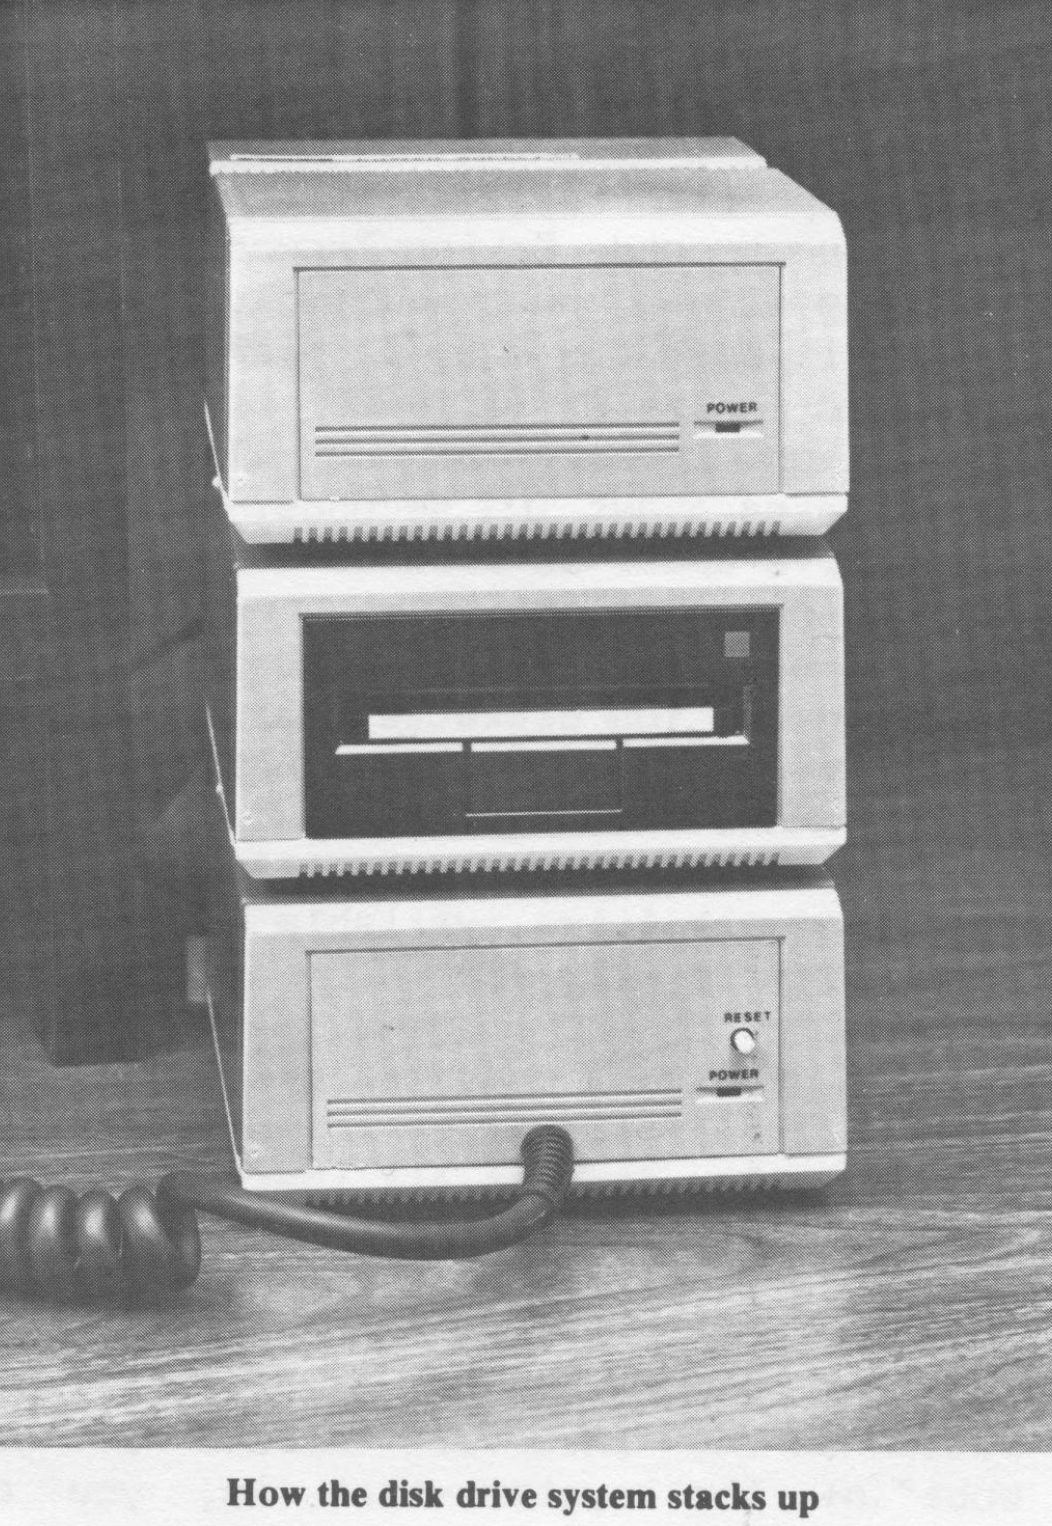
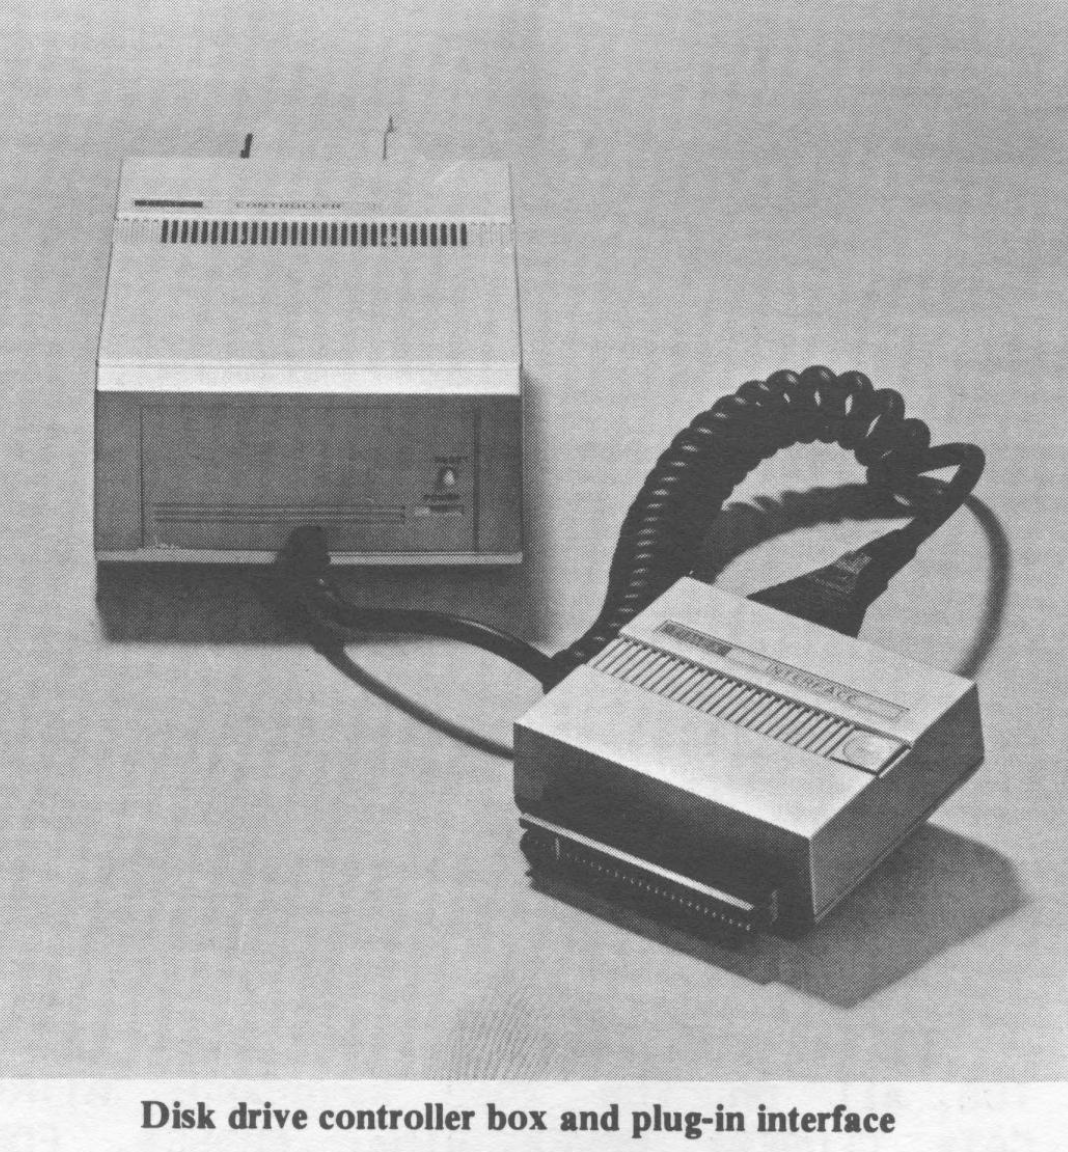
The disk drive system consists of three identical sized boxes approximately 5″ wide by 6 1/4″ deep by 2 3/4″ tall. They contain the power supply, disk controller, and disk drive. In addition, the approp- riate interface is provided which plugs into the rear of the computer. Three versions of the interface are said to exist, two of which we tested. Versions for the Spectrum and the Portuguese T-2068 we ran through their paces. We have not seen the interface that adapts the drive system to the American TS-2068. Various cables also protrude from the three boxes connecting the power supply to the controller and drive. Another cable from the rear of the controller box connects to the disk drive. A second coiled cable comes from the front of the controller and plugs into the interface.
Having the drive system spread out over three boxes and an interface is a mixed blessing. The snarl of cables keeps things untidy looking in the back, accentuated if you are also using one or both of the RS- 232 interfaces on the back of the controller box. They are also a bother to pick up and move. On the other hand, being small and separate gives you some variety in how you place them, though the cables which run between the boxes won’t allow them to be separated by too much. They can be stacked on top of each other or set up on a shelf to leave more room on your desk top.
One real problem is the lack of any access to the rear edge connector when the interface is plugged in. This means, in my case, that I cannot run my printer with the disk drive since my printer has a centronics parallel interface. Unless you purchase a Y-connector, a serial-to-paraIlel converter, or a serial printer, you will have the same problem. (An exception to this is Joe Williamson’s Foote Print printer interface which plugs into the cartridge slot of the TS-2068.)
UP AND RUNNING
The disk system connects up easily, but first time users may be a little unsure of themselves since the manual has no diagram or picture to accompany the written instructions. When powering up, the computer is turned on first. Then the power switch on the back of the disk power supply is flipped on. A prominent red light shows on the disk drive unit indicating its readiness. A 3″ microfloppy comes with the system. It contains the disk operating system designated T.O.S. (Timex Operating System) and is self booting (loading) when slipped into the drive slot.
When the disk is inserted, the red light flickers off and on why the quiet drive loads the TOS. When booting is completed, the light goes off, indicating both that the operation is complete and that it is now safe to remove the diskette if another one is to be used. The diskette itself is enclosed in a rigid plastic case and has a metal shutter covering all openings in to the magnetic surface. This shutter slides out of the way when the disk is inserted in the drive and closes as it is removed.
The disk drive is a Hitachi unit which is a wonder of miniaturization. This same drive was offered for a while in the U.S. but never caught on, losing out to the Sony drives used on the Apple Macintosh, Hewlett-Packard, and other computers. But it does seem to be quite popular in Europe as I see it advertised either available for or actually being used with a number of different computers there. TOS can handle up to 4 drives, though cabling is only supplied for two, and an extra power supply would be necessary. The drive is a single-sided (SS) model meaning it has one read/write head and operates on one side of the diskette. However, the diskettes can be turned over and the second side used.
Maximum storage capacity of the diskettes is 160k per side, or 320k each. When the operating system is saved on a disk, it leaves 140k of useable space on a side.
Access time, saving, and loading are fast. I was able to save everything thing in the memory of the 2068, from address 0 to Ramtop–64k–in 32 seconds. That comes to 2k per second. Saving Tasword II on to disk was simple, practically identical to saving it onto the A & J Microdrives as detailed in the April issue of SUM. For comparison, loading Tasword Il off cas- sette takes about 105 seconds, off A & J Microdrive about 25 seconds (once it finds the beginning of the file, and off the Timex disk drive about 7 seconds!
After the TOS diskette boots up, there is no immediate indication that TOS is in place. However, the CAT* command will bring the drive briefly to life and a directory of all files available on the current diskette will be displayed on the screen. Saving and loading files is accomplished as with a cassette except the command must be followed by an asterisk (symbol-shift B). In fact all instructions to the disk drive must contain the asterisk or they will either look for cassette or send the system off to “never never land”. When the computer does “go away”, a reset button on the interface allows a “warm boot” of the system–that is, you can break in a reset the system without using the power switch.
SECRETS OF THE OPERATING SYSTEM
The following commands are supported by TOS, all on the 2068 keyboard: ATTR, CAT, CLOSE#, MOVE, DIM, ERASE, FORMAT, GO SUB, GO TO, INPUT, LIST, LOAD, MERGE, LET, OPEN, PRINT, DRAW, and SAVE. An accompanying article details exactly what each command does.
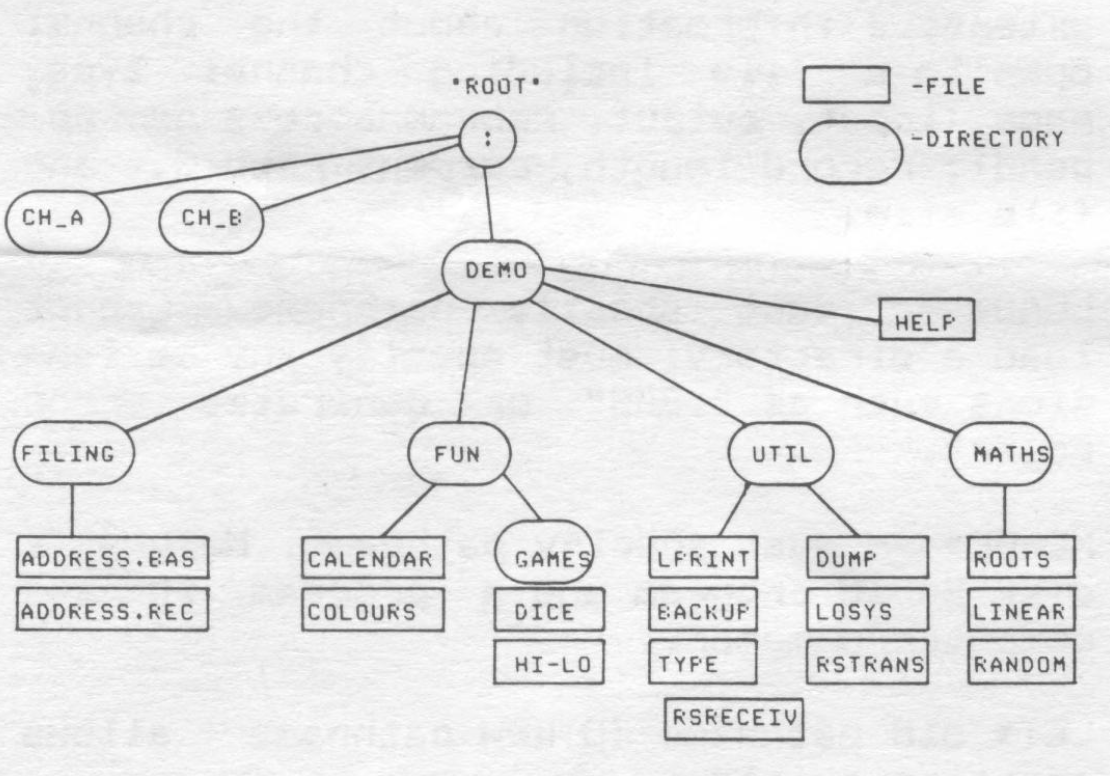
The TOS is quite adequately explained in the manual accompanying the system. It consists of a 70 page 5 1/2″ by 8″ book. There are no photos or drawings in the manual and only one diagram (reproduced below). The original was produced on a dot matrix printer then offset printed. In spite of this, the text is quite readable. The book is divided into seven sections:
- Introduction
- Setting Up
- TOS, Part 1 — basic commands
- TOS, Part II — working with directories and Pathnames
- Random Access and Sequential Files
- Serial Communication Ports
- Appendices
- TOS Command Summary
- Error Reports
- Utility Programs
- RS232C Link Ups
- Error Trapping
- Machine Code Tips
The main two failings of the manual are the lack of illustrations to make things easier, and the lack of an index which would greatly simplify locating just the information you need.
The manual is easy to read, and goes a good job of explaining several rather complex subjects, such as directories and pathnames. Further, it has several simple programs at appropriate places which really should be typed in by the beginner as they illustrate very well the intended point.
In order to understand how to use and get around in TOS, it is necessary to know about DIRECTORIES, PATHNAMES, and TREES. The opening directory (obtained by CAT*) when the operating system is first loaded is called the “Root Directory”. The Root Directory may list both files (whether programs, data files, etc.) and subdirectories leading to other files. These directories in turn may contain other files and/or directories. When the whole filing structure of a diskette is considered it is called a TREE. Describing the path from the Root Directory down to the particular file you wish to access is called the PATH NAME. The accompanying diagram taken from the TOS manual illustrates this concept very well. The diagram is a map of the contents of Side A of the Operating System Disk which comes with the disk system. Such a “hierarchic” structure allows an orderly arranging of files. Note in the diagram that Utilities are all under one directory, Maths under another, and Fun under a third.
When the disk is first booted, a CAT* will yield the following:
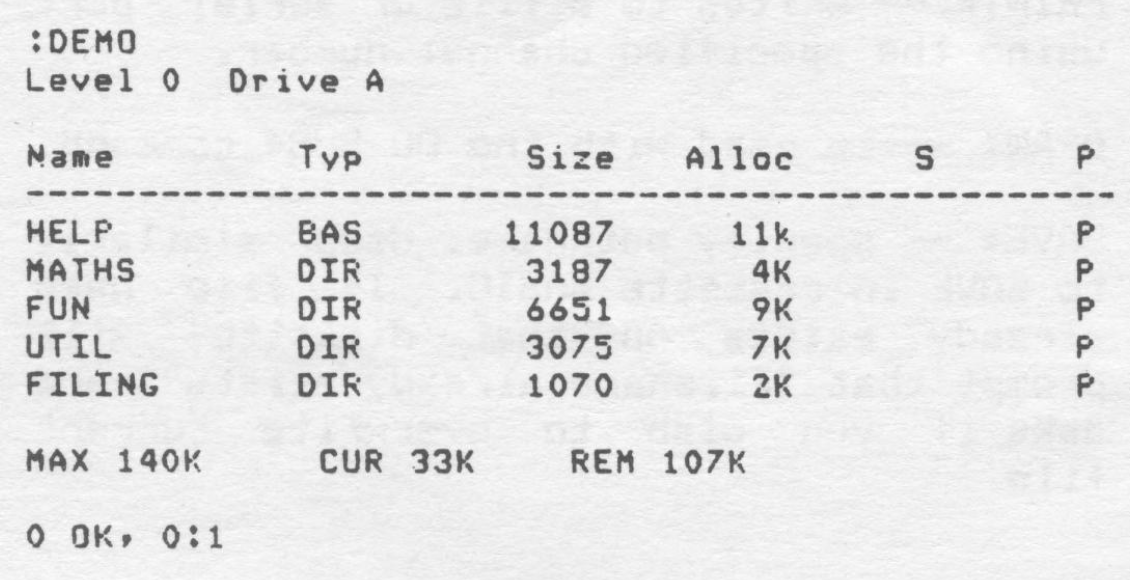
Compare this to the diagram. The Directory being viewed is designated first preceded by a colon, that is “: DEMO”. This is at “Level 0”. One Basic program, “HELP.BAS”, can be accessed, or four directories.
HELP.BAS may be loaded with LOAD* but entrance to the directories is possible using the CAT* (pathname) or GO TO* (pathname). An example (using diagram) would be accessing “DICE” by entering GO TO*”:DEMO:FUN:GAMES”. Calling for CAT* would now show “Level 2” and only two listings in the :GAMES directory. A total of 16 directories can be created and maintained on one side of a diskette. These can be arranged in practically any way including as directories inside other directories. In the diagram, 9 directories exist.
Files within directories are allocated a minimum of 1k of disk space. File names can be up to 8 characters plus a dot and a 3 character extension. All of the following are examples of legal file names:
- A
- CALENDAR.BAS
- CALENDAR.COD
- DICE
All file names are automatically converted to upper case characters. TOS automatically assigns “.DIR” to directory names and “.SCP” to serial communication port files. Looking at the listing above for the directory of :DEMO, there are 2 columns on the right side labelled S and P. If a file is open at the time a directory is called for, an “O” will appear in the S column. Since up to 16 files may be open at once for reading and/or writing from, this column shows which are open and closed at any given time. The P column shows if a file is protected. Protected files cannot be erased (except by FORMAT*) or written to, only read from. Files are protected or unprotected using the ATTR* command. This command also allows files to be created which are invisible to the CAT* command.
Though this overview does not do justice to the TOS, I am convinced that once this system is available to serious software producers, the Timex/Spectrum community will see business software far more powerful than anything possible today. By using the power of TOS to automatically open, close, read, write, append, and create up to 16 different files at once, powerful databases and complex management programs similar to those available to IBM PC users is possible. I use an IBM PC with its PC-DOS and was immediately struck when I read the TOS manual by its similarity to PC-DOS while being easier to use!
An extensive list of 65 error messages is used by the system. Each is clearly explained in an appendix of the manual. They are quite specific and allow a quick diagnosis of mistake was made.
At present, four utility programs exist on the TOS diskette: BACKUP, LOSYS, DUMP, and LPRINT. BACKUP allows the copying of an entire diskette, sector by sector, to another diskette, even if only one drive is available. LOSYS allows updating to new versions of the operating system as they become available without loss of data on current diskettes. Each diskette has a version of TOS written to it when it is formatted. DUMP will dump the chosen file onto the screen, giving the hexadecimal bytes for each address and the ASCII equivalent. LPRINT activates serial port A on the back of the controller box so that the BASIC commands LPRINT and LLIST will drive a serial printer.
I had no way to check the functioning or uses of the two serial ports. The TOS manual provides several pages of information concerning opening and closing channels, transmitting and receiving data, connecting two Spectrums or T-2068s together and communicating, etc. It is very fascinating and the manual makes it sound very easy.
Two final appendices in the manual explain the use of error trapping and using TOS in machine code routines. Error trapping uses two otherwise unused system variables in the Spectrum and Timex: SYSERR and TRAP. The machine code tips detail accessing the TOS ROM without crashing the system. Those users who understand machine code programming will find these 3 pages of great value.
CONCLUSIONS
The Timex Disk Drive System and TOS may be the vehicle that can carry both the Spectrum in England and the 2068 in the U.S.A. on to their rightful place as standards in the small computer field. I cannot imagine any device, peripheral, or software that Timex or Sinclair could have introduced for these machines that could have a greater impact for good than this system. Once a user has worked with this disk system for 30 minutes, I do not believe he/she will truly be happy with anything less!
The system provides for a great deal of expansion. A notice on the bottom of the controller box, and mentions in the literature Timex shipped with the system, show that CP/M is already able to run on this setup with the addition of 48k more of RAM in the controller box. CP/M is the most popular operating system for 8 bit business computers and has thousands of programs written for use with it.
Here at SUM Magazine we have some of everything–Microdrives, Wafadrives, cassette, ROM cartridges–and we use them all at one time or another. It is my opinion that, should Timex ever decide to bring this system to market here, and it works as well as our Portuguese model does, not only will 2068 owners stand in long lines to purchase a system, but previous non- owners will also stand in line to purchase BOTH the computer AND the drive system!
TIMEX OPERATING SYSTEM (TOS) Commands
Here is a brief description of each one of the extended BASIC instructions provided by TOS. Each command is on the TS-2068 keyboard.
- ATTR* — must be followed by pathname and P or U or I or V. Protects or Unprotects a file (P or U) and makes it invisible or visible (I or V) to the CAT* command.
- CAT* — optionally followed by pathname to list on screen information on all files and subdirectories defined in the the current or pathname directory.
- CLOSE#* — must be followed by channel number between 1 and 16. Closes a file that was accessed after updating file changes made while the channel was open.
- MOVE* source pathname TO destination path- name — Copies a source file to a destination file without destroying the source file.
- DIM* — must be followed by a pathname. Creates a file with the name specified, or a new directory if “.DIR” is appended to the pathname.
- ERASE* — must be followed by a pathname. Erases the file specified. Will generate an “Erase pathname (Y/N)?” for confirmation.
- FORMAT* drive name TO disk name — formats diskette not write protected by red tab on diskette. Erases all files on one side of diskette, places a copy of TOS on it, and names one side of diskette.
- GO SUB* — must be followed by pathname. Saves the current directory, accesses the specified directory or file, allows execution of whatever instructions are needed and returns to original file or directory when a DRAW* is encountered. Functions like GO SUB/RETURN.
- GO TO* — must be followed by pathname or drive name. Changes the current directory to that designated by the pathname. Works similar to GO TO in BASIC.
- INPUT* — must be followed by channel #. Reads a record from a file. Record number may be specified allowing random access to file records.
- LIST* — lists information on the current directory and on all directories stored in the stack. Information listed includes the pathname of the current directory, its level, and the drive being accessed. When used with a channel number, lists extensive information about the channel open to a file including channel type, mode (input, output, random access or append), record length, current record, and file size.
- LOAD* — must specify pathname. Cannot load a directory; must specify any extensions such as “. BAS” or generates error report.
- MERGE* — must specify pathname. Merges a disk BASIC program and a program in the computer’s memory.
- LET* old pathname TO new pathname — allows renaming a file.
- OPEN#* channel number; pathname; mode — opens a file and associates a channel number with it. Also specifies mode and optionally gives record length. Modes input (i), output (o), random access are (г), append (a).
- PRINT* — writes to a file or serial port using the specified channel number.
- DRAW* — is used with the GO SUB* command.
- SAVE* — specify pathname. Used similarly to SAVE in cassette BASIC. If file name already exists on that diskette, will prompt that “Filename already exists” and asks if you wish to overwrite current file.
Image Gallery