
Modifications to Add-on Keyboard
NOTE: T-S HORIZONS and the author assume no responsibility for any damages arising from the use or misuse of this article. The reader must understand that any modification suggested here is to be taken at the reader’s own risk.
Last month I told how to convert a TI keyboard to work on your TS 1000. If you were successful in getting it to work, you should now have a nice new addition to your computer. As promised last month I will now describe some uses for those extra keys on the converted keyboard.
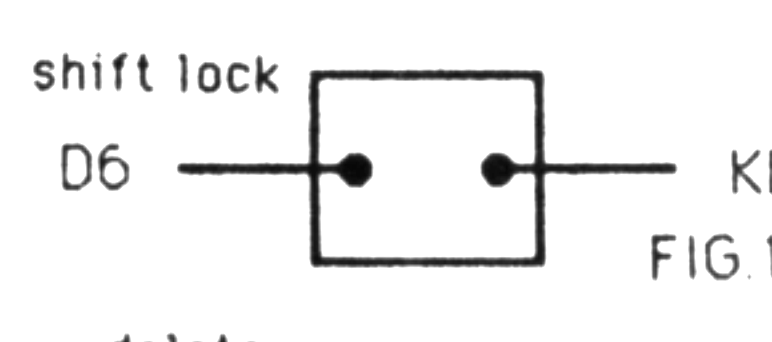
The first addition we will look at is a shift lock key, which makes editing a one finger job. The ALPHA LOCK key is the one we will use. To convert this key, all you need to do is connect both terminals from the ALPHA LOCK key to both terminals of the SHIFT key just above it. See figure 1. Once this is done you are now ready to test this new key. Turn on the computer as normal, when the K appears, enter a short line of BASIC. If the keyboard won’t accept it, make sure the ALPHA LOCK is in the upper position. Now that the one line has been entered, do a shift 1 to place the computer in the edit mode. Now press the ALPHA LOCK, placing it in the lower posi- tion. The cursor can now be moved around, with a simple one finger action. Before re-entering the line of BASIC make sure to place the ALPHA LOCK back in the upper position. The following keys are also one finger action, with the ALPHA LOCK down: Function, Delete and Edit.
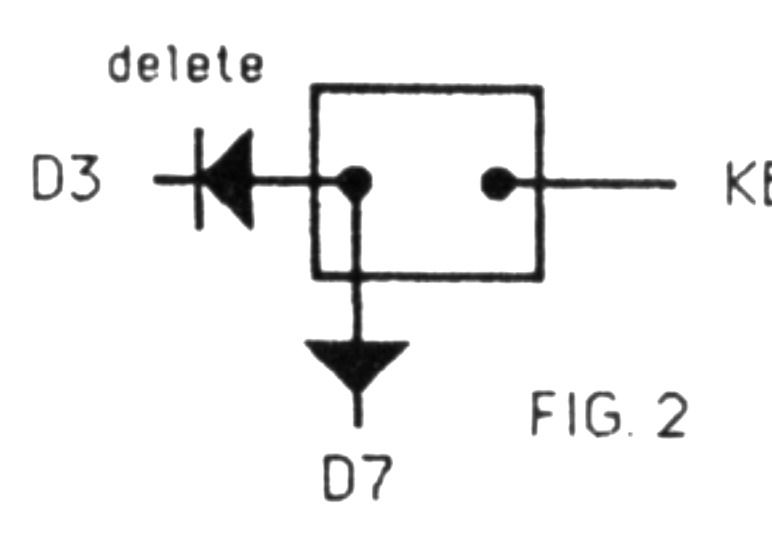
The next key we will add is a one key delete. Any remaining key can be used for this operation-I chose the key to the right of the P. For this new addition, you will need two diodes, of the 1N914/1N4148 type. These can be found at Radio Shack for under a dollar. Follow the wiring diagram in Figure 2, to wire up this next addition. This new key can be very handy when entering a program, for you don’t need to use the shift.
The last addition I will describe is a single key Function key. As you may have guessed I chose to use the key marked FCTN, just below the right shift key. Again you will need two more diodes, of the 1N914/ 1N4148 type. Follow the wiring diagram in Figure 3, for the auto Function key.
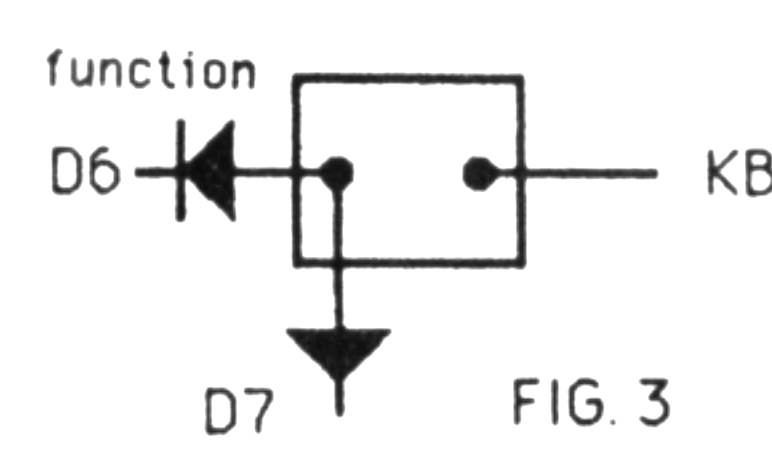
If the new Function key is working properly, when you press it, an F should appear at the left bottom corner of the screen. If you press it again, the K should return, indicating that you are in the Keywork mode again.
If you were unable to get some or all of these new keys to work, recheck your wiring, and if you still have trouble, try different diodes, in the function and delete sections.
If you have any questions or suggestions, you can write me at the address given below.
John Marion
HC 63, Box 650
Greenup, KY 41144