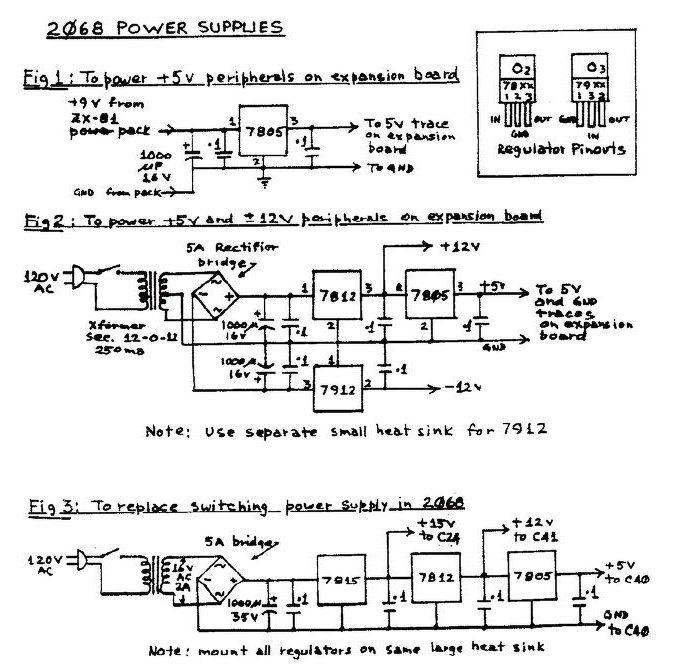
Those of us who have not “graduated” to a more up-to-date computer probably have a tangle of peripherals hanging out the back of the 2068. Each of these add-ons draws power from the internal power supply. There is a real danger of overloading it with rather nasty results. Bill Jones of UPDATE magazine tells me that his voltage regulator had failed a couple of times, taking some RAM chips with it each time. An obvious and easy solution to this problem is to power the expansion board problem separately, leaving the 2068’s supply to look after its own innards exclusively.
If none of your peripherals needs 12 volts, a ZX-81 powerpack feed will serve very nicely as a source to feed a 7805 regulator mounted on the expansion board. Cut the +5v supply trace on the board ciose to the edge connector at the computer end and mount a 7805 in a convenient location along with a jack for the power pack to plug into. Wire it up according to Fig 1 and your’e in business. When using this arrangement, it’s convenient to plug the computer and power pack into the same switched power bar so that they are both switched on and off together. It’s very easy to forget one or the other when you are messing around.
If your expansion equipment needs +12v and – 12v for OP-amps, or whatever, you will have to use a 12v ac or higher transformer to feed 7812 and 7912 regulators as well as the 7805. See Fig 2. In that case, you may as well mount the new power supply on a separate board with the regulators on heat sinks and run a cable to connectors on the expansion board.
I mounted a 7805 with 0.1 uF bypass capacitors on capacitors on my EPROM burner board so that it is completely self-powered and have had a much larger percentage of successful burns since.
About a year ago, I received from George Chambers a reprint from newsletter shortcomings an American newsletter describing the shortcomings of the switching power supply in the 2068. Apparently it generates a lot of noise which interferes with tape saving and loading. The author’s solution was to switch in some Zener diodes to decrease the voltage entering the computer to less than 9 or so volts. This lower voltage removed the noise problem but also the color and sound outputs. I was willing to try it, but had no Zeners lying around so I decided to go whole hog and eliminate the internal supply completely. It takes a lot of guts, but it does improve tape operations considerably and retains the color and sound functions at the same time. It also has enough power to supply all the peripherals without another separate supply.
First, you need an 18v ac or higher 2 ampere transformer, (Radio Shack 273-1515 is suitable), 7815, 7812, and 7805 regulators, a 5-amp rectifier bridge, and some capacitors. See Fig 3. Mount the regulators on a hefty heat sink and run a 4-conductor cable to the modified computer board. To defeat the switching power suppiy, remove Q1, the large transistor on the left hand edge, R1, the large resistor near it, and U8 the 12v regulator that looks like a transistor at the left end of C40. Cut the lower trace from the power switch and the board is ready for the new power source.
Solder the +15v wire to the positive end of C24, the +12v wire to the positive end of C41, and the +5v and ground wires to their respective ends of C40. I brought these wires in through a hole drilled in the bottom half of the computer case right next to the RF modulator can. I housed the power supply itself in a ventilated case with a small muffin fan running at low speed so that it is silent (put a 120v Christmas tree light bulb in series with the fan to slow it down). I’ve been using the power supply now for about a year and it has given no trouble up to given this point.
If the major surgery approach seems a bit drastic, do consider one of the less radical options to take some of the strain off the internal power supply.
Image Gallery