
Introduction to LKDOS
The LarKen disk system for the Timex 2068 is fully Spectrum compatible and also can be used with AROS or LROS cartridge ROMs.
It supports all token keywords – CAT, ERASE, LOAD, SAVE, MERGE, OPEN#, CLOSE# and also GOTO and PRINT that were intended to be used with a external mass storage device. FORMAT and MOVE are supplied as programs that run in RAM.
The way these commands are implemented by the LarKen system is to precede them with a Rand USR 100: e.g.: RAND USR 100: CAT “”,
For easier typing and a shorter command the PRINT #4: command can be used instead of Rand USR 100:. To use PRINT #4: you must first OPEN Channel 4 to the disk drive with RAND USR 100: OPEN #4,”dd”
You can now precede all LKDOS and Ex-BASIC commands with PRINT #4: e.g.: PRINT #4: LOAD “filename.ex”
If the PRINT #4: command is used before it has initialized, error 0 – Invalid Stream will result.
LKDOS File Names
The only other difference between a LKDOS command and a standard cassette command, is the file name.
LKDOS uses a file name that contains a program name up to 6 characters followed by a two character extension. A period separates the program name from the extension. The first letter of the extension tells the DOS what type of file it is . It must be an A, B or C
‘A’ for Array ‘B’ for BASIC ‘C’ for Code
This second letter of the extension can be any character except, if you are saving a sting array, it must be a $
The extension must be two characters long.
The only character that can’t he used in a file name is a “^”. This is used as a wildcard character for use in CAT searches.
Some examples of file names:
"Progrm.B1"      a BASIC program
"zeus.Cx"        a code file
"Name.A$"        a string array
"Numbrs.A1"      a numeric array
SAVE Commands
Before you can save your programs and data to the disk, your disk must be formatted. (See section on setup and formatting) Any formula or expression in a command can be used.
e.g.: PRINT #4: SAVE a$ (TO 6)+”.CT” CODE Start, End-Start All variations of cassette commands are supported.
PRINT #4: SAVE "Prog.Bl"               BASIC program
       : SAVE "Prog.B1 LINE 100        Basic Auto run
       : SAVE "Prog.C1" CODE           Start, length Bytes save
       : SAVE "Prog.C1" SCREEN$        Screen save
       : SAVE "Prog.A1" DATA ( )       Numeric Array
       : SAVE "Prog.A$:" DATA$ ( )     String array
Before saving make sure that the write protect notch on the disk is not covered by a protect sticker and that the disk is in the drive properly with the door closed.
LOAD
Similarly all cassette LOAD commands are supported. A special feature in the LOAD command will allow your BASIC program to continue even when a ‘File Not Found’ error has occurred.
If you POKE 23728,100 before doing a LOAD command, your program will not stop with error T if the DOS can’t find the file. Instead, the DOS will PRINT “NO FILE” on the screen in the current position and return to your BASIC program. It will also put 101 in 23728 to indicate it didn’t find the file.
This feature was added for programs such as word processors etc. that LOAD and SAVE text or work files from within them. The ON-ERROR command does not recognize LKDOS errors.
MERGE
The MERGE command differs from the cassette MERGE in a few ways. Programs aren’t automatically stopped when merged like the cassette does. This allows ‘basic overlays’ which means that a BASIC program can be far larger than what can be loaded into the computer at once. You can have parts of a program merged into your main controlling program when necessary.
Two rules determine from what line # the program will continue at, after a MERGE command.
- If a running BASIC program merges an other program into memory, the first BASIC program will continue and have control over the merged program. The merged program’s AUTORUN line# will be ignored.
- If a program is merged from an immediate command (not running), the merged program will start from its AUTORUN line #. If it is not an AUTORUN program it will not run.
Due to the fact that programs are stored on the disk in blocks, the maximum size of any line in a program to be merged is 1200 bytes. Merging from disk is a complex process and there will be noticeable difference in the speed of a MERGE compared to a load.
The MERGE command doesn’t MERGE program variables only the program lines. This makes your BASIC overlay programs easier to program.
CAT (Catalog)
The Cat command displays the disk name, all the files on the disk along with the size of each file in blocks, disk, number of files and free blocks.
The syntax for the Cat in the 2068 is Cat ” “, can be closed quotes or they can contain part of a string that you would like searched for, in the catalog.
E.g.: PRINT #4: Cat “.Bz”, would PRINT all the files that had “.Bz” in them.
The ↑ is used as a wild card character and can be substituted for any character. e.g.: If a disk had files called prog1.B* , Prog2.BB , Prog2.B* on it. And the command was PRINT #4: CAT “Prog↑.B*”
The CAT command would find – Prog1.B* Prog2.B*
The Spectrum does not allow the search function since the syntax is only – PRINT #4: CAT
To send a copy of the catalog to the printer, you can OPEN channel 2 to the printer then do the CAT command.
E.g. OPEN #2, “p” for small printer
PRINT #4: OPEN #2,”lp” for large printer.
(note- use LKDOS Close command to close #2 . See Ex-Basic commands for use of OPEN command )
ERASE
The ERASE command deletes the file on the disk. The blocks used by the file will be made available to the free blocks. The erase syntax requires a comma after the file name.
GOTO
The GOTO command is used to select which disk drive is to be used for the next disk commands. The LarKen disk interface will support up to 4 drives, Numbered 0 to 3. GOTO 4 will select the RAMdisk.
The selected drive will stay selected until another GOTO command or the system is turned off.
Drive 0 is selected during power up. Pressing ‘J’ on power up will select RAMdisk.
The PRINT #4: print “File” displays the file to screen or printer directly from disk without altering your program memory. It can be used to search a disk for a program or even to examine an NMI SAVE to see the contents of memory. The listing of BASIC programs will not print line numbers, but word processor files and text are fairly accurate. This command was inspired by the CPM type command.
LPRINT
The PRINT #4: LPRINT file command is BASICally the same as the PRINT command except the file is sent to the printer instead of the screen. If the file contains printer control codes (escape codes) then you should PRINT #4:POKE 16098,3 and also POKE 16093 ,32 to disable any filtering by the printer driver and LPRINT command.
NEW
Entering the command PRINT#4: NEW will cause the DOS to do a warm start. This can be used to reload an AUTOSTART program from the current drive. If an auto start is not on the drive then it will do a cold start. A warm start doesn’t change any of the settings in the cartridge or any selected banks.
MOVE (Rename)
The PRINT#4: MOVE “oldname”, “newname” command will rename a file on disk. This is useful for giving NMI saves a more meaningful name or changing the name of any file. It does not check for an extension (.B or .C etc.) so use it wisely. You can rename an NMI save with a .B extension so it can be loaded with out using the CODE token.
Sequential Files
A sequential file is a file that is read from or written to, one character at a time. Just as the way that you PRINT to the screen or the printer by sending one character at a time, you can now send characters or data to a file on disk the same way.
The 2068 uses channels 0 to 15 to send and receive data to the screen or printer or from the keyboard. Channels 2 to 15 can be also used for LKDOS sequential files.
(Note – The 2068 uses the command PRINT # to send data to a channel . E.g.: PRINT #2 ;”the brown fox” Do not confuse this with the ‘PRINT #4:’ that is used to precede LKDOS commands. In the following examples RAND USR 100: is used instead of PRINT #4 to precede LKDOS commands for clarity.)
Writing to Sequential Files
To begin, you must OPEN a file to send data to (as OUTPUT) by entering the command RAND USR 100: OPEN #C,”filename OUT”
(C = channel 2-15 , the file name can be anything up to 9 chrs , OUT or IN is the Sinclair token on the ‘i’ or ‘o’ keys . There should be 1 space between the filename and the OUT or IN token) After the file has been opened you can send data to it using the PRINT# . e.g.: PRINT #7; “HELLO”
The data sent should be separated into records by using a comma or a return character (13) as a separator. This will allow the data to be read back a record at a time. After all data has been sent to the file, you must CLOSE the file . E.g.: RAND USR 100: CLOSE #7
Here is a program to demonstrate OUTputing to a file.
10 RAND USR 100: OPEN #5,"Test.Cf OUT"
20 FOR A= 0 TO 10
30 PRINT #5; "RECORD -"; A
40 NEXT A
50 RAND USR 100: CLOSE #5
(Note that only OPEN and CLOSE commands are preceded by the LKDOS RAND USR 100: , not the PRINT command.)
You can also send a program listing to a seq-file by using LIST # (ch), and if the file is OPEN to channel 3 (printer channel) you can use LPRINT or LLIST.
Reading From A File
To read data back from a file, you must open it as input (IN).
E.g.: RAND USR 100: OPEN #7, “filename IN”
Then you can use the commands INPUT# or INKEYS# to read back the data in the file. e.g.: INPUT #7; a$ ; or LET a$ = INKEYS#7
This program will read back the file and print it
10 RAND USR 100: OPEN #5,"Test.Cf IN"
20 INPUT #5;A$; (or LET a$=INKEYS#5)
30 PRINT A$
40 PAUSE 30 ( delay to show data is read in by records)
50 GOTO 20
(note that INPUT or INKEYS are not preceded by RAND USR 100)
INKEYS# only reads one character at a time, but INPUT# reads an entire record.
If you read a file right to the end, you will get an END of FILE error and the file will be closed automatically. If you don’t read to the end you must close it before any other LKDOS Commands can be used. LKDOS will send CHR$ 255 as its last character. If the file is read further you will get the EOF error.
Uses of Sequential File
Seq-files are normally used for storing data but are also handy for transferring text and data between different programs.
By opening the seq-file to channel #3 (the printer channel) you can print your data to a file instead of printing it to the printer. You could then for example, LOAD the file into a word processor for modification or read the data back a bit at a time by a program. You can also convert BASIC listings into ASCII text by listing them to a file, or print the output from an assembler or disassembler to a file. You can also read array, BASIC or code files using INKEYS.
Using a modem you can send and receive very large files (larger than 100K) directly to and from disk, eliminating the need for a large memory buffer.
Notes On Sequential Files
- When a file is OPEN, the only LKDOS command allowed is CLOSE. Be sure to use RAND USR 100: CLOSE and not just CLOSE.
- Input works very much like a normal keyboard input. It will not accept some characters such as quotes ‘ ” ‘ or unprintable characters. You can use INPUT LINE to read in quotes. INKEYS will read in any character though. Also there will be a click noise for every character read using INPUT.
- You can have more than 1 variable in an INPUT statement but they should only be separated by a semicolon e.g.: INPUT a$; b$;
- Channel 2 is used by the 2068 to print to the main screen. If you open a file to channel 2, you can use ordinary PRINT commands without specifying a channel #. But it is tricky to use because no printing will be send to the screen.
- Do not change the disk in the drive when a file is open.
- If you PRINT #4:POKE 16098,3 then this will turn off the deTokenizing routine in the seq-file OUTput routine. This lets you now send all character 0-255 to the file without the LKDOS treating these as Timex Tokens . This means you can use seq-files to store machine code files. POKE 16098,0 to return to normal.
- The file name for a sequential file does not need an extension (e.g. .D or .C). This allows a lot of freedom but there are limitations. Such as you can not name it with a .B in the file name and LOAD as BASIC. If the file is not too big though you can LOAD it as code.
- Only one file can be opened at once, also data cannot be added to a file once it is closed. (These restrictions do not apply to the RAM based version of Seq-Files, available on disk)
Push Button SAVEs (NMI)
Located on the top left corner of the disk interface is a push button that will save any program running in memory to disk. It is known as a snap shot or NMI SAVE push button. The button triggers a Non-maskable interrupt in the Z-80 and LKDOS software in that area it SAVEs the program along with all registers and stack pointers. (the line on the bottom of the screen is actually these registers).
When the NMI push button is triggered, the computer will play a tune and then PAUSE. The entire program and screen can be saved by pressing keys 1 to 5 which will name the file “NMI-S (1-5).CM” . If you do not need to SAVE the screen and want to conserve disk space as well, you can press Caps Shift while pressing 1 to 5 and this will do a shorter NMI save that is also compatible with Versions 1 and 2 of LKDOS. The display file can he saved as “SCREEN.CM” by pressing ‘S’. Also the “a” key will attempt to stop the program by a RST 8.
You can just press Enter to return you to your program if you decide to not do a SAVE.
To reload the saved program you need to LOAD it as a CODE file.
e.g. : PRINT #4: LOAD “NMI-S4.CM” CODE
AUTOSTART Programs
A BASIC or machine code program can be made to AUTORUN when the computer is turned on if the Enter Key is held down.
To save an auto start program, you should first reduce the size of disk space used by lowering RAMtop with the CLEAR (address) command so that when you type PRINT FREE you get. 150 to 200 free bytes. Then enter RAND USR 102: RUN or RAND USR 102: GOTO (line#). This will cause an NMI type SAVE. After the tune plays, press “d”. This will save your program from the start of the attribute file to RAM top.
This program will auto run when the computer is turned on with the Enter key pressed. The memory above RAMtop will be clear, no UDG’s. These can be loaded if necessary as a code file. If the Auto Start program is going to LOAD in a larger program it should first reset RAMtop to a high value. The lines on the bottom of the screen is actually all the Z80 registers, interrupt information and stack pointers.
Some Spectrum emulators need to be turned on by the command OUT 244,3. To make this type of emulator he able to AUTORUN a program you need to add this small machine code routine.
The best place for this routine is in the printer buffer at location 23300.
Assembly Language  Decimal Equivalent
CALL 102      (decimal) 205, 102, 0
LD A,3                  62, 3
OUT (244), A            211, 244
RET                     201
After this program has been loaded, you can save your AUTORUN program by RAND USR 23300: RUN
AUTOSTART saves in 2068 mode will not run in Spectrum mode and vice versa.
User Defined NMI Routine
Advanced programmers can LOAD their own NMI routine and have it run when they press the ‘F’ key after pressing the NMI button. Your code should be loaded into the cartridge in an unused Location and 8214 should he poked with the start address of the routine. The routine should not do any Sinclair ROM calls or disturb the registers stored at the bottom of the display file. This routine could be a screen copy, disassembler, monitor, etc. Code can he loaded into the cartridge using standard LKDOS LOAD code commands.
Kempston Compatible Joystick
A Kempston compatible joystick port is on the left side of the disk interface. It is compatible with most software written for the Spectrum. It is a good idea to anchor your joystick cable before it attaches to the board. This will prevent damage to the disk interface in case you accidentally pull the joystick cable.
The joystick can be addressed by the command IN 31.
Extended BASIC Commands
These commands consist of extended graphic, additional PRINT and I/O device Channels and up to 3 scrolling windows on the screen.
Graphic Commands
- PRINT #4: DRAW width, height, pattern (This is a versatile box fill or clear command that starts at the last plot command that fills in the selected pattern (0 to 9 (or 10 = user defined pattern that consists of 8 bytes starting at address 23540).
- PRINT #4: CIRCLE x,y, pattern (This is a region filling command that fills from right to left, selected blank areas of the screen in the patterns described above. It will fill a line until it finds a set pixel) x, y sets the starting pos.
- PRINT #4: INK x (immediately changes ink color on screen)
- PRINT #4: PAPER x (immediately changes paper color on screen)
- PRINT #4: POKE a,b This does a double POKE for 16 bit numbers. ‘b’ can be 0 to 65535. This command can be used to POKE into the LKDOS cartridge if the address is below 16384. This can be used to change parameters for printer windows or files.
PEEKing Into The Cartridge
The method for peeking into the LKDOS cartridge EPROM or RAM is to first PRINT #4: POKE 8200, (address to be peeked). Then USR 110 will return the peeked value. e.g.: this program will print the first 10 bytes of the LKDOS EPROM.
10 FOR A = 0 TO 10
20 PRINT #4: POKE  8200, A
30 LET B = USR 110: PRINT A, B
40 NEXT A
(do not peek or POKE addresses 96 to 111 or the cartridge will crash )
Channel And Window Commands
- PRINT #4: OPEN #n , “device” This attaches a channel to a display device. (n can be channel 2 to 15 ) device can be “w0”, “w1”, “w2” (window 0 to 2). (See other uses for the OPEN command for sequential file or Large printer elsewhere in this manual.)
- PRINT #4: CLOSE #n (n can be 2 to 15). This is used for closing channels opened with the above command. Note: never use the Sinclair CLOSE command (unpreceded by LKDOS switch) to close a channel opened by LKDOS)
- PRINT #4: INPUT#(window), top, left pos, right pos, bottom pos.
This command defines a windows size, position and color. “window” is 0-2, other parameters are standard PRINT positions in absolute numbers (0 to 20 or 31) e.g.: PRINT#4: INPUT#1, 0, 10, 20, 8
This would define window #1 to have its upper left corner at print pos 0, 10 and the window would be 10 units wide (20-10). The bottom of the window would be at the 8th line. The screen colors that are being used when the window is defined will stay with that window.
PRINT #4: CLEAR w This will clear the window (0-2) and restore the print pos to the top of the window . It will also recolor the window.
Window Character Sets
When you turn on your 2068 the LKDOS loads the 2068 character set into the cartridge for use with the windows. The character set Loads into the cartridge at address 15200 and is 768 bytes long. You can LOAD in 42, 51, 64 or proportional spaced character sets for use with the windows also. The first byte in each character in the char set determines the width of the character. The number of pixels set in the first byte (top pixel row) starting from the right sets the width of the character. No pixels set would indicate a full 8 pixel wide character.
E.g.: This is the character pattern for a ‘Y’ character that is 5 pixels wide. (you could print 51 of these wide on a screen).
00000111 - This sets a character width of 5 pixels
10001000 - Character data
01010000 - Character data
00100000 - Character data
00100000 - Character data
00100000 - Character data
00100000 - Character data
00000000 - Character data
Using Windows
To use a window you need to OPEN a channel to a window and then define the size and position with the PRINT #4: INPUT command.
After that, to use the window (or “lp”) you can use the standard commands in the 2068/Spectrum (not preceded by the LKDOS switch) such as PRINT #n, or LIST #n. e.g.: if channel #10 has been opened to a window then PRINT #10; “TEST’ would print to it. Or LIST #10: would list your program to it.
The computer uses channel 2 as the channel for standard PRINT commands to the main screen. You can OPEN channel #2 to a window or printer. Then all standard PRINT or LIST will be directed to the selected device.
When any PRINT #4: OPEN # command is used, 50 bytes (total) of memory is added to the channel table. This may cause a problem for a program that has machine code in a REM statement. This is not reclaimed by the PRINT #4: Close command.
Large Printer Driver
The command PRINT #4: OPEN# 3, LP will allow you to use the standard LPRINT and LLIST commands for your large printer. It can be used with AERCO, Tasman or A&J printer interfaces or a user defined printer interface. You can change line length, left margin setting, and specify line feed and it prints graphic characters as underlined ASCII chrs. TAB and comma ‘,’ are supported also.
On power up the default settings are AERCO interface, line length 63, line feed with cartridge return and margin of 0.
To change settings you will need to use PRINT#4: POKE Add, Setting. These addresses are in the LKDOS cartridge RAM and are not affected by NEW.
POKE 16090, Maximum width of print. This is set at 64 on power up. 16092,0 if you don’t want a linefeed with carriage return, 10 if LF wanted with CR. It is set at 10 on power up.
16094, Left Margin Setting. This is set at 0 on power up. Do an LPRINT after changing this.
16096, 0 for AERCO CPI, 1 for Tasman CPI, 2 for A&J CPI, 4 for user defined interface routine. For 4, POKE 8216, address of the routine.
You can open LP to any channel but channel 3 is normally for printer since it uses LPRINT and LLIST. You can use both Large printer and 2040 at the same time by opening the LP to a different channel than 3.
Copying And Moving Files
On the disk (or tape) supplied with the system there are disks programs that are loaded in for copying disks and moving single files FORMAT.Bx is used to format disks (see Formatting) and to copy entire disks using 2 drives.
MOVE.B1 is a program for moving 1 or more files between 2 drives or even just 1 drive. It is very easy to use if you only have one drive, enter drive 0 for both source and destination.
Adding a RAMDISK
A 256K RAMdisk can also be controlled by LKDOS as well as 4 floppy drives. The LarKen 1/4 Meg. nonvolatile memory board attaches to the rear of the 2068. It acts exactly like the other floppy drives but is very fast.
GOTO 4 selects the RAMdisk. Then all floppy commands can be used. Before using, you must format the RAM with the PRINT #4: FORMAT “n”, command. (n = number of RAMchips on the board). Users of the LKDOS for the AERCO FD-68 can use the AERCO RAM.
The LarKen RAMdisk comes with complete documentation. Hardware experimenters can add a small RAMdisk by adding 32K of RAM in the upper 32K of the dock bank.
User Defined Command
Advanced machine code programmers can add an extra command to LKDOS by using the PRINT #4: DATA a, b, c… command. You must LOAD your new command into an unused area in the LKDOS cartridge and the POKE 8214, (address of command).
The LarKen Disk Editor includes documentation on how to use MC with the DOS and how to interpret BASIC lines.
LKDOS Errors
In addition to a number of Sinclair errors used by LKDOS, a number of extra errors are added.
The On-Error command in the 2068 does not recognize these extra errors .
S – Protect Error Disk cannot be written to. It has a write protect sticker on it.
T – File Not Found: The requested file is not in the Catalog. This can be overridden. See LOAD command
U – Disk Full: There is not enough room on the disk to save the file or more that 100 files in Catalog
V – Wrong File Type: The file type in the extension doesn’t match the syntax of the command. If the token CODE or DATA is missing or the wrong array type.
W – Invalid Command: The command following the PRINT #4: is not used by LKDOS.
X – Cat Data Error: The Catalog cannot be read properly so the command is aborted.
Y – File OPEN: A sequential file is open and the only command allowed is CLOSE.
Z – Name Exists: When renaming a file with MOVE this will occur if the new name is already used.
Crc ERROR (num): A Crc error will be printed on the screen when the DOS cannot read a block after 10 tries. The number following the Crc error is the block number.
Notes On Using The LKDOS System
- Never turn the power to the disk drive ON or OFF when there is a disk in the drive with the door closed. This can glitch a disk and cause loss of data.
- It is a good idea to keep write protect stickers on important disks at all times except when you want to save or delete a file.
- You don’t have to open the PRINT #4: command every time you use the LKDOS . If or example you just want to see the Cat of a disk, it is faster just to type PRINT USR 100: CAT “”
- But in BASIC programs, it is a good practice to use the PRINT#4 command. It uses 3 less bytes that PRINT USR 100: and looks neater. Your BASIC program should contain the OPEN #4, “dd” in it at the start. of the program so that, Error 0 – Invalid Stream doesn’t occur if the program is just loaded and RUN.
- Never LOAD or save code over addresses 96 to 111. This will cause the LKDOS cartridge to be turned off during a command and cause a crash. This also applies to PRINT #4: POKE and using PEEK USR 110.
- When you remove and install your disk interface from the 2068 inspect the connector to make sure no pins are bent and also that the locating key is in place. A damaged or missing locating key can cause damage to both the 2068 and the disk IF.
- If you plan on distributing some software that is on LKDOS disks, using disks formatted as single sided will be compatible on more systems than double sided disks. (48 TPI is most common)
The LKDOS cartridge is also available for the RAMEX, OLIGER and AERCO disk systems. Your Disks are compatible with any of these systems.
Addresses Within LKDOS
That can be poked to change parameters (Using PRINT #4: POKE or PEEKed by USR 110)
8195 – Dvsel – this is the current drive selected. 2 = drv0, 4 = drv1, 8 = drv2, 16 = drv3, 1128 = drv4 (RAMdisk)
8200 – PEEK – holds the address of the address to be peeked by USR 110.
8214 – USERad – holds the address of the user NMI function or the address of the User command (DATA)
8216 – PTdrv – holds the address of the user installed printer interface routine .
8218 – Chars – holds the address of 256 Window Character set
Window POKEs
Each window uses 20 bytes to keep its info. Window 0 starts 16000, W1 at 16020, and W2 at 16040. Addresses below are for W0. Add 20 for W1 and 40 for W2. You may have to PEEK the next address and then add 256* its value to the value being POKEd when using PRINT#4: POKE.
16004 – Wscrol – POKE this with 255 to increase scroll counter just like in the 2068.
16005 – Xpos – Xpos of the next print pos. (0-255). Don’t go out of range of window.
16006 – Ypos – Ypos of the next print pos. (0-176). Don’t go out of range of window.
16014 – Wcol – Ink and Paper color byte for window.
Printer And Detokenize POKEs
16090 – MWIDE – maximum printer width. 255 maximum
16092 – LFEED – if 10 then a line feed will be send with each carriage return. If 0 then no line feed will be sent.
16093 – PPAS – if poked to 32 then all characters LPRINTed will be sent directly to the printer with no checking. This is useful for sending control chars or graphic info to the printer. POKE it to 0 to return to detokenizing and filtering. Re POKE ‘MARG’ after poking this one because PRINT #4: POKE does a 2 byte poke.
16094 – MARG – specifies left margin width. Be sure MARG + MWIDE does not equal more than your printer can print (80 chrs)
16096 – PTYPE – Printer Interface type. 0 = AERCO , 1 = Tasman , 2=A&J, 4 = User defined. POKE USERad with address of user code.
16098 – PFLAG – POKE with 3 to defeat detokenizing and filtering in LPRINT “file” command and in printing to a seq-file. POKE with 0 for restore to normal.
Free Memory in the cartridge for USER routines. Code can be loaded by the standard LOAD CODE LKDOS command.
13600 – There are 1400 bytes here that are only used when the MERGE command is used.
16100 – There are 283 bytes here free at all times.
FORMATting
A floppy disk, unlike a cassette must be formatted before data can be saved on it. Formatting initializes all tracks and installs a track map, directory and disk parameters on track 0. Any errors will be reported as CRC errors followed by number indicating the track number. A good format should have no errors reported .
The Format command is not on the LKDOS Cartridge but is on the supplied cassette. LOAD the cassette and put a disk in drive 0 and close the door. The first thing to enter is the Disk Name. Usually the disk name is a short name (less than 1 line) but LKDOS allows the Name to be up to 1000 characters. This can be used for a disk description etc. The DELETE key (shift 0) can be used to correct mistakes but the editing is limited. If you make a big mistake you can just BREAK the program and reRUN it.
To end the entry of the disk name press STOP (symbol shift A). The drive number can be drive 1 to 4. Next is the head speed. It must be 6, 12, 20 or 30 milliseconds. Most modern drives can run at a 6 ms head speed. Some older single sided drives such as the SA400 Shugart run at a slow 20 ms. (Some newer LarKen disk interfaces may have a 1772-02 Floppy disk controller chip. The Format program supplied with it will have a head speed selection of 2, 3, 6 and 12 ms.)
The number of sides should be 1 or 2. (Single sided or double)
The next parameter to enter is the number of tracks. This number should be 35, 40, or 80. Most drives are 40 track. 35 track drives are obsolete now and rarely used. An 80 track drive is also known as a Quad density drive.
Type “y” if the drive is ready to format the disk. The drive should turn on and the drive should step from track to track until the format is completed. The format program can now be saved onto the disk for future use.
BREAK the program and type RAND USR 100: CAT ” “. You should see a directory of the disk with all the disk info displayed. The term BLOCK refers to one track. The total Blocks on a disk is the (number of sides ) X ( the number of tracks)
The DOS numbers the blocks starting from track 0 side 0. Block 1 is track 0 side 1. Block 2 is track 1 side 0. Block 3 is track 1 side 1 and so on .
The Format routine creates a track map in the directory (block 0) that corresponds to the number of tracks and number of sides that were entered.
When you format a single sided disk, the format routine creates a track map on the disk that has all side 1 tracks set as in use.
Because the DOS reads tracks from side to side, you cannot read a double sided disk with a single sided drive. Also because of track density, disks formatted on an 80 track drive can’t be read from 35 or 40 track drives.
You can however read single sided disks with a double sided drive. So if you have a double sided drive and you would like to transfer files to someone with a single sided drive, you can format your disk as single sided.
LKDOS Operation
The LarKen disk system consists of a Cartridge that contains the software for controlling the drive. This is called the Disk Operating System (DOS). On the cartridge is a 8K EPROM mapped in the 0-8K area of the DOS bank and an 8K RAM that is mapped in the 8-16K area of the DOS bank.
The DOS bank is activated when the cartridge senses a USR call (M1 cycle) At address 96 to 110 (decimal). For LKDOS commands only the address 100 is used (also 102 is used for SAVEing an AUTOSTART file). The other addresses are used by the DOS as entry points for the PRINT #4 command, PEEK and windows.
The DOS bank is deactivated when a read of write is made to this area of memory.
The command – RAND USR 100: OPEN #4,”dd” is used to initialize the PRINT #4: Command to point to the LKDOS cartridge. The PRINT #4: is easier to type than RAND USR 100: and there is no chance of accidentally typing a wrong USR address. The “dd” means “disk drive”.
The LKDOS operating system manages all disk space allocations by using a track map. The map is created by the format program and resides in track 0 along with the catalog. By using the map the DOS keeps track of used and unused areas of the disk.
The catalog can contain up to a 100 filenames. The blocks used by each file are kept in the Catalog also.
Full information on LKDOS operation and accessing the DOS from machine code is supplied with the LarKen Disk Editor.
The rear mounted board is the Disk Drive Interface. This board controls the drive motors and the data transfer to and from the disk drive(s). It can control up to 4 drives. (3″ 3.5″ or 5.25″ drives) The disk format used by LKDOS is double density with 10 sectors of 512 bytes per track (5120 bytes per track).
On a 40 track Double sided drive this will give a capacity of over 400K per disk. On a single sided 40 track you will have 200K and on an 80 track double sided you will have 800K per disk.
On each track 5090 bytes are actually used to hold the saved data and the remaining 30 bytes are used by an information header .
Also on the board is a push button that will trigger the NMI line on the Z-80. This is used to capture any program to disk.
A Kempston joy stick port is also on the disk interface for use with most of the software that is produced for the Spectrum.
Setup Procedure
Your new LarKen disk system contains some chips that can be destroyed by static electricity. This is why the boards are wrapped in aluminum foil during shipping. Observe antistatic precautions when handling these boards. Always make sure that all power is turned OFF when installing or removing either of the boards.
In addition to the LarKen boards, you will need a disk drive(s) , a disk drive cable and a disk drive power supply. The disk interface can control any floppy drive except an 8″ drive .
The power supply needs to supply 5 volts and 12 volts DC. The current rating depends on the number of drives, but a general rule is 1 amp. (on 5V and 12V) per drive.
When using more that 1 drive, set the drive select jumpers on each drive, as drive 0 to 3 respectively. Also make sure that all terminator resistor packs are removed from the drive EXCEPT the drive that is connected closest to the end of the drive cable.
Connect the cartridge and interface to the 2068. Turn on the 2068 type PRINT USR 100: You should get the error message – W Invalid Command .
Connect the drive cable to the interface and drives and power up the drives and 2068. The drives should not turn on. If they do, you may have the drive cable reversed.
To test to see if drives are connected properly, insert a disk into drive 0. Type PRINT USR 100: Cat “”, Drive 0 should turn on (LED and motor) and then after the approx 15 seconds it should have turned off. To test the other drives, use the command PRINT USR 100: GOTO drive number (0-3) then use the PRINT USR 100: Cat “”, to activate the drive.
If you did not purchase the disk drive cable you can make your own using 2 feet of 34 conductor ribbon cable and 2 or more 34 position ribbon cable edge card connectors. The best way to install the connectors on to the cable is to use a vise to squeeze the connector. The connector on the interface end should be mounted opposite to the drive connector(s). If you use more than 1 drive, space the drive connectors 3″ apart.
Installing the cable on backwards will not cause any damage, but the drives will turn on.
ADDING a LROS Cartridge chip to the LKDOS Cartridge
Don’t attempt this unless you have a proper soldering iron and experience in delicate soldering Parts needed – 28 pin IC socket , 74HCT37 IC
Use a low power soldering pencil that is properly grounded. Temporarily remove the EPROM from the LKDOS cartridge. Bend pins 20 and 22 on the socket outwards. Note – all Ics have their pin 1 (dot or notch) towards the center of the cartridge.
Install the 28-pin socket on top of the 8K; RAM IC (the 28 pin IC that is soldered to the board). Carefully solder all pins except 20 and 22. (you only need a tiny bit of solder). Carefully remove all leads from the 74HCT32 except pins 1, 2, 3, 7, 14. Bend pins 1 and 3 up (fold the lower half back up). Stack this chip on top of the middle 14 pin IC- (pin 1 faces in) and solder the pins 2, 7 and 14 to the same pins on the IC beneath.
Run a small wire from pin 3 on the HCT32 to pins 20 and 22 on the 28 pin socket. Run a small wire ROM pin 1 on the HCT32 to the ROS enable connection near the buss. That’s it !
Check for any shorts or solder bridges. Reinstall the LKDOS EPROM and test it in the 2068 to see if it still works OK.
Remove the EPROM for your OS-64 or Spectrum emulator and insert it into the socket. If it doesn’t work, recheck your work.
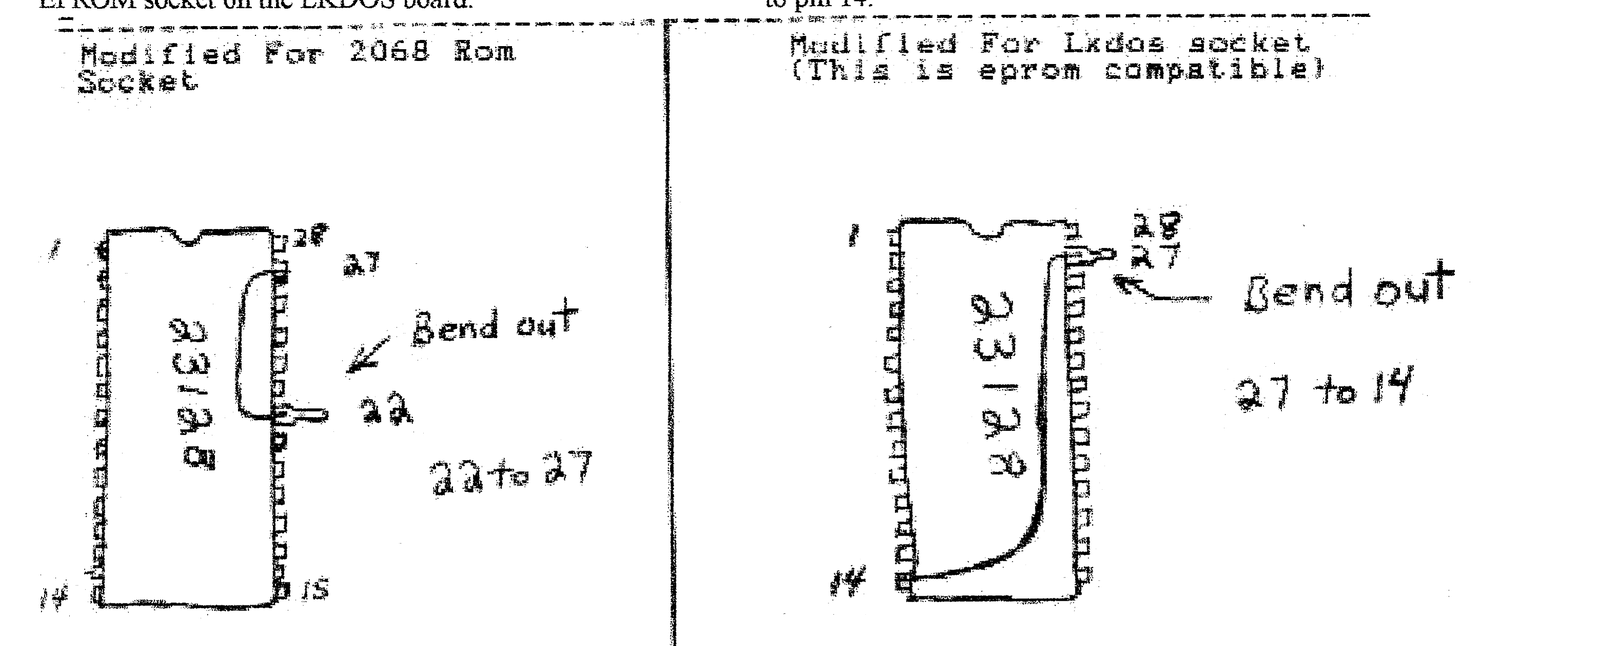
If you have a Spectrum ROM chip (not EPROM), part# : 23128 it may not work unless you bend pin 27 out (so it doesn’t go into the socket) and ground this pin (connect a small wire from pin 14 to pin 27)
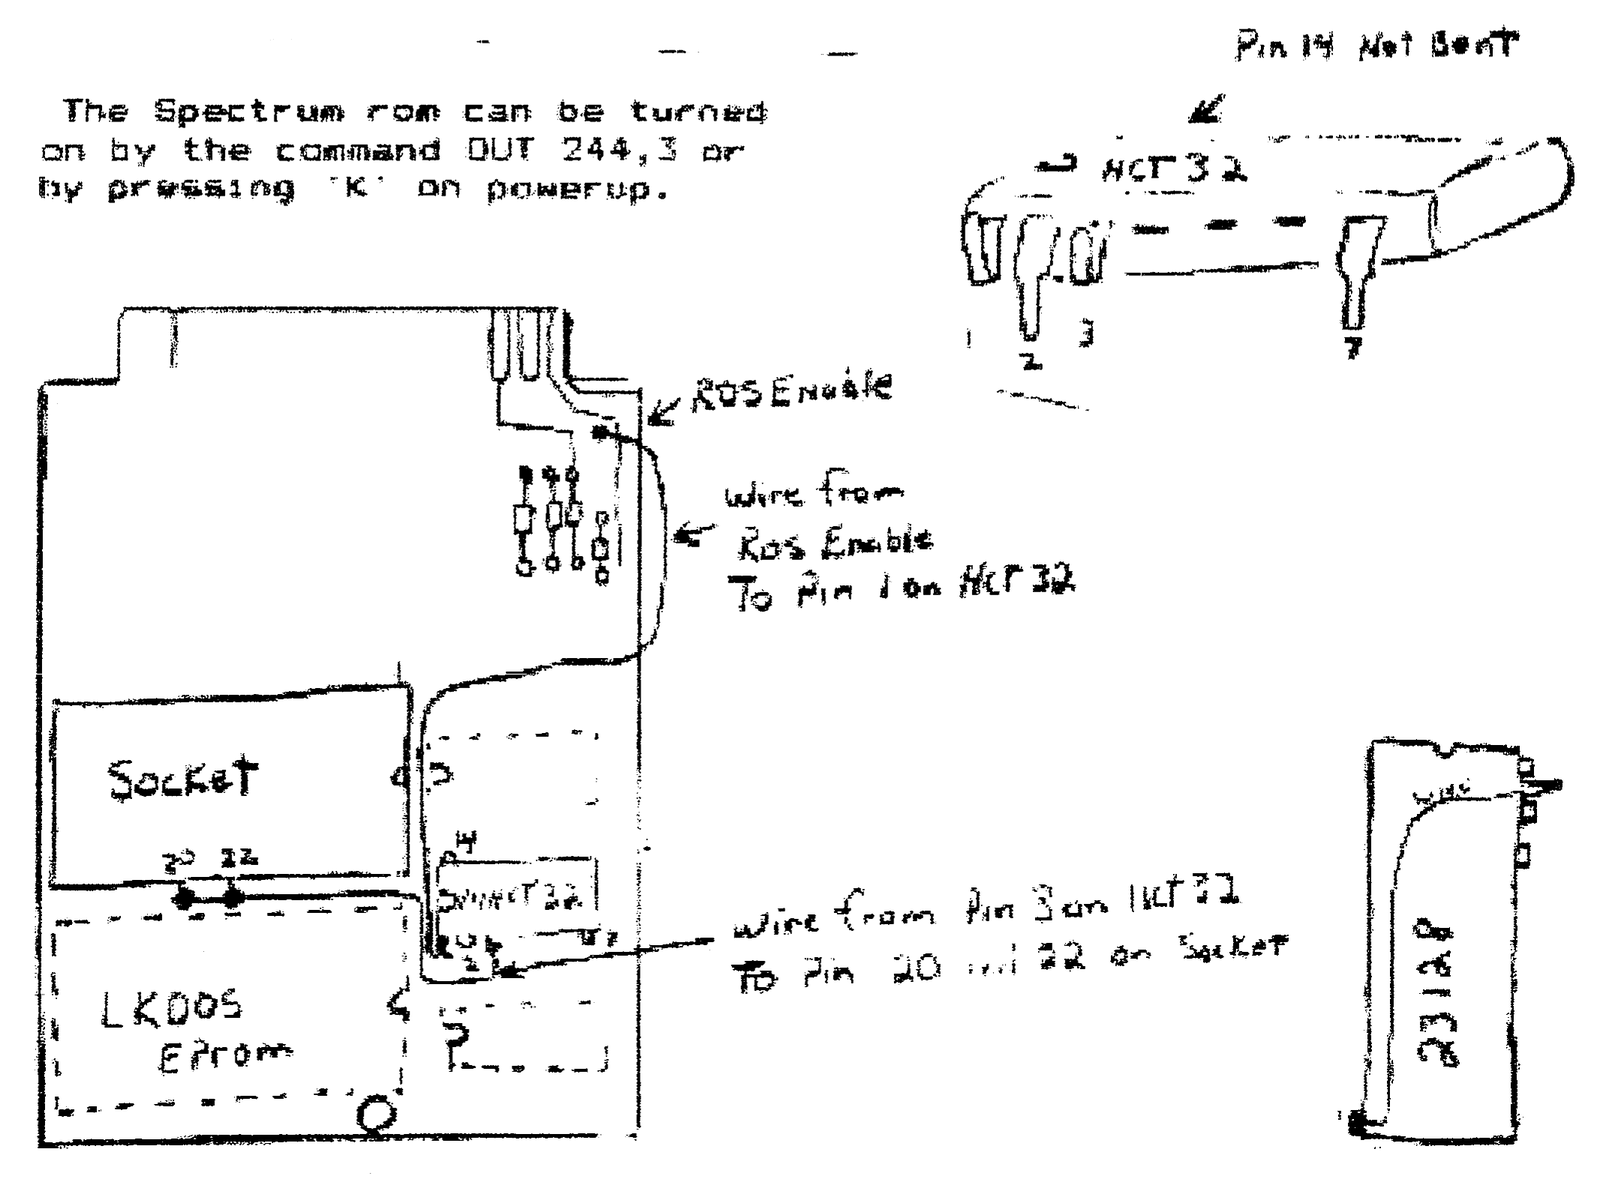
The Spectrum ROM can be turned on by the command OUT 244,3 or by pressing K on power up.
The Spectrum 23128 ROM
The 23128 ROM (NEC and others) has 3 chip selects which cause problems (it can’t be deselected by LKDOS) when installed in the 2068 ROM socket or in the optional EPROM socket on the LKDOS board.
If you want to remove the 2068 ROM and install the Spectrum ROM, you must bend out pin 22 so it won’t go into the socket and solder a small wire from it to pin 27.
If you want to install the Spectrum ROM into a socket added to the LKDOS cartridge you must bend out pin 27 so it doesn’t go into the socket and solder a small wire from it to pin 14.
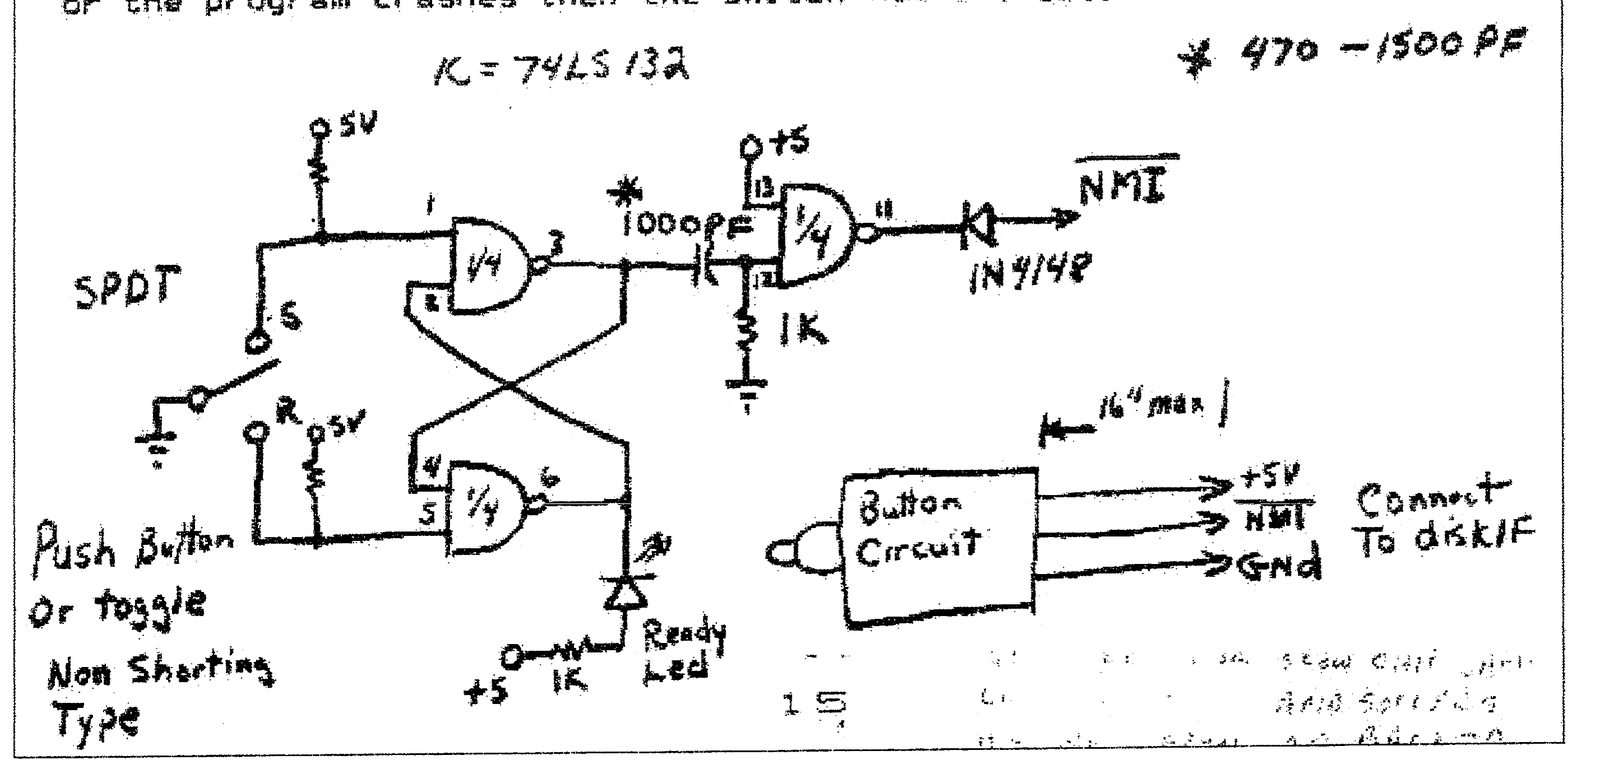
CIRCUIT for NMI SAVE Push button
(Aerco Ramex or Olger Only)
For the NMI save to work properly a push button circuit with no bounce and a short pulse is critical. This circuit is only a simple idea but you should use a flip flop or a latch like this. A capacitor, schmitt trigger type debounce circuit should’nt be used because it doesnt produce a single pulse.
To test the nmi button you can trigger it within a program and the press enter. The tune should only play once (start and end) and the program should continue. If the tune repeats its self or the program crashes then the switch has bounced.
LarKen Electronics
RR#2 Navan Ontario
Canada K4B-1H9