
Lemke Software Development
2144 White Oak
Wichita, Ks. 67207
When I bought the printer for my TS-2068, I took the first step in computer hardware expansion. A cassette recorder and used TV monitor had been easy to get. But a printer??? This was a more serious problem.
Well, how does one select a printer? I started by asking around. A friend at work (with a TI-99 computer) had a Star printer that he really liked, another was using a Star with his Commodore, and also liked it. So, based on this, I bought a Star printer. Quite by luck, I got a very good deal!
The Star SG-10 (and hundreds of other dot matrix printers) are advertized as IBM compatible. But, as I got into graphics more and more (first with the Pixel Sketch and Graphics Editor, and later the Pixel Print Desktop Publisher), I soon came to realize that NOT ALL Printers are created equal, even if they all claim IBM compatability!
When it comes to printers and graphics, there is very little standardization! However, IBM compatible printers all use a common command FORMAT. This is a series of 4 to 8 bytes that “tells” the printer two things:
1) the printer dot density
2) the number of dots/line
Most printers provide at least 2 graphics densities, my Star can print in no less than 6!
The IBM graphics format syntax looks like this for the Star…
(ASCII)  ESC,  K, n1, n2
(dec.)    27, 75, n1, n2
where “K” identifies the density (in this case 60 dots per inch, or 480 dots per line). n1 and n2 are used to tell the printer how many dots are to be printed, up to 480 for this density.
To define n1 and n2, you need to solve these equations:
n2 = INT (number of dots/256)
n1 = number of dots - n2 * 256
One variation on this format is to use a 2 byte density command:
(ASCII)  ESC,  *, 48, n1, n2
(dec.)    27, 42,  0, n1, n2
where the “*” byte is a generic graphics identifier, and the following byte (in this case 0) defines which density is to be used.
The C. Itoh (Prowriter) printer implements a very loose form of this format using:
(ASCII) ESC,  S, n1, n2, n3, n4
(dec.)   27, 83, n1, n2, n3, n4
where the “S” identifies the printer density, and n1 thru n4 are the ASCII codes for a 4 byte number defining the number of dots to print. For example, to print 256 dots, you would use:
byte   dec.   code
 n1     0      48
 n2     2      50
 n3     5      53
 n4     6      54
I have included the ASCII and decimal forms of these commands for a reason, namely, that while we primarily use the decimal form when communicating with our printers, most printer manuals like to use the ASCII form, and some use it exclusively! Hardly what I would call useful when you are just getting started.
Once you have conquered the graphics command syntax problem, you are ready for the next hurdle: adjusting the line spacing. This also is a non-std. command. Most printer print heads are built with a 1/72 inch space between pins. Also, most IBM compatable printers of the class used by the Timex community use 8 pins to print graphics. So, an 8/72 inch space between lines is needed to prevent print gaps or overlap. The format for this command usually looks like this:
(ASCII)  ESC,  A, n
(dec.)    27, 65, 8
where the “A” defines a line spacing with a multiple of 1/72 inch, and “n” defines what that multiple is.
The last commands are: Carriage Return and Line Feeds. There are some standards here in that “13” is usually a “CR” and “10” is a “LF”. But, some printers will give a “LF” when the “CR” command is received, others do not. Still others can be set either way. So, if your printer advances the paper twice for each printed line, and leaves big gaps between lines, it may be that your graphics program is sending your printer a “LF”, while your printer is automatically advancing on the “CR”. Hopefully one or the other can be adjusted easily.
So, how is it all put together? Your printer driver must pass the following information to the printer like this:
1) send the line spacing cmnd.
     (this is only sent once)
2) send the graphics cmnd.
3) send the Bit-Image data
     (the dot patterns)
4) send the CR and LF cmnds.
5) repeat 2 thru 4 until the
     whole page is printed.
The picture (Bit-Image-Graphics) byte patterns are created by testing each “dot” on the screen to see if it is “ink” or “paper” and then relaying this to the printer. This “testing” can be done in a variety of ways, and even how the dots are assembled and sent to the printer is somewhat non-standard.
Each of the 8 pins in the printer print head is assigned a numerical value. When the printer gets a command for that value, that pin is fired, and a dot is placed on your paper. Two variations are common:
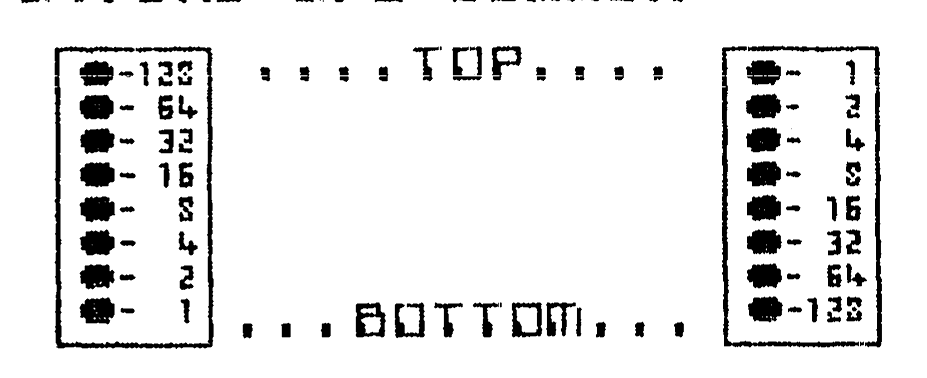
If a “1” is sent, in each case the “1” pin fires. If a “3” is sent, the “1” and “2” pins both fire. If a “255” is sent, then all 8 pins print, etc… But, if both printers are going to print the same picture, your printer driver must “know” which pin assignment/arrangement your printer uses. Notice, also, that since the pins on the print head are aligned vertically (up and down) and that the print head moves left to right, top to bottom, one must test the screen, starting at the upper-left hand corner, in 8 dot columns. Unfortunately, this is not the same form in which the computer stores the picture data, or printing pictures would have been made very simple.
Now, with this printer tutorial completed, I’d like to move on to the next phase, a somewhat practical application: an all BASIC BIT-IMAGE-GRAPHICS printer driver program you can use.
LISTING A is a TIMACHINE-ready Basic Bit-Image-Graphics printer driver. (TIMACHINE is a BASIC compiler written by Novelsoft).
This program MUST BE USED with an AERCO type printer interface.
If used in BASIC, each line takes about 30 seconds to print. Compiled, each screen takes about 30 seconds to print!
LISTING B presents a simple way to use this program… Just LOAD a SCREEN$ and PRINT it.
LINE 1: Copyright Notice Please use and distribute this program freely, but leave this notice in for identification.
LINE 10-50: TIMACHINE Directives
LINE 100-120: PRINTER COMMANDS Please see notes relative these lines below.
LINE 200: Sends Line Spacing command (LINE 100) to the printer.
NOTE: The AERCO CPI uses a very simple OUT 127,VALUE command to transfer information from the computer to the printer. Also, IN 127,VALUE is used to transfer information from the printer to the computer (see LINE 510).
LINE 300: Pixel row counter. Most TS-2068 graphics programs use the upper 176 pixel rows to display pictures. This counter starts at 0 (zero) and counts to 175 incrementing by 8. The “Y” variable defines the vertical screen coordinate associated with the upper pin of each 8 dot column. NOTE that the screen coordinates go from 175 (top) to 0 (bottom).
LINE 310: Sends the Graphics command (LINE 110) to the printer.
LINE 320: Pixel column (X coordinate) counter. NOTE: the TS-2068 screen has 256 dots per row.
LINE 325: This line is optional, and should be DELETED from your final program version to SPEED up your printer. This line prints the Pixel Row and Column currently being tested at the BOTTOM of the screen.
LINE 330: Assemble byte (value) to be sent to the printer.
LINE 340: Send “CR” and “LF” commands (LINE 120) to the printer.
LINE 350: DONE.
LINE 510-560: Check the status of the printer.
DO THE FOLLOWING TEST: WITH YOUR PRINTER TURNED ON AND THE READY LIGHT ON, TYPE: PRINT IN 127
The value printed is the value YOU should use in LINES 520 and 550 in the place of “229”. “229” is the value I get with my STAR printer.
IN 127 is tested. If the printer is ready, printing continues. If the printer is not ready, a message is placed at the bottom of the screen until the printer is ready.
LINE 1010-1090: An 8 dot column is tested using the POINT(X,Y) command to see if each dot is INK or PAPER. The value of the variable “BIT” is determined by adding the values of each dot that is “INK”. NOTE: this arrangement is for the upper pin using a value of 128. To switch to the other system, simply change the value in each line preceding the POINT function.
Now for a few words about those 3 lines of DATA. To make the program flexible, the first number that is read from each line “tells” the program how many bytes are to be sent to the printer for this specific cmnd.
For example, Line 100 we have:
DATA INT 5, 27, 65, 8, 27, 50
(INT is used by TIMACHINE to identify all of these as integer numbers). The “5” says that this printer command needs 5 values. And you see that there are 5 numbers remaining. LINE 110 also has a 5 byte command, LINE 120 has a 2 byte command.
Here are some examples of LINEs 100, 110, and 120 for a variety of printers…
STAR SG-10 (IBM Compatibles)
100 DATA INT 5,27,65,8,27,50
110 DATA INT 5,27,42,5,0,1
120 DATA INT 2,13,10

STAR SG-10 (STAR Mode)
100 DATA INT 3,27,65,8
110 DATA INT 5,27,103,5,0,1
120 DATA INT 2,13,10

C. Itoh (Prowriter)
100 DATA INT 4,27,84,49,54
110 DATA INT 6,27,83,48,50,53,54
120 DATA INT 2,13,10

Spirit 80, Legend 880
Star SG-10X
100 DATA INT 3,27,65,8
110 DATA INT 4,27,75,0,1
120 DATA INT 2,13,10

Epson RX+
100 DATA INT 3,27,65,8
110 DATA INT 5,27,42,4,0,1
120 DATA INT 2,13,10

Epson FX+
Seikosha SP-1000A/1200AI
Smith Corona Fastex 80
Datasouth I/II
Sakata SP-1500
Panasonic P1091/1092
Mannesmann Talley 85/86
100 DATA INT 5,27,65,8
110 DATA INT 5,27,42,5,0,1
120 DATA INT 2,13,10
One of the nice things about having a BASIC printer driver program for your printer, is that now you can experiment with this printer driver, and learn more about how your printer works. Modifications in BASIC are simple to make compared to a machine code program!
Some of the “enhancements” one might make are: double size printouts, mirror-image, up-side down printouts, inverse video printouts… etc. Each of these enhancements can be achieved with relatively simple program modifications. Try some.
There are a few things to watch for however. For example, if you are printing your pictures with a dot density of 60 dots per inch (480 dots per line), you will not be able to print a full double-width picture since the TS-2068 screen has 256 dots, and a double wide requires 512 dots!
Also, if you are printing pictures with circles, at 60 dots per inch density across the page and 72 dots per inch down the page, your circles will print as ellipses! So, for such pictures, use a 72 dot per inch (576 dot per line) printer density. Note: this will print a perfectly round circle, and will allow you to print a full double wide page too!
So, just how should one go about selecting a printer? Most important, know what you want to do with it! If you want to print graphics or do Desktop Publishing (print combined text and graphics), then you want a printer that can provide you the flexibility you need for graphics. This means a variety of printer densities! including (as a MUST HAVE ITEM) a 72 dot per inch (plotter mode) density.
Listing A:
   1 REM *********************** Basic Bit-Image-Graphics Printer Driver (c) by S D Lemke 1988 Lemke Software Development ********************************
  10 REM !INT A,BIT,I,J,K,R,X,Y
  20 REM ! LIST
  30 REM ! LPRINT
  40 REM ! OPEN #
  50 REM ***********************
 100 DATA INT 5,27,65,8,27,50
 110 DATA INT 5,27,42,5,0,1
 120 DATA INT 2,13,10
 190 REM ***********************
 200 GO SUB 500: RESTORE 100: READ J: FOR I=1 TO J: GO SUB 500: READ K: OUT 127,K: NEXT I
 290 REM ***********************
 300 FOR R=0 TO 175 STEP 8: LET Y=175-R
 310 RESTORE 110: READ J: FOR I=1 TO J: GO SUB 500: READ K: OUT 127,K: NEXT I
 320 FOR X=0 TO 255
 325 PRINT #0;AT 1,0;"ROW =";R,"COLUMN = ";X;TAB 31;" "
 330 GO SUB 1000
 340 NEXT X: RESTORE 120: READ J: FOR I=1 TO J: GO SUB 500: READ K: OUT 127,K: NEXT I
 350 NEXT R: STOP
 500 REM ***********************
 510 LET A=IN 127
 520 IF A=229 THEN RETURN
 530 PRINT #0;AT 1,0;"PRINTER IS NOT READY.........."
 540 LET A=IN 127
 550 IF A=229 THEN PRINT #0;AT 1,0;TAB 31;" ": RETURN
 560 GO TO 540
1000 REM ************************
1010 LET BIT=128*POINT (X,Y)
1020 LET BIT=BIT+64*POINT (X,Y-1)
1030 LET BIT=BIT+32*POINT (X,Y-2)
1040 LET BIT=BIT+16*POINT (X,Y-3)
1050 LET BIT=BIT+8*POINT (X,Y-4)
1060 LET BIT=BIT+4*POINT (X,Y-5)
1070 LET BIT=BIT+2*POINT (X,Y-6)
1080 LET BIT=BIT+POINT (X,Y-7)
1090 GO SUB 500: OUT 127,BIT: RETURN
9990 REM ! CLOSE #
Listing B:
100 LOAD "PRINTER" CODE 64339
200 LOAD "" SCREEN$
300 RANDOMIZE USR 64339
400 STOP
NOTE: When LISTING A is compiled with TIMACHINE, you will have a PRINTER DRIVER code that will be 1001 bytes long, at 64339.
Lemke Software Development
QUALITY PRODUCTS FOR THE TS-2068
Join the world of Desktop Publishing with the Pixel Print Professional!
v3.2  Aerco Disk Version
v3.3  Cassette Version*
v3.4  A&J Microdrive*
v3.5  Oliger Disk Version*
v3.6  Larken Disk Version+
v3.7  Zebra FDD Version*
* NOTE: these versions require at least a 32K RAM cartridge for BANK-SWITCHED memory.
+ NOTE: the LARKEN version needs at least a 64K RAM DISK memory expansion.
Pixel Print PLUS!……$19.95 (BASIC DESKTOP PUBLISHER PRG.)
Pixel Print Professional!……$29.95 (SEE ABOVE, W/BANK-SWITCHING FOR FULL-PAGE DESIGN/PRINTING)
72 to 90 Dots/inch, IBM/EPSON format graphics compatible…
Masthead Package #2 – 33 Great Graphics!! (33 GREAT, EYE-CATCHING PICS TO REALLY ADD ‘CLASS’ TO YOUR DESKTOP COLUMNS! JUST LOAD THEM INTO THE DTP… ADD TEXT) Masthead Package #2….$14.95
32K RAM Cartridge:…..$44.00 (32K RAM EXPANSION CARTRIDGE: VOLATILE MEMORY, PLUGS INTO CARTRIDGE DOCK. NOT LIMITED TO USE WITH THE DTP.) (WITH THE PURCHASE OF THE PIXEL PRINT PROFESSIONAL… PURCHASED SEPARATELY, $47.95)
1989 Personal Calendar PLUS! (LOAD INTO ALL VERSIONS OF THE PLUS! AND PROFESSIONAL. ADD FAMILY BIRTHDAYS… AND MORE!! COMES WITH 80 CUSTOMIZING HIGH RES. ICONS! CALENDAR COVERS A 14 MONTH PERIOD, JAN ’89 THRU FEB ’90!) ONLY $19.95
Lemke Software Development
2144 White Oak
Wichita, Ks. 67207
This ad created w/Pixel Print.
Note: Type-in program listings on this website use ZMAKEBAS notation for graphics characters.