
High among the list of things you’ll want to be able to do with your T/S Personal Computer will be loading and saving operations.
Let’s start by defining these two terms:
Loading is a process by which a program — prerecorded on a tape cassette (such as a TIMEX® software tape cassette) — is transferred into the computer. When you load a program, the computer reads the information from the external storage medium (tape) and enters it into its own internal memory. This is accomplished with an “EAR-to-EAR” connection — listening is our equivalent of reading.
Saving, in contrast, is the exact opposite of loading. In this operation, data held in the computer’s internal memory is transferred onto an external storage medium (tape). When you save a program, the computer writes the program onto a (blank) tape cassette. This is accomplished by a “MIC-to-MIC” connection — talking is our equivalent of writing.
Loading and saving techniques aren’t particularly difficult, but just like learning to ride a bicycle or drive a car, it does require a little concentration and practice. So, if you don’t succeed the first time, don’t give up — just make the appropriate adjustments and try it again.
To load and save, a number of steps must be performed in their proper sequence.
In addition, there are a few “tricks of the trade” we’ll tell you about to help make this operation proceed more smoothly. We’ve combined all of this into an easy-to-follow procedure that shouldn’t take you more than a few minutes. Do remember to perform each step in exactly the order in which it is listed.
PRELIMINARY STEPS
Before starting, install your TIMEX Sinclair™ Personal Computer by completing the instructions provided in the User Manual. Make sure that all electrical connections are secure and tight.
If the program size exceeds 2K (instructions with your TIMEX Software Cassette note the size), you will need to install the RAM Expansion Module. To do so, simply push the RAM Expansion Pack into the card connector on the rear of your computer.
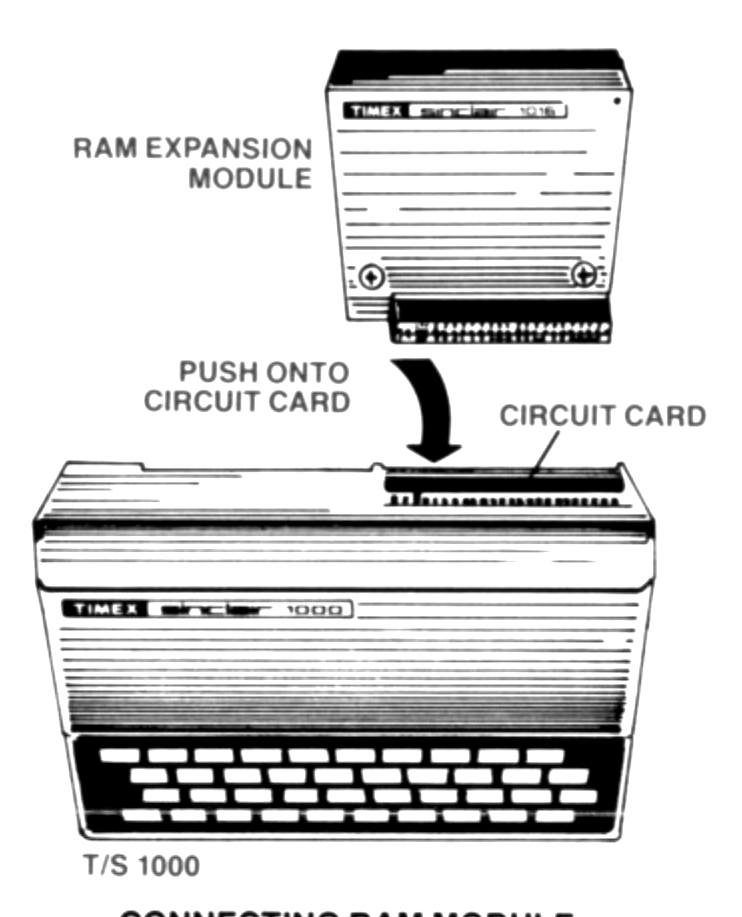
Make sure that the playback/recording heads of your tape recorder are clean. Excessive dust or dirt could make the load or save operation much more difficult.
Turn your television set ON; the K cursor will display on the lower left-hand corner of the screen.
LOADING THE PROGRAM
Place your tape recorder adjacent to your computer. Insert your TIMEX Software Cassette into your tape recorder (directions are provided with the tape recorder); it does not matter whether Side A or Side B (unless otherwise noted in the instructions) is used. Then:
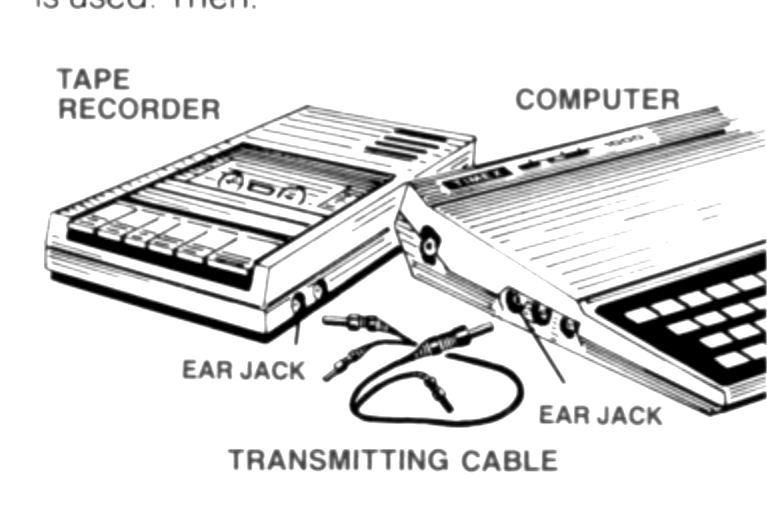
1. Press the tape recorder rewind control to fully rewind the tape (if a program has been saved on tape, rewind to the position where the program is to begin.) Stop the tape recorder.
2. Packed into the box with your TIMEX Personal Computer, you’ll find a cable that has two connectors — on each end of the cable.
Plug either of the two connectors into the EAR jack on the computer. At the opposite end of the cable, plug the connector of the same color into the EAR jack on the tape recorder.
3. Set the tape recorder volume control to about 3/4 of maximum volume (about 7, if the control is marked with volume levels).
(Please be aware that the volume level is critical. It may be necessary to rerun the loading procedure several times until you have found the appropriate volume level. You may want to mark this point on the control for easy future reference.)
4. If your tape recorder is equipped with a tone control, set the control for maximum treble and minimum bass (the tone is also an important ingredient in the loading/saving procedure).
5. Confirm that the K cursor is displayed on the screen. Press the J key on the keyboard to initiate the LOAD command (the word LOAD will appear on your television screen).
Should the wrong command be entered accidentally, it’s easy to change; just press the SHIFT and the DELETE (0) keys simultaneously to delete the improper command, then press the proper key.
6. Simultaneously press both the SHIFT and the letter P keys to produce the quotation marks.
7. At the keyboard, type the name of the program (i.e., “VU-FILE”) exactly as it is printed in the instructions (or on the cassette. If you are loading a program you’ve created, type the name that you’ve assigned to it).
8. Repeat Step 6.
9. Press the PLAY key on your tape recorder. Wait for a few seconds to allow the tape leader (the non-recording portion of the tape) to pass through the recording head.
10. Press the ENTER key on the keyboard to commence the loading process.
During the loading, your television screen will display different kinds of horizontal lines. This is perfectly normal. The lines — especially the thick, solid black ones, are indicating that the program is loading normally.
Note that the total loading time depends upon the size of the program. Naturally, longer programs require more time. Your TIMEX Software Cassette instructions will indicate the loading time for that specific program.
However, never, never move or otherwise disturb the computer during the load; otherwise the computer may fail to load the program.
11. Upon completion of a successful load, (and with a little practice you will be able to load successfully); either of the following will display on your television screen:
- The symbols 0/0 in the lower left-hand corner of the screen
- The Main Menu or some other portion of the program
Instructions, that accompany your TIMEX Software Cassette, will tell you which display will appear on your television screen after a successful load.
12. Turn your tape recorder OFF (it can now be disconnected from your TIMEX Sinclair Personal Computer, if desired).
13. If appropriate (and if you are not concerned with losing data), press the RUN (R) and then the ENTER keys to initiate the program. Follow the instructions provided with your TIMEX Software Cassette. (Note that in some instances you will not want to RUN the program, instead a GOTO command will initiate the program; instruction with your software cassette will tell you when to do this.)
IF THE PROGRAM FAILS TO LOAD
If the program fails to load after your first attempt, don’t get discouraged: A little practice and experimentation should resolve the difficulty.
There are, however, a few common reasons why the computer didn’t load, and we can use this knowledge to perfect our loading technique.
Loose Connections. Loose electrical connections can impede the loading process. Therefore, let’s check all electrical connections — between the computer, the television, and the tape recorder — before we try again.
Improper Connections. Remember, the computer and the tape recorder must be connected “EAR-to-EAR” with the same color connectors. So, let’s make certain that we’ve connected them right!
Ram Module Sensitivity. The contacts on this unit are sensitive to movement. So, let’s try to keep it steady during operation.
Wrong Volume Level. Here’s where we might need to experiment a bit. Try to load your TIMEX Sinclair Personal Computer at various (higher/lower) volume levels until the correct setting is found.
Computer Does Not Read Program Name. This is one of the most common loading difficulties and the reasons for this vary, ranging from a “bad spot” on the tape, to the users renaming of a program (after you’ve saved data). Fortunately, this difficulty is easily resolved by performing the following steps:
1. Complete Steps 1 through 5 of the loading procedure.
2. Instead of completing Steps 6 through 8, Press the SHIFT and the P keys twice to input two sets of quotes (” “). In essence, this technique “tells” the computer to load whatever program is encountered first, rather than to look for a program with a specific program name.
3. Complete steps 9 through 13 of the loading procedure.
MALADJUSTMENT OF RECORDING HEAD
You can verify whether or not the recording head of your tape recorder is improperly aligned by this simple test:
Run the tape through your tape recorder just as you would to listen to music. As the program runs, you will hear a shrill tone which identifies the program. The tone should be audible as a clear sound; if it appears to be muffled, the recorder head is misaligned and should be adjusted (by your local electronics store).
(Please note that an alignment problem may only affect a particular software cassette. Other tapes may run perfectly fine without an adjustment.)
SAVING A PROGRAM
Although similar to the loading protocol, the saving procedure requires a different type of tape recorder-to-computer interconnection.
Firstly, why would you want to save a program. The following lists the principal reasons:
- To save a program which you have created.
- Copy the original program to obtain a backup tape in case the original tape was somehow damaged or destroyed; thus the entire program would not have to be recreated.
- Save a tape onto which data has been stored (not to be run through the RUN command).
- You can update a tape (i.e., transaction tape) holding data (i.e., last month’s sales receipts) by adding more recent data (i.e., this month’s sales receipts).
There are two types of saves that are used to save programs. They are: A Manual Save, and a Program-Controlled Save.
MANUAL SAVE
This type of procedure is used to save a program which you have created, or to backup your original program by copying onto a spare tape cassette.
To run a manual save:
1. Perform all Preliminary Steps listed in the Loading Procedure.
2. Insert a blank, high-quality, non-stereo tape cassette into your tape recorder. (Unless otherwise indicated by TIMEX Software instructions, the running time of the cassette generally should not exceed 30-minutes. In general, the more programs you have on a cassette, the harder it is to find a particular program and the longer you will have to wait for the computer to find the program. 120-minute cassette tape is too thin and should not be used.)
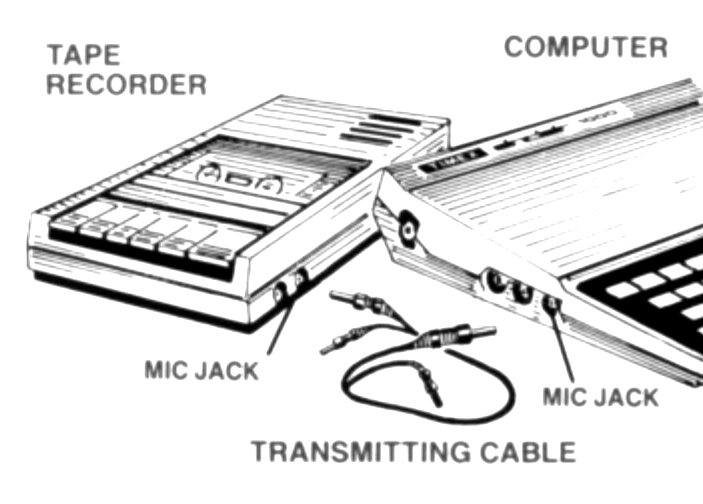
Rewind the tape to its starting position, or set the tape to any other desired recording position (note that if you save a program on an area of the tape which already contains a program, the original program will be deleted (actually written-over) and will be replaced by the new program.
3. Plug one end of the double-connector cable into the MIC jack of your TIMEX Sinclair Personal Computer. At the opposite end of the cable, plug the connector of the same color into the MIC jack of the tape recorder.
4. To save the program, wait until the program has finished executing or press the BREAK (SPACE) key to interrupt the program (in the latter case, an error message will display at the bottom of the screen).
5. Press the SAVE (S) key. The command, SAVE will display on the lower left-hand corner of the screen.
6. Simultaneously press both the SHIFT and the P keys to produce a pair of quotes (“). The L cursor will appear.
7. At the keyboard, type the name that you are assigning to the program for identification and (future) loading purposes.
Then, repeat Step 6. The command should look like this:
SAVE "NEW PROGRAM NAME"8. Simultaneously press the tape recorder RECORD and PLAY controls. Wait for a few seconds for the tape leader to pass through the recording head.
9. Press the ENTER key.
If your tape recorder is equipped with a tape counter, it is a good idea to note the counter setting. This will help you to more quickly locate a saved program in the future.
Running the save causes your TV screen to display a pattern of alternating thick, thin and wavy lines; this indicates that the program is being recorded on the tape cassette. Don’t be surprised if it takes longer to save a program than it does to load the same program; this is quite common!
10. Upon completion of a successful save, the symbols 0/0 will display on the lower left-hand corner of the screen.
(If the autostart feature has been employed, 0/0 will not display. Instead the program will automatically advance to the menu or to some other part of the program specified by the GOTO command.)
Stop the tape recorder (it can be disconnected, if desired).
When you save a program which contains transaction data, do not initiate the program with a RUN command. Why not? Well, the primary reason is related to the fact that the RUN command clears all variables; thus all transaction data will be deleted and would unnecessarily need to be reentered into file.
PROGRAM-CONTROLLED SAVE
A program-controlled save is executed from a command that is incorporated within a program. The statements which execute the save are typically demonstrated by the routines below:
1500 PRINT "ENTER PROGRAM
     NAME"
1510 INPUT N$
1520 PRINT "PRESS PLAY AND
     RECORD CONTROLS ON YOUR
     TAPE RECORDER; THEN PRESS
     ENTER KEY"
1530 INPUT X$
1540 SAVE N$
The above routine permits the programmer to assign a name to the program to be saved.
1500 PRINT "PRESS PLAY AND
     RECORD CONTROLS ON YOUR
     TAPE RECORDER; THEN PRESS
     THE ENTER KEY"
1510 INPUT X$
1520 SAVE "NEW PROGRAM NAME"
This routine saves the program under the name already established (i.e., “NEW PROGRAM NAME”).
To utilize the program-controlled save:
1) Perform steps 1 through 3 of the Manual Save procedure.
2) As the program executes, it will pause at the command where you must start the tape recorder. Simply follow the prompts which are displayed on the screen.
Note that if data has been entered, you won’t want to use a RUN command to initiate the program (for the reason previously discussed). Instead use either a GOTO command or the automatic restart technique to commence the program.
To utilize a GOTO command when the K cursor is displayed, simply type the GOTO command (i.e., GOTO 100) instead of entering the RUN command.
Should you desire to make use of the autostart feature, insert a GOTO command into your program — immediately following the SAVE command (i.e., 1550 GOTO 200 or 1530 GOTO 200). Make certain that the GOTO line number specifies a line prior to the lines which specify the arrays and/or variables.
Finally, the saving techniques used to save the program on certain TIMEX prerecorded Tape Cassettes deserve special attention.
Certain TIMEX programs utilize a menu-driven save (which incorporates the autostart feature). To utilize this option:
A Menu-Driven Save is an option listed on the Main Menu (of a TIMEX Software Program) to let you save your program (and related transaction data) quickly and easily.
Utilize this option in the following manner:
1. Complete Steps 1 to 3 of the Manual Save Procedure.
2. Follow the software instructions to return to the Main Menu. Then, select the appropriate option (option 3 in the illustration below).
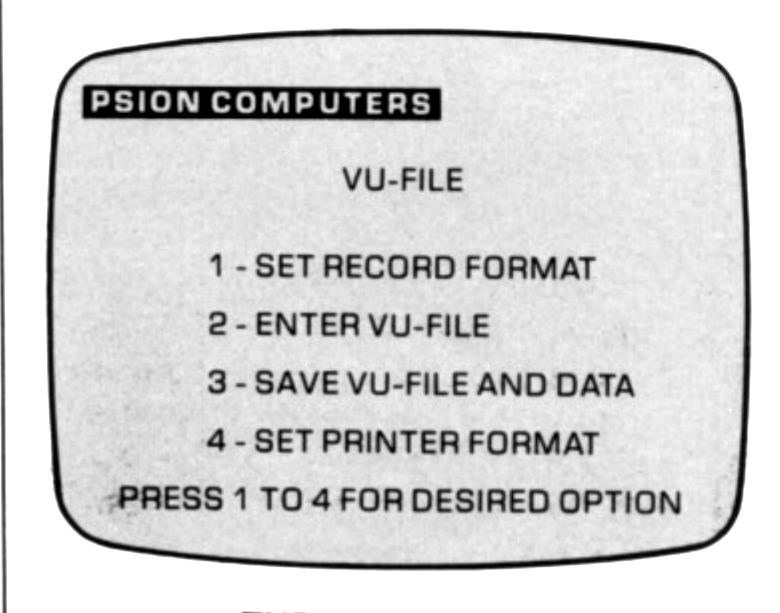
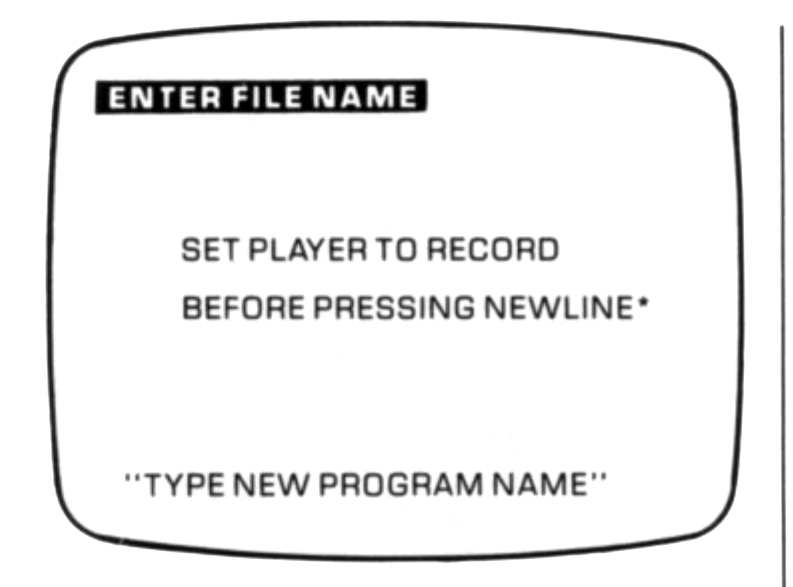
3. At the bottom of the screen, an L cursor is displayed. Simply type the name of the program to be saved (i.e., “VU-FILE”) (you don’t need to enter the quotes, since the TIMEX program already does this for you.)
Be sure to enter the current name of the program; if you rename it, difficulties may be encountered when you try to load the saved program.
After saving a program, label the cassette with the name of the program and the counter setting, for future reference.
That’s all there is to saving a program! Easy, isn’t it?
LOADING A SAVED PROGRAM
When you load a program saved from a TIMEX tape cassette, the computer usually looks for the original program name and does not recognize the new name that has been assigned to the saved program (assuming that you have renamed the program). In this case, utilize the technique discussed in Step 2 “Computer Does Not Load Program”, to achieve a successful load of the saved program.
*Actually the ENTER key on the keyboard.