
The genesis of this work-up goes back to my early work with the Sinclair ZX-81, a computer designed “not to print”. Soon after the Z-81 reached the “million mark”, Cottage industry developed Machine Code “Printer Drivers”. From then until today, our Sinclair Computer fans have not had a minimum diet of “How To Control Printers”. That is, other than via using a copyrighted software and following the manual instructions.
CONCEPTS: 1. Printer Driver Software: These Machine Code utilities provide the Software LINK between the Computer, the Centronics Parallel Interface, and the Printer. The “prcode” program usually resides in RAM, but some prcodes are put into EPROM. The code programs work marvelously to send BURSTS of data from the computer to the printer. Such bursts of data are not FORMATTED. Thus, a separate software is needed to control the data bursts so that Afaganistan, is printed in its entirety on the same line of print. Also, and this is the thrust of this article, the USER NEEDS PRINTER CONTROL. User control is needed so that there is a way to make the printer change its STYLE of PRINT and other PRINTER MODES, via software or direct COMMANDS.
ADDITIONAL CONCEPTS: Some Computers, such as the Unexpanded QL and the TS-2068, have little spare FREE MEMORY to store elaborate ancillary programs such as Printer Control utilities. Thus any such utility should be as brief as is practical to do the jobs needed. What are the JOB TASKS that most users need for controlling a printer “that the prcode does not accomplish”? Lets list them: 1. Menu Control for Automatic printer MODE Changes. 2. Line Length Control. 3. Page Length Control. 4. Margins Control. 5. Center Print of Headers Footers. Each of these have branch needs.
I didn’t list this one because it is so broad. There are many different kinds of printers. A control program “for just one printer” would have very limited application. We really need a “universal printer control system” that can be used for Dot Matrix printers, Daisy Wheel Printers, and all makes of both. Now that is a tall order, isn’t it? AND is is make even taller when one attempts to develop a Control System that works with both the Sinclair QL and the TS-2068. The task must be approached with the knowledge that some “user adjustments” will always be required for different computers and different printers, and different Centronics Interfaces. If the needs for user adjustments are well defined, then such a universal program will be useful to many.
Printer Considerations
THE NEW 24 PIN PRINTERS: Recently one of Update’s printers, a Star Micronics 1000 dot matrix, reached its 365th day of warranty, and promptly expired. The Print Head quit printing half of the characters, which made English look like gobeleze, a dialect of the Australian aborigines. To get it fixed would have required about $85 skins, which did not seem to be cost effective, what with the “out of the door, out of warranty” situation with repairs. So I opted for a new Panasonic KXP-1124 printer. This is a 24 pin printer, whereas the old Star was a 8 pin printer. Why mention that? Well I have read where there is much confusion as to whether our computers (QL and TS-2068) will even work with a 24 Pin Printer. Lets put that to rest imediately.
THEY WILL, and with GUSTO! AND without any kludge-up at all. If your 8 pin Dot Matrix prints something via “LPRINT”, it will do the same, but with three times better print quality than with an 8 pin printer. “3 times better” because the 24 pin printer prints three times as many dots for a character printed. DRAFT quality with the 24 pin printer is better than NLQ quality with most 8 or 9 pin printers. For proof of that, this column is printed with the new 24 pin printer (in Draft Mode).
DAISY WHEEL PRINTERS: The main difference in these and Dot Matrix is the Daisy Wheel has a “print wheel” that has “whole formed characters”. A solenoid Whacks the reed that has the “die of the character”, and a perfect character prints to paper. The other main difference is that a Daisy Wheel printer is SLOW, about 17 characters per second speed. Daisy Wheel printers are easier to control than dot matrix printers. This is because there are only a few different modes of printing, and my new Panasonic has more than 5000 different possible set ups. Of course, that many set-ups are impossible to program in an automatic Menu Controlled program. So we must select a dozen or so “preferred modes” and use the printer’s front panel switches to control the unusual modes.
The FOUR KEY IN UTILITIES: The “varset.B6” Program
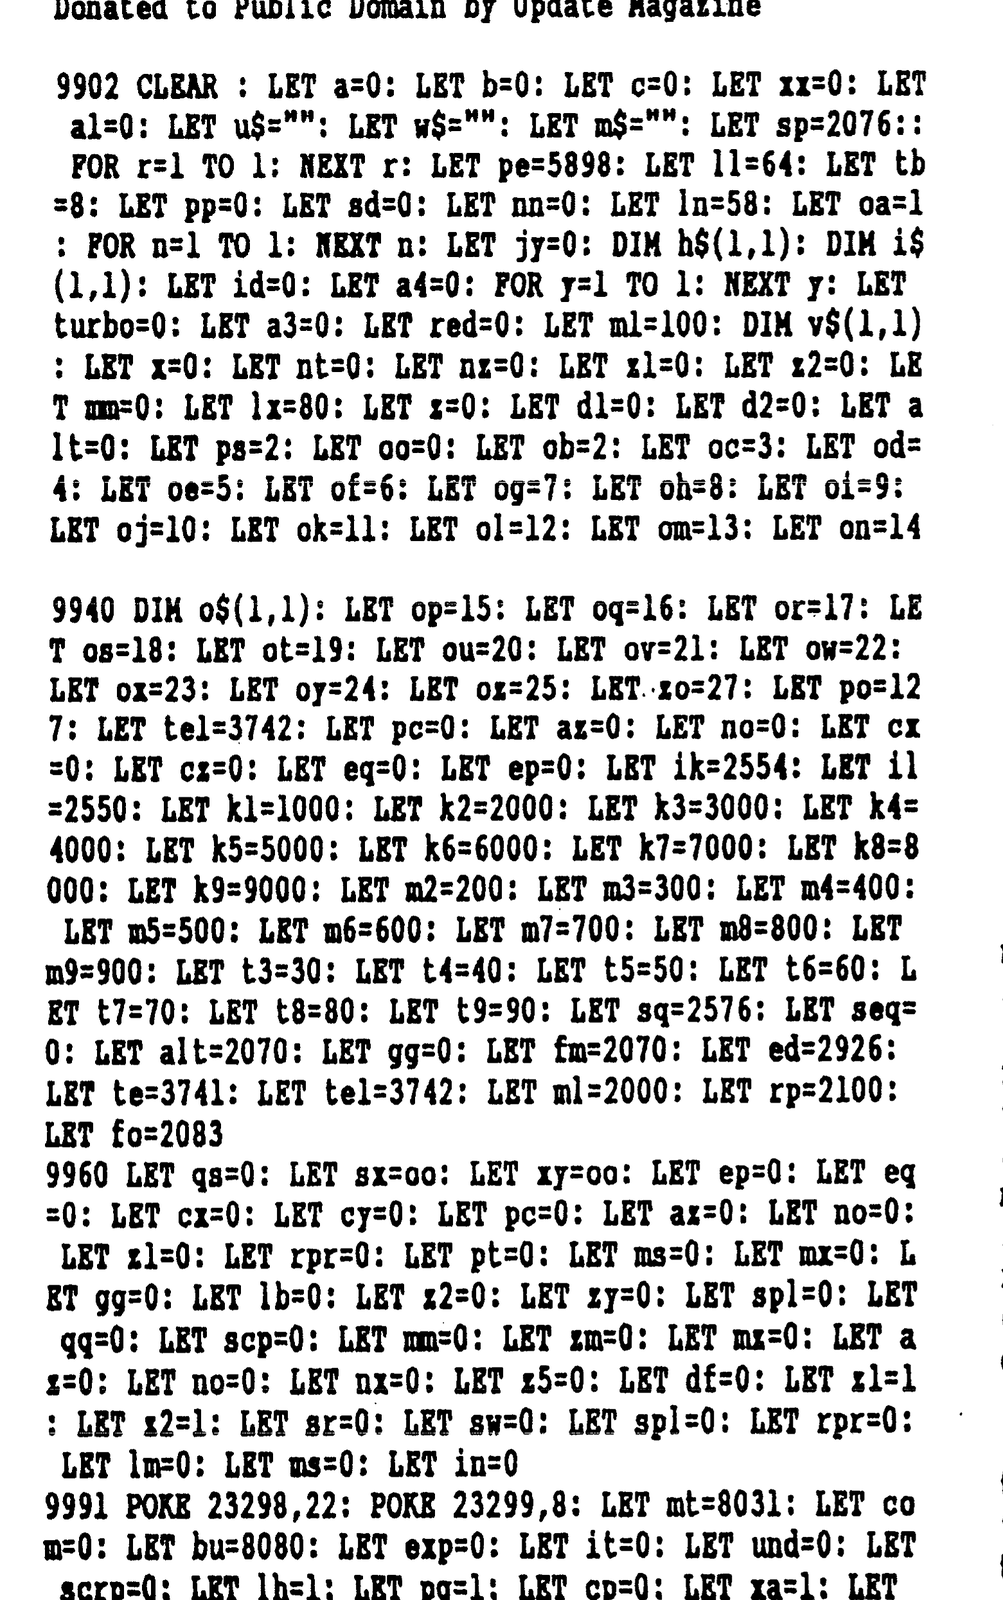
There are four programs to be presented. Each is done for the TS-2068, but each can easily be adapted for the QL, that is, if I can adequately explain the programming rationale. Lets start with the program “varset.B6”. This is a program designed to be MERGED to either the TS-2068 or the QL. The program has HIGH LINE numbers that should not interfere with any existing program. All of the variables used in the other three programs are “initialized” by this “varset.B6” program via <GO TO 9902>. ONCE DONE, you can DELETE the program, as the variables are then in memory. Use <DELETE 9902,> and the vars table will stay in memory for your work with the other three programs. This variable file forms the basis for MUCH MEMORY SAVINGS in all programming that you will create.
As a general rule, if your Basic program is over 4K in program length, the use of these variables within the program (instead of raw numbers) will equalize. That is to say, that the memory loss of 1751 bytes for the vars file storage in memory will be recouped. After that, the continued use of the vars instead of raw numbers will multiply in memory savings. A typical program length of 20K will be reduced by about 5000 bytes via the use of the vars for numbers. I use a system that lends itself to easy recollection. Numbers zero through 25 are represented by the “oo” variables, “zero=oo, oa=1,ob=2, through on=14. Skip oo because oo=zero, pick up with on=16, through oz=25”.
One can count on one’s pinkies at first until their habitual use sinks into the noggin, and one thinks “oj instead of ten”. Then “tens” are “t3 through t9”. “t3=30, t4=40, etc”. Then Hundreds are represented by “M1 through M9”, and Thousands are represented by “K1 through K9”. Thus <GO TO k2+ob> would be <GO TO 2002>. All other variables in the “varset.B6” file are oft used numbers in the Daisy.B6 Software. These “line numer and program specific vars” may be changed for the needs of a specific program. So much for “varset.B6”. Key it in and SAVE it to disk. Once done you can always MERGE it, then <GO TO 9902> to initialize this variable file .
Universal Variable File, “varset.B6” — Donated to Public Domain by Update Magazine
The “fomat.B6” Program
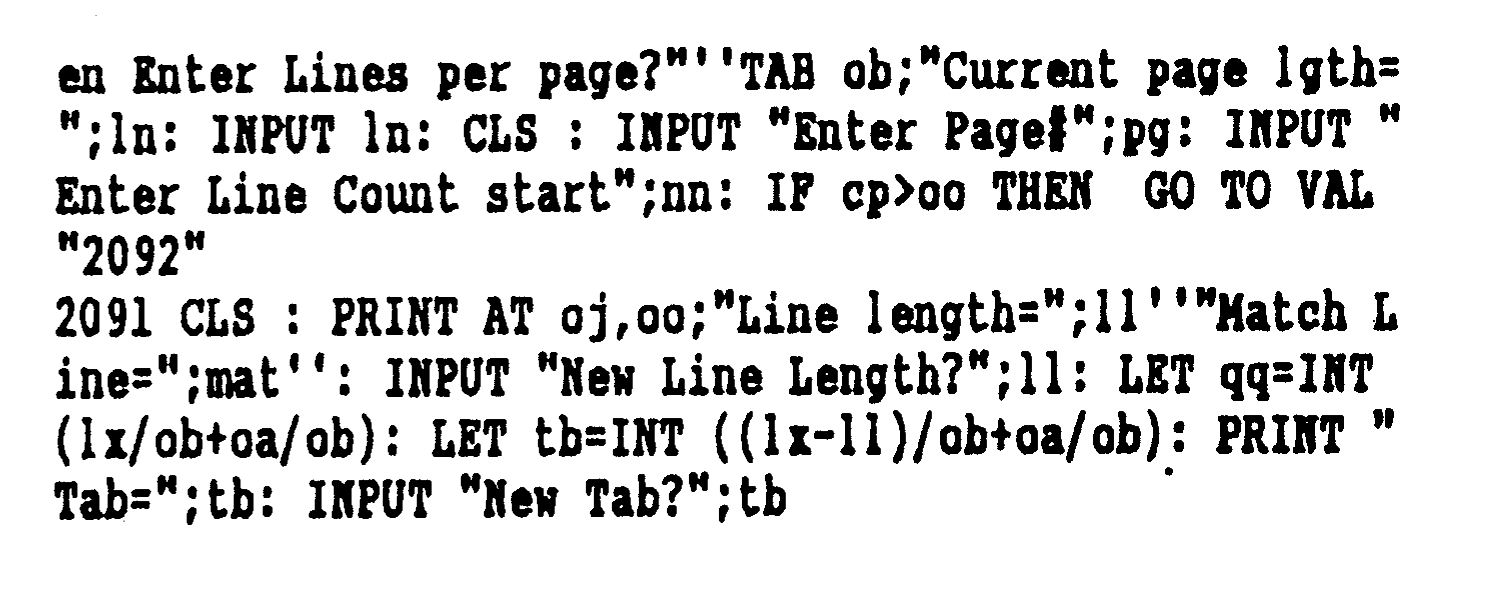
THE FORMAT MENU GROUP, and the PRINT STYLE MENU GROUP: These two programs work hand in glove to provide a miriad of PRINTER CONTROL and FORMATTING needs. We will first discuss the FORMAT MENU GROUP, which is designed to provide Automatic Format assistance. The Menu Itself is reproduced below. Incidentally, this menu is produced “right within the text”, using the Daisy.B6 software for the TS-2068.
   Select until Finished

 <1> Sngle Spc
 <2> Dbl Spc
 <3> Print Style Menu
 <4> Block Indent Off

 <5> Block Indent ON
 <6> To Fun Menu
 <7> Column Print
 <8> Let Head Stnry
                        2083
     Pg Cent=     Pg Lgth=

Max     Line    Match   Line=
Line    Lgth    Line    Page=
                        Tab =
For cross reference purposes, you can refer to the above Menu, its numbered selections, and the LLIST of “fomat.B6”. The menu is a “rotary”, in that all selections “1 through 5” return the menu after the selection task is done. These selections cause a graphics block to be posted to show the new status. The current Format Status is displayed with their vars identification. This makes a pretty busy screen display, but one that keeps you oriented as to the format status.
When referring to the LLIST, there is one odd character that is wrong in many places. The “@” in the listing is actually a graphics block, which is posted at various places on screen to designate current status. When keying in use the graphics block for this character. The menu provides many electives for Formatting. Some electives follow via prompts after the selection is made to return to the FUNCTION MENU. Basically, the menu electives cause calculations for using Format Line Length, TAB, and Center of Page, to format CENTER PRINTED LINES on a page. We start with the premise that the printer itself is DUMB, and is set to its start up initialization parameters. NO MARGINS, no Porportional Print, and the printer is set for the usual 60 lines per page (most initialize that way).
Two special set-ups are provided. <LETTER HEAD Stationary> selection sets variable “lh” to be used by a word processor. The Daisy program that uses this group of menus uses var “lh” to roll up 12 lines before printing the Business Block of a letter. This lets one use pre-printed letterhead stationary. Then if a second page prints, it begins at the regular place on page 2 from the top of form. <COLUMN PRINT> selection results in a prompt “Start at Col 1 or Col 2?”, then “Start at Line #?”. This allows one to start column printing anywhere with either the left column or the right column.
When in Column Print Mode, the line length and left margin are set for fixed values. (50 chrs per line for Dot Matrix, or 52 for Daisy Wheel printers). You can change this in line number 2082. The TAB “tb” and Center of page “qq” may also be changed for your Condensed print line length. One should have CONDENSED PRINT set up either manually or via the Style Menu to use the Column Print mode. The PAGE END utility “pe.B6” is used by the Dasiy.B6 program for Switching columns in mid print stream. The text is printed beginning at the column selected, and continues printing alternate columns until all data has been printed. This works better with Cut Sheets, as you can re-insert the page at each page end to let the next column print on the same page.
This Panasonic dot matrix printer allows Paper Parking, and Cut Sheets to be fed into the printer from the front. This way, I can print alternate columns on the same page. Also, to be experimented with is a capability to “reverse direction line feed”. Perhaps I can develop a little routine for fan fold forms to “back up to the top of form” and continue column print on the same fan fold page? In discussing these functions, the Daisy software is used as an example of how the miriad of Formatting functions can be used by a software, using the array of FORMATTING VARIABLES that are established at this format menu. In a later issue of Update we will give the “LINE FORMATTER-PRINTER” which makes use of the printing variables that this “fomat.B6” program establishes. For now, you can see the results in these printed columns.
When <FUNCTION MENU> is the selection, a series of prompts appear to allow “Exceptional” Formats. These allow one to input different TAB and LINE LENGTH to achieve OFF-SET printing. The printing variables are normally set for text printing to be centered on page, or in pre-set columns. These prompts offer the choices of other formats. Also, a pair of prompts allow for condensing or expanding the increments of spacing between lines, to produce such printing as subscript or superscript, or Daisy Wheel characters that have reduced or expanded height. For example, one use that I make of these prompts is to use a print wheel having reduced height charcters that produce 76 lines of characters on a page, instead of a normal page of 56 lines.
The “fomat.B6” program allows for either Daisy Wheel or Dot Matrix printers that have different “maximum columns per line”. This differentiation is detected by variable “pr=1 for Dot Matrix” or “pr=2 for Daisy Wheel”. This also is a nicety of the Daisy.B6 software. This Format program is coordinated with the next program “stymn.B6” which provides for both Daisy Wheel and Dot Matrix Printer control.
The Format program works on “an existing print style” to allow a complete range of formats to be set up. But in one instance it does actually change a print style. That is when “Column Print” is elected. Then the printer is commanded to change to “Micron pitch”, which for some printers is called “Condensed”. This produces 120 Character line (maximum. Column print is automatically set for 50 character lines for this printer.
The Format Menu Group, “fomat.B6” — Donated to Public Domain by Update Magazine

Using MERGE/DELETE
THE MERGE CONCEPT: All of these programs are designed to be MERGED to any operating Program, and once used to be DELETED. A typical program line to MERGE the “fomat.B6” program is given in TS-2068 LKDOS Syntax: <2079 RANDOMIZE USR 100: MERGE “fomat.B6”>. Then anywhere within the host program, <GO TO 2079> will MERGE the fomat.B6 program and it will operate. A typical DELETE line (after the fomat.B6 program has been used) would be: <2093 DELETE 2080,2091: GO TO fm>. These two lines are exactly the ones used in the Daisy software to Merge in the Format Menu and when finished with it to delete it. Note the menu routing in line 2081 in which if <8 Format Menu is elected> the program is DELETED by line 2083. Since you only need such menus to Set Up Parameters Ocasionally, it shouldn’t be stuck in memory to sacrifice data capacity.
The PAGE END Program
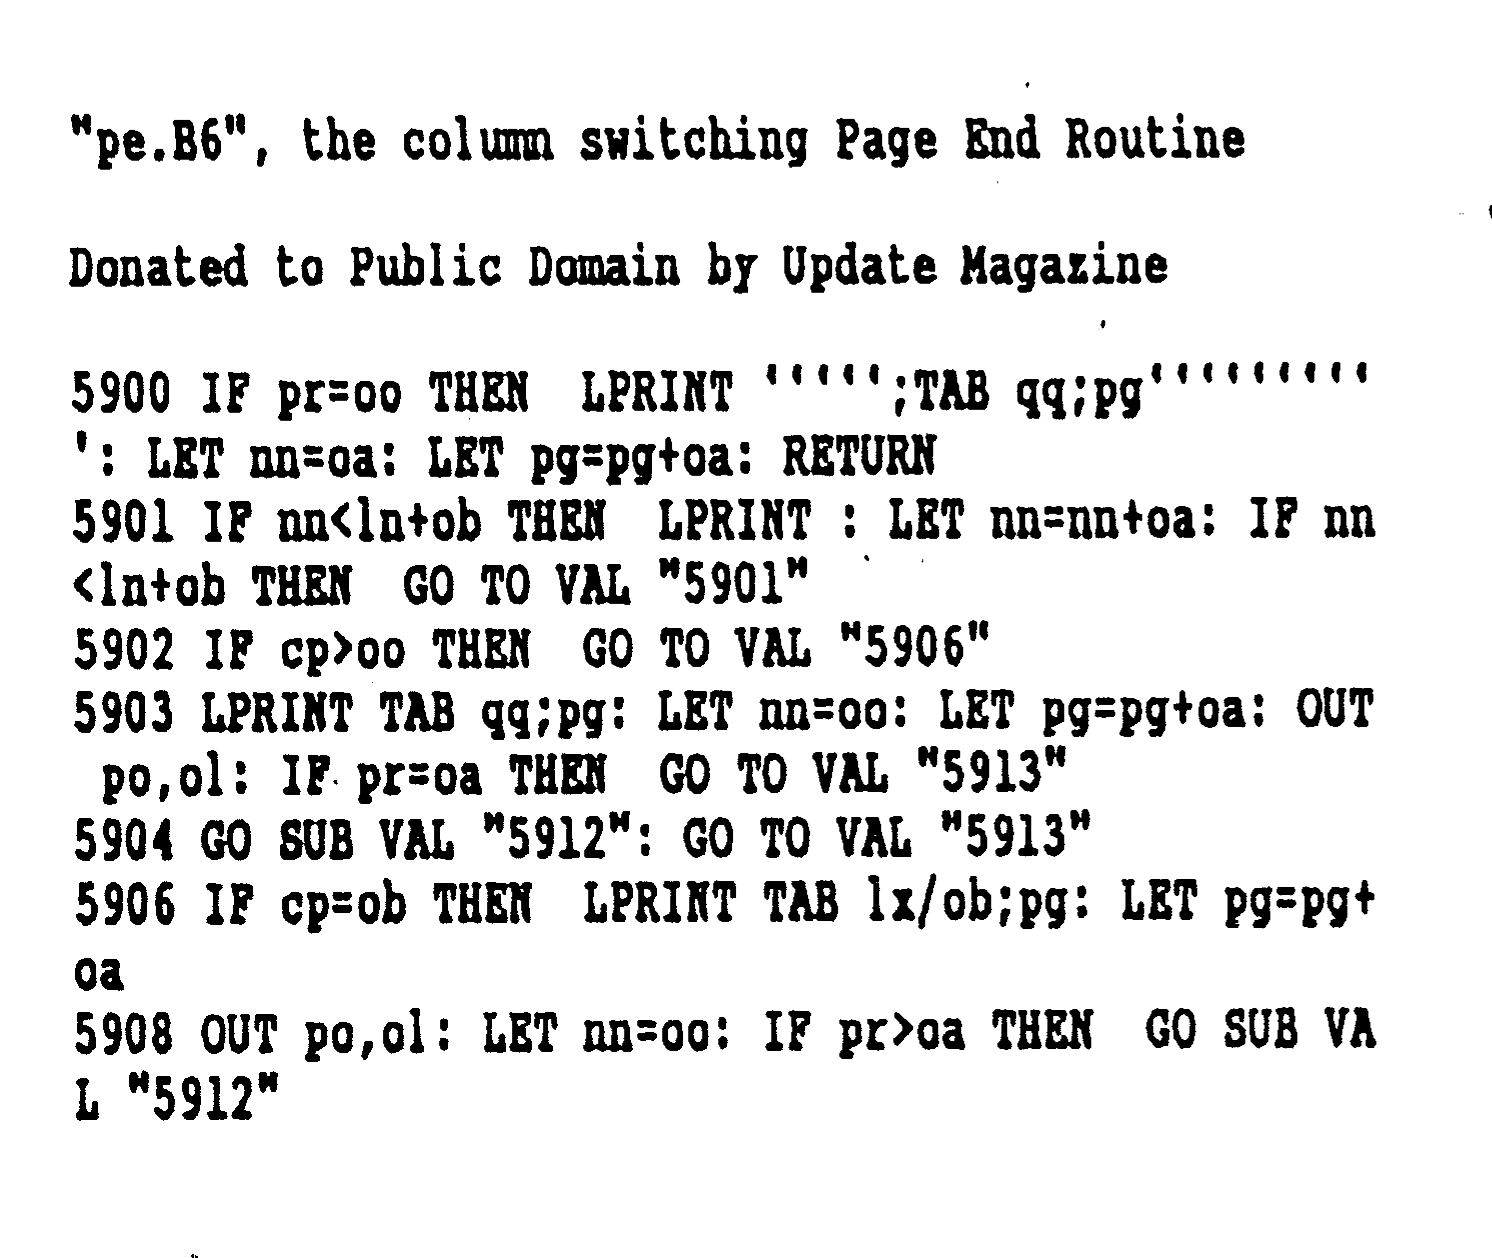
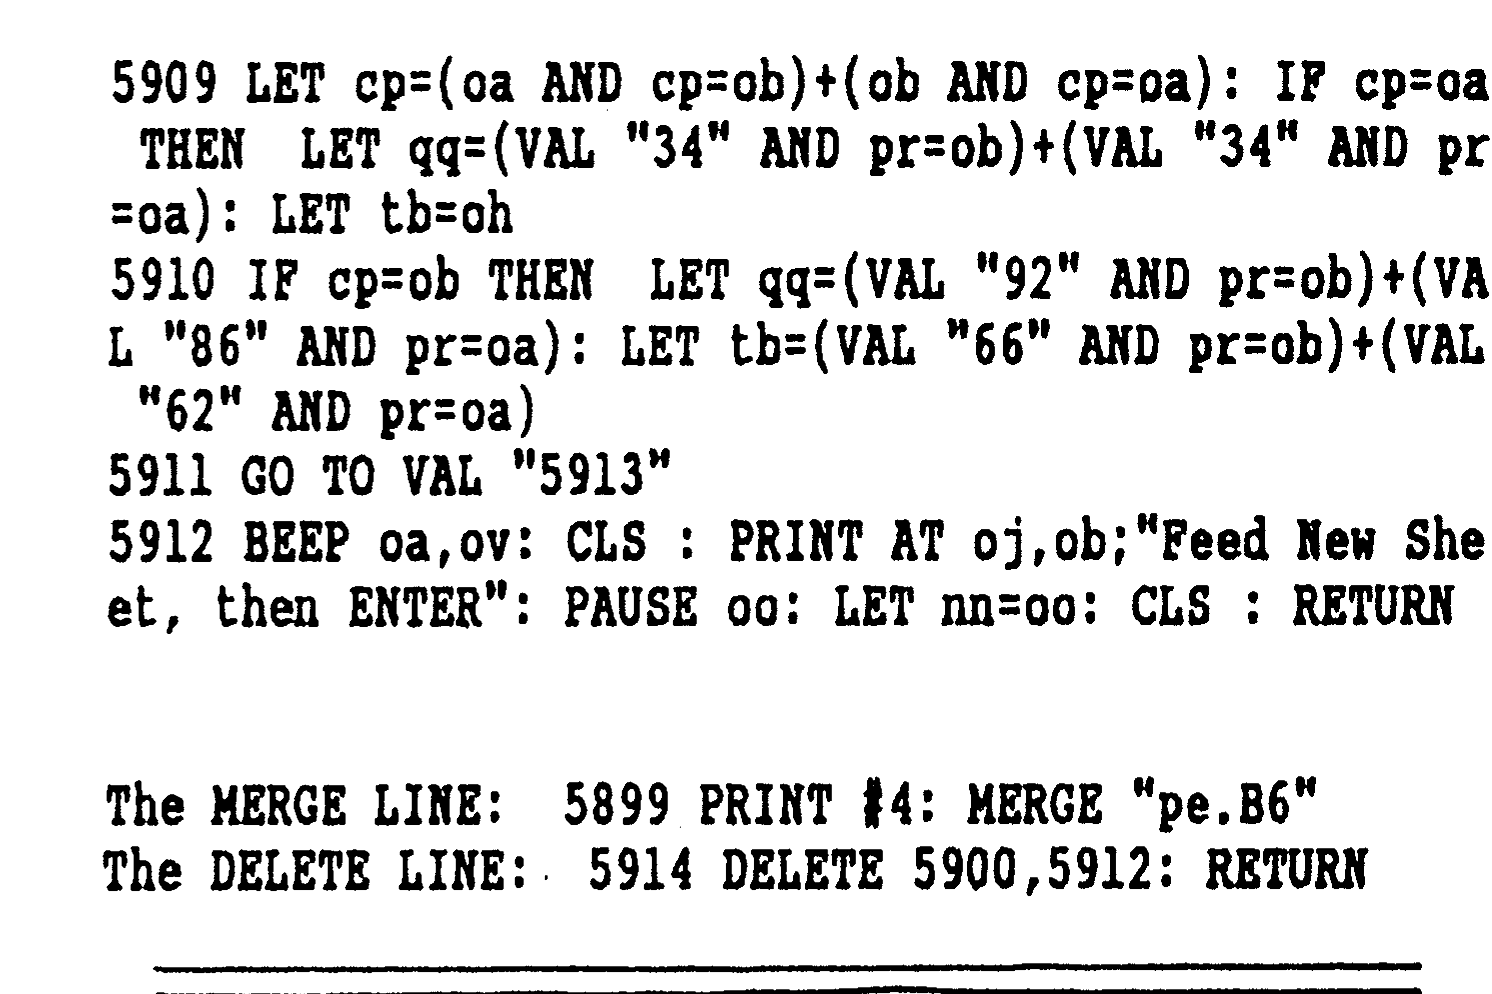
The PAGE END ROUTINE, “pe.B6”: This utility is given only because it relates to the “Column Print Mode” as set up by the Format Menu. This program ALSO is designed to work with either Daisy Wheel or Dot Matrix Printers. If using a Daisy Wheel, a prompt is given to “Service Printer”, which means, “Feed another Sheet, or Re-insert the Same Sheet”. This allows the alternate Column to be printed on the same page. For Dot Matrix printers (pr=1), the pause is not given between pages. The variable “cp” value of 1 or 2 is used to switch to the alternate column, then re-set the TAB “tb” for printing the next column. Again, the differences between print size between a Dot Matrix and a Daisy Wheel printer is accounted for in the calculations. Ordinary printing with “page width” columns bypasses the “column switcher” because “cp=0”.
“pe.B6”, the column switching Page End Routine — Donated to Public Domain by Update Magazine
The Style Menu Group
Select Print Style

<1> Pica  -80-     Com=137
<2> Elite -96-     Com=160
<3> Micron-120-    same

<4> Com  137/160  ]
                  ]
<5> Script        ] Set
<6> Expand Height ] First
<7> Italics       ]
<8> Underline     ]
<9> Format Menu

LX=80   TB=15
QQ=40   LL=50          8000
The program “stymn.B6” is the PRINT STYLE MENU and the PRINTER CONTROL PROGRAM. This program is also designed to be MERGED as needed, and when it is used, to be DELETED from memory. The program line to MERGE “stymn.B6” is given in TS-2068 LKDOS syntax to be emulated by other DOS Syntax. It is: <8000 RANDOMIZE USR 100: MERGE “stymn.B6”>. Then the DELETE LINE is: <8114 DELETE 8001,8082: GO TO fm>. “fm” is line #2070 of the Daisy software (is Function Menu).
“stymn.B6” first defines the “font variables” in line #8001. They are: “it=1 for Italics”, com=1 for Compressed print, exp=1 for EXPAND Hight, und=1 for Underline ON, scrp=1 for Script style ON. These are control variables that are set by the menu electives 4 through 8. They are not “Print Sizes”. The first three 1-3 electives are “Print Size or Style”. The menu is a “rotary” in that the selections 4 through 8 are used first to elect the fonts. None of these affect the actual width of the characters,except “4 Compress”, which has different results depending upon the basic print style in use. Once the fonts have been elected, and up to four may be combined, the last selection is the Print Style (1 through 3).
The selections 1-3 selects the Print Style. Line #8020 is reached only by selecting one or the three basic Print Styles (1-3). This line assigns the Print Style variable “ps=1 through 3”. Then lines 8021 through 8028 are executed. Twin routines are for either Dot Matrix or Daisy Wheel printers. These are differentiated by the variable “pr=1 for Dot Matrix, or pr=2 for Daisy Wheel”. Other operating vars are “ll=Line Length, qq=page center, tb=TAB”. We enter the program at line 8001 with these printing vars having been in use or set by the software initialization. Then at the last part of line #8002, these printing vars are “set aside to be used for calculations” when the style is changed at menu.
These vars values are set aside (in line #8002) by asigning their “past values” to “px=ps, xo=lx, and lo=ll. Then px and ps= the previous print style 1-3, xo and lx= the previous Max Printer line for the past print style in use. “lo and ll”= the past Line Length in use. The calculations beginning at line 8021 computes a “MATCHING Set of Parameters” so that you can elect a MATCHING Line length for a new print style selected at menu. The Matching Line length is presented on screen with a prompt “Input Line Length”. Then computations are done to FORMAT THAT Line Length to be centered on page. A new TAB “tb” and Page Center “qq” is calculated and assigned. Now we have Line Length “ll”, page center “qq”, and TAB “tb” assigned for the newly selected print style.
At this time, if Daisy Wheel printer is in use (pr=2), the Style Menu is re-called, where an escape is provided back to the FORMAT Menu. The Daisy Wheel printer requires no further commanding, because it has a fixed print wheel. Why then do we even use the Style menu for a Daisy Wheel? Well, it is quick and easy to change print wheels, and this program will match up the printing with a new print wheel’s style of print.
The Style Menu Group, “stymn.B6” — Donated to Public Domain by Update Magazine


Dot Matrix Printer Control
The DOT MATRIX PRINTER CONTROL Section begins at line #8034. After all of the calculations has been done and the Format for the New Style of print has been set up, an obscure command in line #8024 is “GOSUB mt”, followed by “GOSUB 8050”. “Line mt” is 8031. We will now SET THE PRINTER to the newly selected style and fonts. This section deserves the most explanation because it is where most users will have to work on to Match the Printer Control Commands to their specific printer. It really is quite SIMPLE, and YOU CAN DO IT!
THE PRINTER CONTROL GROUP FOR A PANASONIC KX-P1124 24 pin Dot Matrix Printer: We begin at LINE #8031 which rejects anything BUT a Dot Matrix Printer. Then the Dot Matrix Control section begins at line #8034. The very first task to perform is to RESET the Printer to its TURN ON STATUS- That is EXCEPT for the TOP OF FORM setting. We do this by installing the proper “CANCEL COMMANDS” for every special Font and Style that we use. This cancels the printer back to its “Initialization Status upon Turn ON”, — EXCEPT for the TOP OF FORM setting. The total number of these CANCEL commands depend upon the total number of the Special Fonts and Print Styles that the program is to use. If you dont USE a Printer Function, then it isn’t necessary to CANCEL that function. The three Print Styles (for this printer) does not need to be cancelled.
QL Users take note: The protocol for sending control codes to a printer is different. The PRINCIPLE though is the same. The printer must be hit with a CONTROL CODE to respond and change an internal setting. We do that with the TS-2068 (Aerco and Oliger Interface) by <OUT 127,code>. Some other TS-2068 interfaces use <LPRINT CHR$ code>. A printer, such as the KXP-1124 may be “an EPSON Compatable” printer, but that does not mean that its required Command Codes are the same as an Epson Printer. Most printers require different Control Codes to do similiar or identical internal changes. There are three methods for sending Control Codes to the Printer. QL users must use PRINT CHR$ number to the Serial Port. TS-2068 users of Aerco and Oliger Printer code sends these commands via <OUT 127,number>.
Other TS-2068 users of TASMAN or other prcode may need to use LPRINT CHR$ (number). If you use TASMAN or another interface than Aerco or Oliger, then consult your Interface manual for the proper way to send command characters to the printer. We will use the method for the TS-2068 Aerco or Oliger interfaces. The next is where your PRINTER MANUAL is the KEY. You must decide WHICH of the special fonts and styles that you want to have done automatically with the menu control, then go about using the printer manual to dig out both the “SET and CANCEL” comands. You can use the rationale given herein and corrolate with your printer manual to develop the programming changes in these line numbers “that will command your printer” to accomplish the style changes. But the following NEEDS are Common to all.
Commanding the Printer
The first part of this Printer Control Section is to Set the Printer Back to its Turn On STATE, without resetting the TOP of FORM. Then printing can resume with a new style of print and the software can retain PAGE CONTROL. You can see by the Menu Illustration the styles and fonts that “I selected” for my Printer. Now the first task to do is to CANCEL all of these settings. At Line 8034 we start by <GO SUB BU> which throws you for a loop, eh? Well, “bu is line #8080”, and lets look at that.
The purpose of line #8080 is to check to see if the PRINTER IS BUSY. The printer goes through a routine of “turning itself off or on” to do internal changes. ONE Control Command sent from the keyboard is acted upon by the printer faster than one can type and send the next command. But, in software lines, the computer is sending control codes faster than the printer can react to. Therefore a LOOP is needed to check the Printer’s status before sending the NEXT control command. The TS-2068 uses the IN command through “Port 127”. Most TS-2068’s will return “253” if the printer is BUSY or OFF LINE.
To check yours, first turn ON your Printer, then INITIALIZE your PRINTER CODE. Then leave your printer ON, but switch it OFF LINE. Then type: <PRINT IN 127 ENTER>. “IN” is the token below the I Key. If you get some other number than 253, then use that number instead of 253 in line 8080. Now we can go back to line #8034 to continue to CANCEL all printer functions that we will use in the “stymn.B6” program. The programming is used <OUT PO,18>. The variable “po=127”, so that means <OUT 127,18>. This is to CANCEL the Compressed Mode of print. Between each OUT command, <GO SUB BU> is used to loop line 8080 until the printer is READY. So, we wont discuss the <GO SUB BU> any more. Next in line #8034 the grouped command <27,119,0> is sent to the printer in similiar fashion with <OUT PO>. This Cancels the “Double High character” Mode.
Next <27,53> is sent to CANCEL ITALICS Mode. Then <27,45,0> is sent to CANCEL UNDERLINE MODE. Now this is all of the special settings that is used in this program that are not “self cancelling when an alternate selection is made”. If you use more in your programming then you must include CANCEL COMMANDS in this line of programming. AND- your printer may require all or some more of the print style settings to be CANCELLED before another can be set. An Okidata Printer, for example, requires the existing print style to be CANCELLED before another style can be set.
Line #8036 begins the “PRINTER SET Commands”. The first group, <27,120,0> sets LETTER QUALITY Mode. Then <27,107,num> sets one of two font styles (Bold if in Pica or Elite) or COURIER if in Micron Pitch. Line 8038-8044 sets the print style selected at menu. Then the programming RETURNS to LINE 8024 where another GOSUB is to Line 8050. At line 8050-8056 the special fonts are set, compressed, double height, Italics, or Script. Then RETURN goes to line #8026 where the Matching Line length is calculated, and tab and page center is set. The Style Menu is again presented where it is appropriate to select a return to the Format Menu, as the work is done. On the way back to the Style Menu, line #8114 DELETES programming from memory. The Format Menu and the Style Menu work together as a suite for both Format and Printer Control. _BJ-
Summary
The use of MERGE and DELETE together can broaden your programming horizons. By the use of these powerful functions, you can bring utilities aboard a running program, use them and then discard them. This lets your software have the most data capacity. Printer Control programming is needed only once or twice while running a program. Why clutter up memory by keeping un-needed programs on board? Pardon me for showing off with my new printer! This entire article was printed non-stop with this printer and the Daisy.B6 software. I hope that this discussion of Printers, their control, and Formatting helps. If you get anything from this I hope that it is “Dont be afraid of a new printer” and “You can make it work”. _BJ-