
from the pages of L.I.S.T. Newsletter
November seemed to me as though it was Christmas. After a long wait, I received a Di-Ren keyboard interface for AT 101/102 keys keyboard. The interface is the smallest of QL keyboard interfaces and it operates from a PIC1C57 micro chip, which is fitted to the underside of the PC board. All 12 function keys are operable. There are two header jumpers on the side of the interface and are labeled C1 and C2. respectively. C1 doesn’t have to be changed, as it controls an electronic keyboard lock. The C2 jumper sets the keyboard for either a 101 or 102 keyboard; pins 1 and 2 are jumpered for a 101 key keyboard and pins 2 and 3 are for a 102 key keyboard.
You have to remove the 8049 chip from its’ socket and then the interface plugs into the IC 8049 socket and the IC plugs into the 40 pin IC socket on the interface. The keyboard connector for the fitting of a keyboard is approximately 10 inches in length with a female 5 pin DIN connector. I received my AST 101 keyboard several days after the interface arrived. I was astonished when I saw the size of the keyboard; it was small! The keyboard was a charcoal color with 12 function keys across the top of the keyboard. Every key is operational. I still can’t get used to the function keys at the top of the keyboard since I have been using 84 key keyboards with ten function keys at the left-hand side of the keyboard. You can order directly from the manufacturer, Di-Ren, 59 William Street, Walsall, WS4 2AX, England. You can most probably purchase this interface from Frank Davis of FWD Computing.
Several days after I had received the Di-Ren keyboard interface the Super Hermes interface arrived. Reading through the manual, I was quite surprised that the keyboard interface required LOADing support of a file, IPCEXTS_bin. F1 and F2 from an AT keyboard would function and look for this file in the BOOT, so you must amend your BOOT with either a=RESPR(5200): LBYTES flp1_IPCEXTS_bin,a: CALL a or if you have TK2, just LRESPR flp1_IPCEXTS_bin. I added the loading code to my BOOT, ran it, and the keyboard was operable.
I really have not had the chance to get into the ‘GUTS’ of Super Hermes as of this time as I am reviewing the latest version of Disk Mate 5 for IQLR. The program operates under the Pointer Environment and I have little experience using the PE with the exception of QRAM. Bob Dyl didn’t provide much time for me to complete the assignment by December 10th ’95. However, it is a most interesting disk utility program and the manual is better than most software manuals for the QL.
Last month I had discussed making connectors for a mechanical keyboard. I remember one day I had thoughts about making another mechanical keyboard. I chose to use my last reed switch keyboard for the project and then a thought had occurred that just maybe I could use the original QL keyboard keys for this project. This could save me lots of work! The metal plate on the bottom of the QL keyboard was removed, as was the keyboard membrane and it was then that I realized that each key bottom was secured with pressed on snap rings. After a while all of the rings were removed and the key tops were loose. The QL keyboard was placed on top of the mechanical keyboard and all of the QL keys matched the reed switch key posts. There would be six more reed switches added to this arrangement. Where the TAB key was situated on the QL keyboard, there wasn’t a reed switch to match, so I drilled several holes in the reed switch pc board, installed a reed switch and epoxyed two small pads of copper for the reed switch to be soldered onto. After the epoxy cured, two #65 holes were drilled into the copper pads and the reed switch was soldered to the pads.
The remaining 5 keys which required placement were secured to a small PC board I made. These keys were the 5 function keys and the PC board was attached to the main keyboard with small brackets. The next thing to be accomplished was to wire up each individual key according to the keyboard matrix, which will appear on the next page of this article.
QL KEYBOARD KEY CONNECTIONS
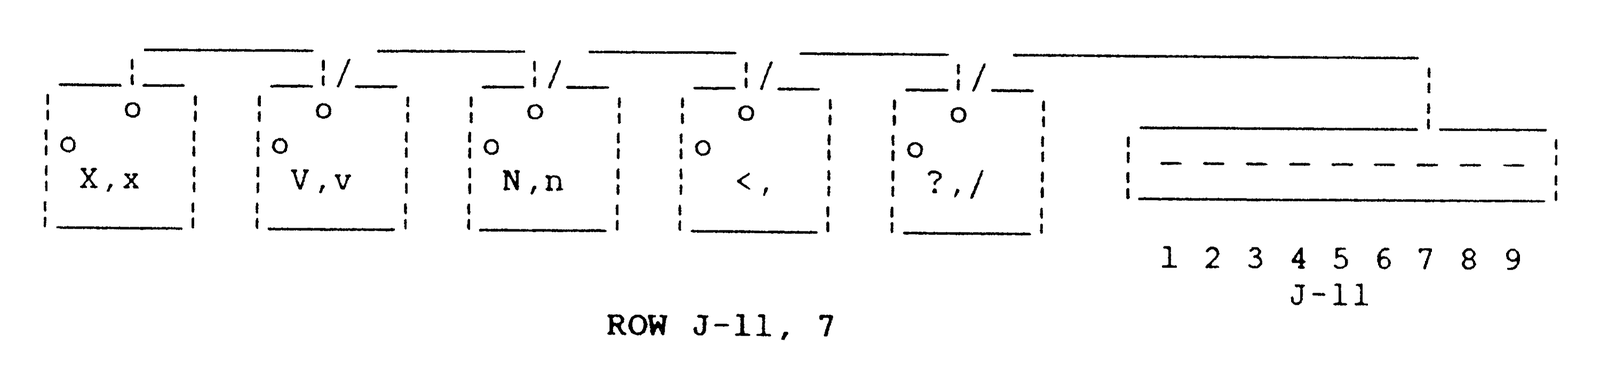
The following table are connections to the J-11 keyboard connector, pin 7, on the QL Mother board – 9 pin female – columns 1 thru 9.
J-11, 1 - F1, F2, F3, F4, F5, 4, 5, 7             8 keys
J-11, 2 - 2, Q, E, T, 6, U, 8, 0                  8 keys
J-11, 3 - W, TAB, R, Y, I, O, 9 -(minus)          8 keys
J-11, 4 - 3, 1, A, D, H, J, L, P                  8 keys
J-11, 5 - CAPSLOCK, S, F, G, K, :, [, =           8 keys
J-11, 6 - Z, C, B, M, >, ", ], £                  8 keys
J-11, 7 - X, V, N, <, ?                           5 keys
J-11, 8 - LFT ARROW, ESC, RT ARROW, SPACE,
          UP ARROW, DOWN ARROW, ENTER,           8 keys
J-11, 9 - CTRL, SHIFT (2), ALT                    3 keys
To use the above table, connect wires from one key switch terminal to the next key switch terminal until each of the ‘J-11’ matrix ‘column’ rows (J-11, 7 for example) are connected together).
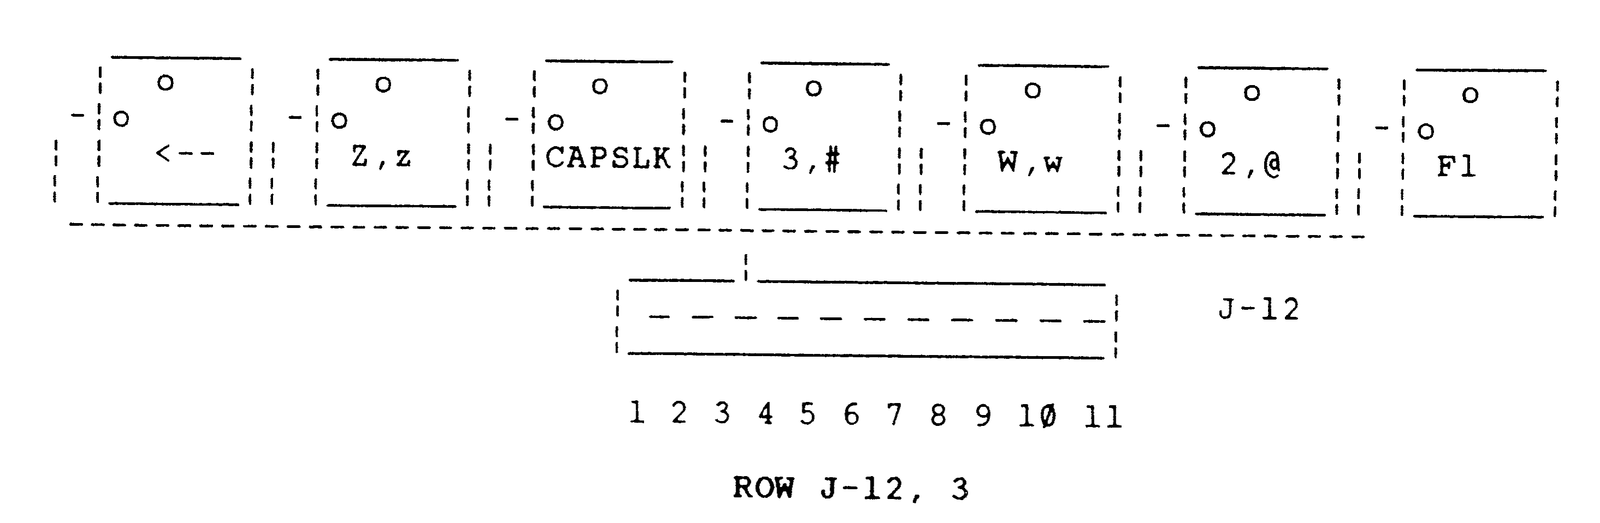
The following table are connections to the J-12 keyboard connector, pin 3, on the QL Mother board – 11 pin female – rows 1 thru 12.
J-12, 1 - CTRL                                    1 key
J-12, 2 - SHIFT (2)                               2 keys
J-12, 3 - RT ARROW, Z, CAPSLOCK, 3,
          W, 2, F1                                7 keys
J-12, 4 - ESC, X, C, S, 1, TAB, Q, F2             8 keys
J-12, 5 - LEFT ARROW, V, B, F, A, R, E, F3        8 keys
J-12, 6 - SPACE, N, M, G, D, Y, T, 4              8 keys
J-12, 7 - UP ARROW, >, K, H, I, 5, 6              7 keys
J-12, 8 - DN ARROW, <, ", :, O, U, 7              8 keys
J-12, 9 - ENTER, ], [, L, 8, 9, F4                7 keys
J-12, 10- , ?, £ , =, P, -, Q, F5                8 keys
J-12, 11- ALT                                     1 key
To use the above table, connect wires from one key switch terminal to the next key switch terminal until each of the ‘J-12’ matrix rows, J-12, 3 for example) are connected together).
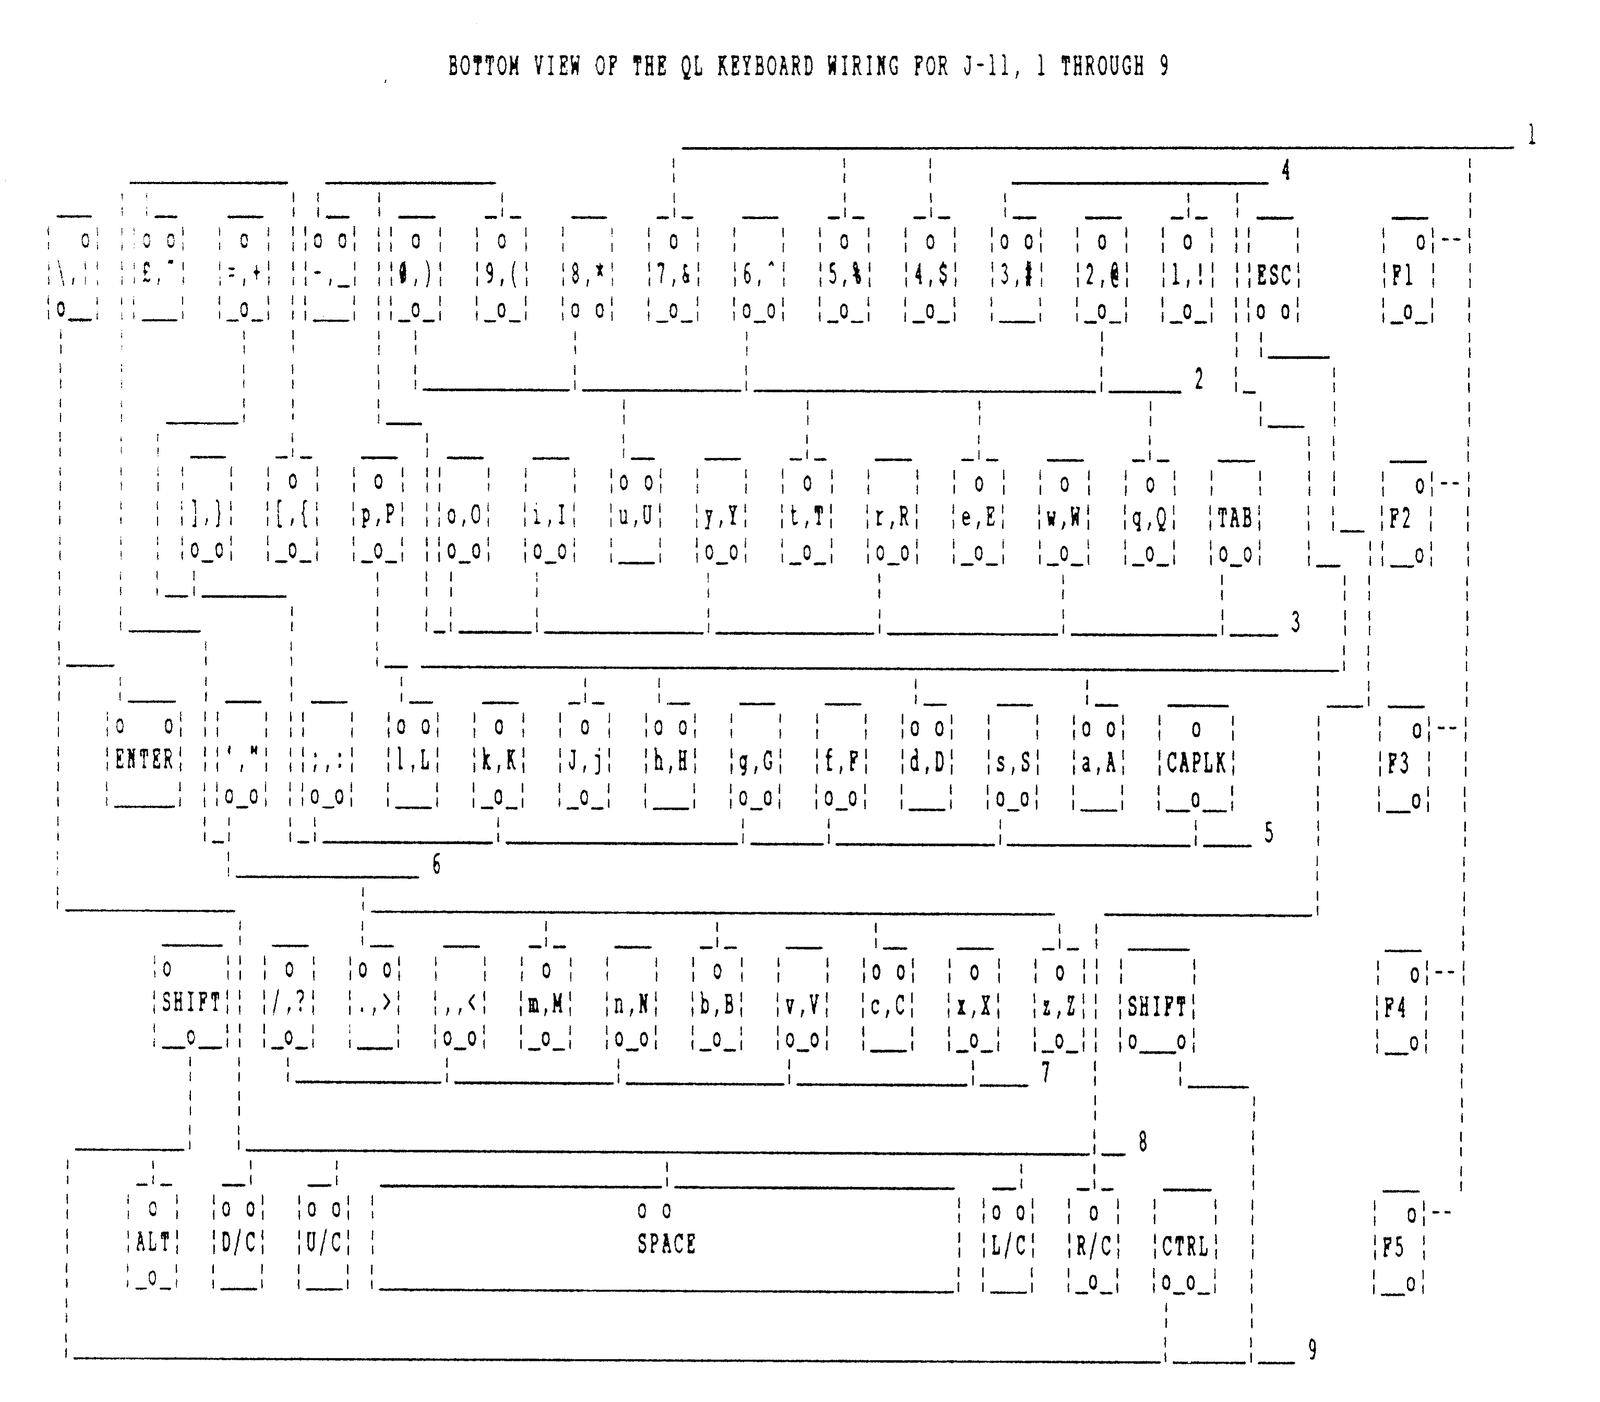
J-11, 1 - F1, F2, F3, F4, F5, 4, 5, 7             8 keys
J-11, 2 - 2, Q, E, T, 6, U, 8, 0                  8 keys
J-11, 3 - W, TAB, R, Y, I, O, 9 -(minus)          8 keys
J-11, 4 - 3, 1, A, D, H, J, L, P                  8 keys
J-11, 5 - CAPSLOCK, S, F, G, K, :, [, =           8 keys
J-11, 6 - Z, C, B, M, >, ", ], £                  8 keys
J-11, 7 - X, V, N, <, ?                           5 keys
J-11, 8 - LFT ARROW, ESC, RT ARROW, SPACE,
          UP ARROW, DOWN ARROW, ENTER,           8 keys
J-11, 9 - CTRL, SHIFT (2), ALT                    3 keys
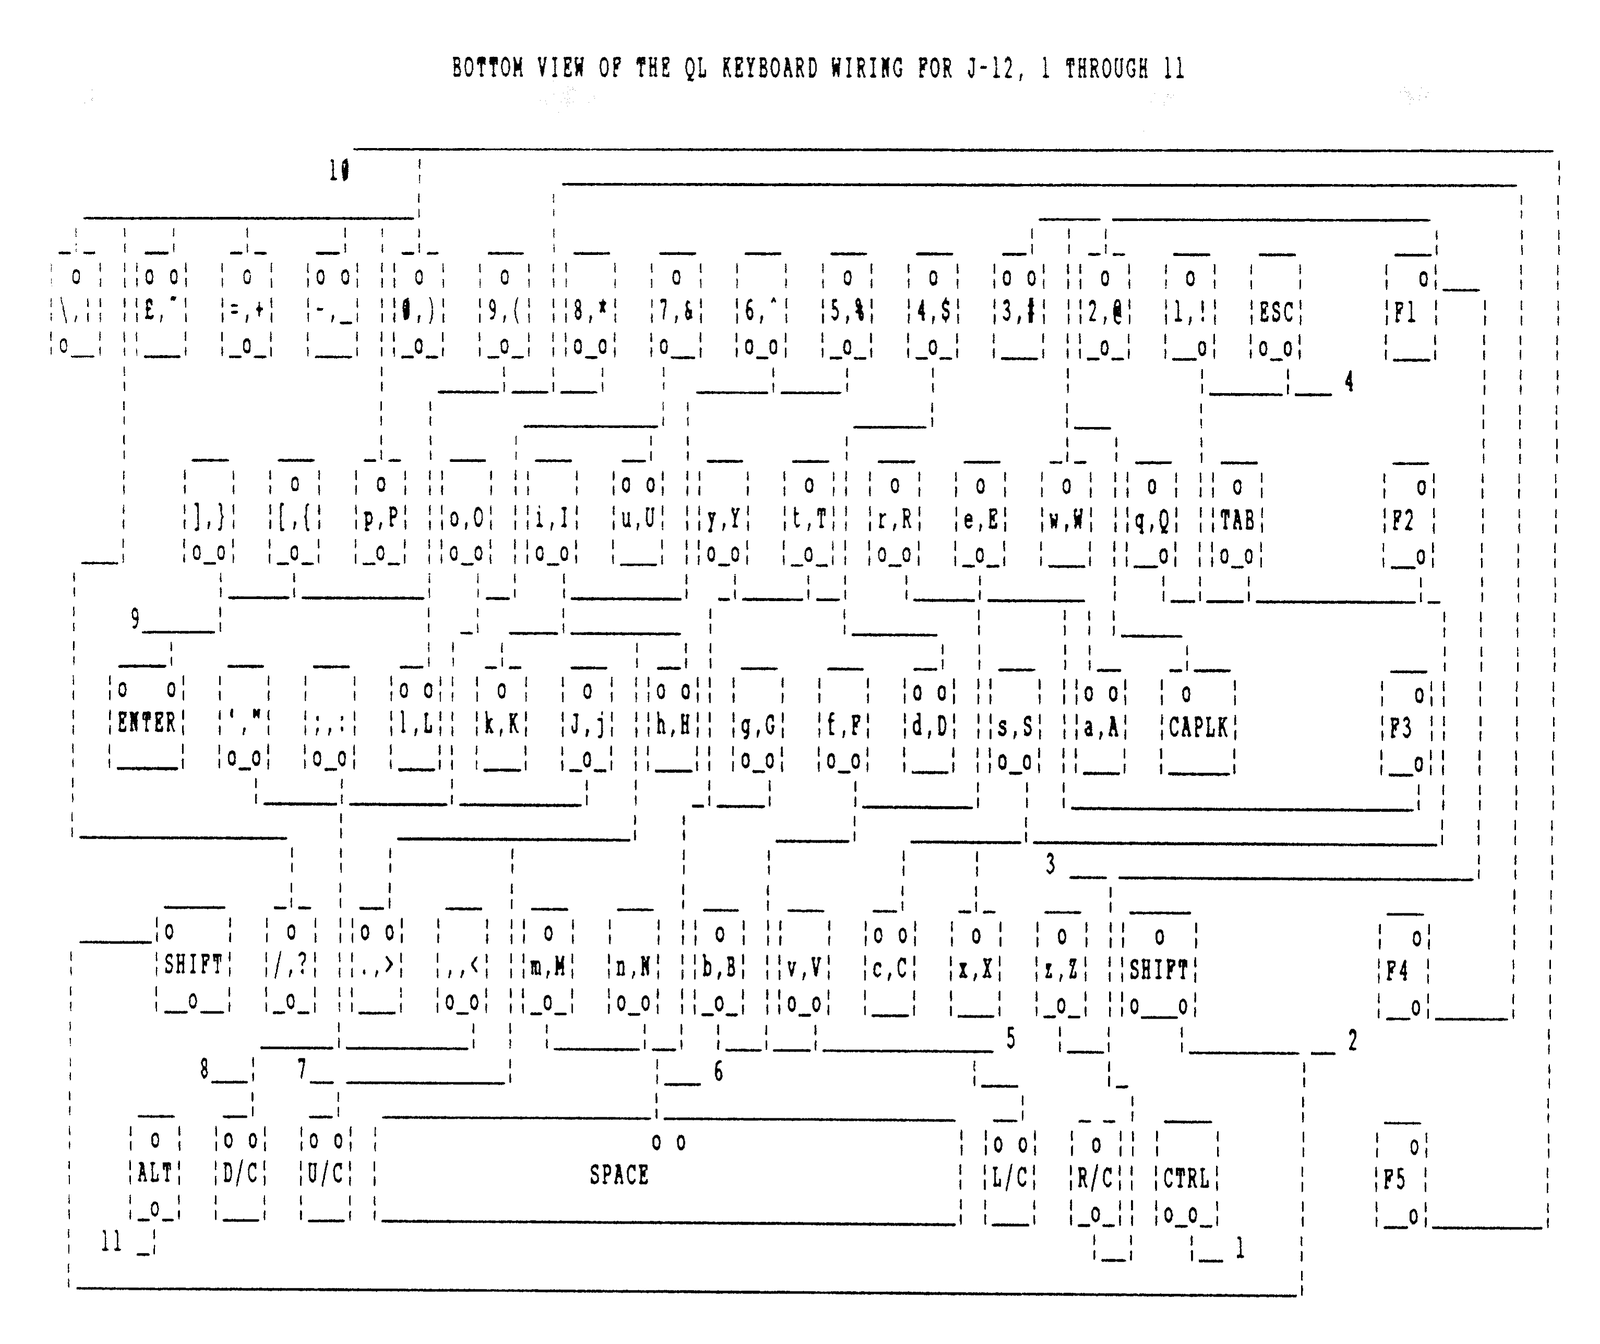
J-12, 1 - CTRL                                    1 key
J-12, 2 - SHIFT (2)                               2 keys
J-12, 3 - LEFT ARROW, Z, CAPSLOCK, 3,
          W, 2, F1                                7 keys
J-12, 4 - ESC, X, C, S, 1, TAB, Q, F2             8 keys
J-12, 5 - RT ARROW, V, B, F, A, R, E, F3          8 keys
J-12, 6 - SPACE, N, M, G, D, Y, T, 4              8 keys
J-12, 7 - UP ARROW, >, K, H, I, 5, 6              7 keys
J-12, 8 - DN ARROW, <, ", :, O, U, 7              8 keys
J-12, 9 - ENTER, ], [, L, 8, 9, F4                7 keys
J-12, 10- , ?, £ , =, P, -, Q, F5                8 keys
J-12, 11- ALT                                     1 key