
If you are experiencing LOADing problems with commercial or tapes from our club library, in all probability your “Azimuth” is not correct. (Fig.1). This simply means that the tape is not running at right angles to the tape head. The following tests and corrections should be made to avoid frustration both to yourself and our librarian. The best time is when you first obtain a new or different tape recorder in order to avoid re-SAVEing all your programs after your recorder is set perfectly.
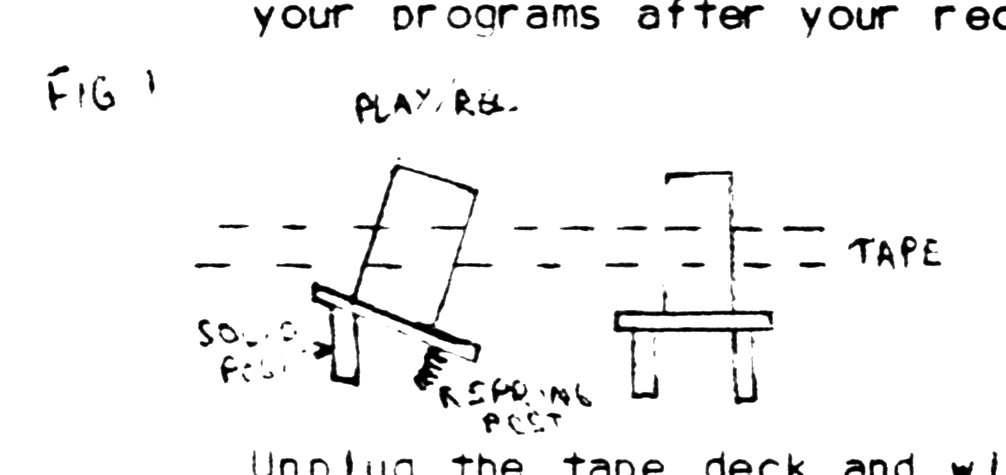
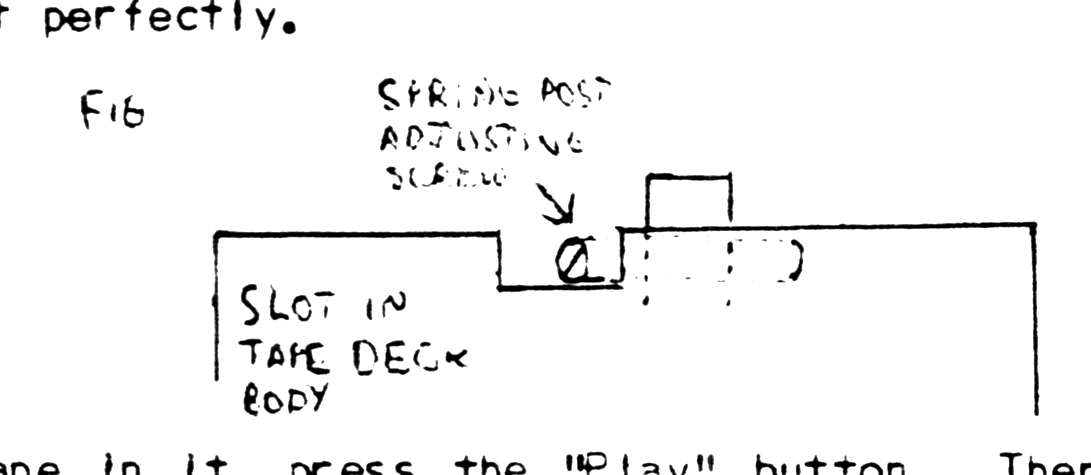
Unplug the tape deck and without any tape in it, press the “Play” button. There are two tape heads that will move forward (your erase and Record/Playback heads). On closer inspection, you will see two solid supporting posts under one head. This is the Erase Head. Under the other head you will see one solid supporting post and one spring-type post. This is the head you will be adjusting. Now, take note that above this spring post is a slotted screw. This is where you will make your adjustments for perfect LOADing. Above this screw, there is usually a slot in the body of the recorder in order to fit a small screw driver so adjustments can be made with the tape running. (Fig.2).
Press the “Stop” button so the tape heads move back to their resting or “not-playing” position. Plug the tape recorder in and use either a commercial ZX-81/Timex 1000 computer tape or one from the library. (The tape recorder should not be hooked up to your computer at this time). Turn the volume down so you can tolerate the whining noise and can clearly hear the differences in pitch and clarity of the tape when you make your adjustments.
Now, slowly turn the screw first in one direction then the other and you will immediately hear the sound becoming more BASS or deeper in tone. Turn the screw head back until you can hear the sound at its highest treble or clearest pitch. This is the ideal setting and means you have corrected the “Azimuth” problem. The screw should not have turned anymore than 1/2 turn from its’ original position. Remember, DO NOT USE ONE OF YOUR TAPES for this test.
Now that you have your tape deck all tuned up correctly, you may not be able to load all your programs since they were SAVEd when the heads were mis-aligned. There are two alternatives: 1. use another tape deck that has tape recorder (before you align the head). 2. a slower but effective means using your tape deck alone:-
To use your tape deck alone you will have to constantly adjust the “Azimuth” adjusting screw by this method: keep that library tape or commercial tape handy. Put your tape back into the player and adjust the screw until you hear the highest treble. Adjust the volume to your normal LOAD level, plug the tape into the computer and LOAD the program. Remove your tape and place the Library or Commercial tape back in and with the tape recorder unplugged from the computer, adjust the screw until you again hear the highest treble. SAVE your program as per normal volume etc.
This is the only solution to your problem, but once completed, your programs should LOAD properly. If you are lucky, you have only a few programs to LOAD & SAVE by this method, otherwise like me, a lot of hours will be spent in correcting all your previous SAVEd programs.