
Having recently acquired a full-width printer, I can now do these items for the newsletter via Tasword. So as a starter, I’ll pass along some of the lessons I have learned that may be value to others converting to a big printer.
First of all, I have a Smith-Corona Fastext 80 which is coupled to the computer via Peter Hacksel‘s printer interface and software. The latter is generally acceptable in that it works as he says it should. But the way it performs the TAB function is poor and generally useless with my programs that rely on TABbing for good displays. Also, my printer is not Epson compatible and therefore his programs for lo-res and hi-res screen copying will not work. Lo-res screen copying can be accomplished using a routine that I show below and which Charlie Urban provided.
When it came to adapting Tasword to this printer, I found that following the manual and some notes by George Chambers made it relatively easy and I soon had the graphics keys adapted to the SCM printer.
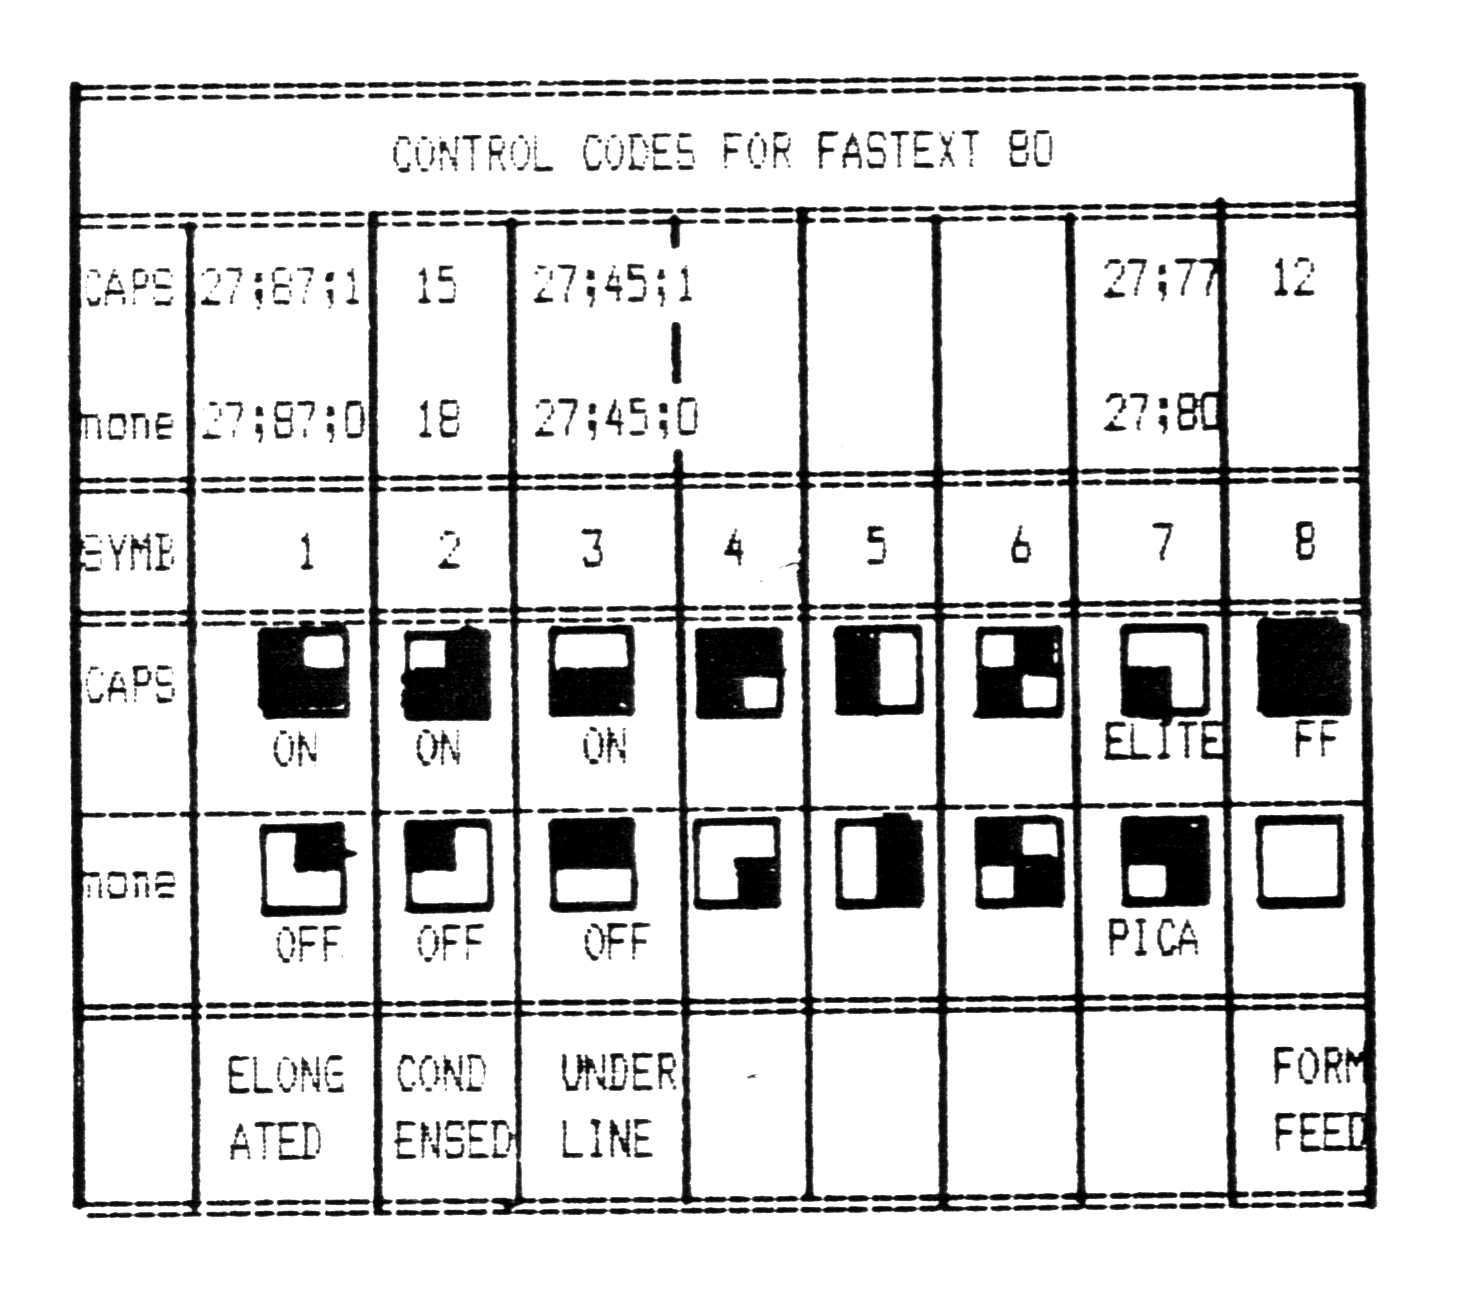
So, I have Elongated on graphics key 1; Condensed on key 2; Underline on key 3; keys 4, 5 and 6 are unused for now; Elite and Pica (normal) are on key 7; and Form Feed is on key 8 (caps).
These graphics characters have to be embedded into the text as you type it in to Tasword. I found it handy to have a crib sheet so I drew one up and here it is. The first two lines show the actual codes used with each graphic character. I keep mine on a cork board just ahead of me as I use Tasword.
PAGINATION
Paging some long text gives a better appearance and I experimented with ensuring a top and bottom margin on each page.
I found it relatively easy to paginate by using a crib sheet which is an alternative to using the form feed graphic character. Here is my crib sheet:
PAGINATION CRIB SHEET

PAGE        START LINE    END LINE
====        ==========    ========
1                    1          60
2                   61         120
3                  121         180
4                  181         240
5                  241         300
This works for my paper which is 28 cm or 11 inches long (ie, between perforations.)
I start all printing with a perforation line just even with the top of the print head. This usually means leaving in the previous page and tearing it off later.
Using form feed embedded in the text will cause the paper to feed out automatically up to the next perforation line according to the predetermined page length, which just happened to be right for my page length. However, it is possible to set the page length to another value but the printer defaults to 66 lines on power up or reset.
One thing I learned early in the game was that when calling for elongated printing, it is important that the print head be at the left margin at the start of printing. Otherwise, the print head will move to the left and cause a crash (on the paper and in Tasword). This is corrected by powering down the printer and then powering up again. The print head (carriage) will be at the left margin and the printing should go according to plan.
Here is the short routine to print the screen display in lo-res. It will not print graphics,though.
9940 CLS: PRINT AT 6,2;"LPRINT loaded":REM Hacksel's
9941 INK 9
9942 PRINT AT 8,2; "USE POKE 26704,254 for LPRINT "
9943 PRINT AT 10,2;"USE 'GO TO 9950' & 'COPY' for SCREEN COPY"
9944 PRINT AT 14,2;"Press CSST-BREAK to continue"
9950 PAUSE 0: IF INKEY$="255" THEN GO TO 9960
9955 IF INKEY$="254" THEN GO TO 9980
9957 IF INKEY$<"254" THEN GO TO 9950
9960 POKE 26704,254: POKE 65535,0
9965 FOR f=0 TO 21: FOR g=0 TO 31
9970 LPRINT SCREEN$ (f,g);
9975 NEXT g: LPRINT:  NEXT f
9980 STOP
Bob Mitchell 870702
Note: Type-in program listings on this website use ZMAKEBAS notation for graphics characters.