
Hi, my name is Kevin — and I’m addicted to the T/S 1000. The only problem is that there aren’t enough challenging articles on the TS to keep me high. That’s why I offered to write up some articles for you and the great guys at TS Horizons. It will not only give me something worthwhile to do, but I trust it may make your TS habit much more fulfilling. This is the first article, and you’ll be seeing more in issues to come…
Don’t let the sight of “Machine Code” in the title scare you off. I am deliberately writing an article that any programmer can use. Most of what I write will be in the form of Machine Code programs that enhance Timex BASIC programming. You don’t have to know anything about Machine Language.
This month’s little gem is a DATA-READ program. The following routine is very short, but it gives you a very nice simulation of the DATA-READ commands that you find on other computers. Here are some of the specs:
1) It is 200 bytes long. 2K computers will be able to use it with memory to spare.
2) The routine is 100% relocatable, or may be stored anywhere in memory It’s ideal for Non-Volatile memory.
3) Timex format error messages help you use correct syntax.
Let’s get down to business…
A machine code program is really only a list of numbers which represent instructions that a microprocessor can understand. Somehow we have to get this list of numbers into the computer’s memory. There are many different ways of doing this, and if you have a favorite loader program then feel free to use it. Even so, I encourage you to try out the loader I’ve included here. It allows you to enter blocks of code to any given memory location. Here are a few reasons why I think it’s a very practical loader: 1) It is short and simple, 2) It has a simple error correcting feature, and 3) It gives a visual picture of the contents of memory. While entering a machine code program, it is imperative that the numbers are entered with no errors. That’s what makes the last two reasons so important.
It’s time to enter the loader program into your computer. If you use mine, then I suggest saving a copy on tape since I will use the same method in succeeding articles. The listing follows:
  10 PRINT "ENTER START ADDRESS"
  20 INPUT A
  30 CLS
  40 FOR B=A TO A+175
  50 PRINT (STR$ PEEK B+"   ")( TO 4);
  60 NEXT B
  80 LET B=0
  90 LET N=999
 100 LET M=9999
 110 LET Y=INT (B/8)
 120 LET X=(B-Y*8)*4
 130 PRINT AT Y,X;"???"
 140 INPUT C
 150 IF C<256 THEN POKE A+B,C
 160 PRINT AT Y,X;(STR$ PEEK (A+B)+"   ")( TO 4)
 170 IF C=N AND B>0 THEN LET B=B-1
 180 IF C<>N AND B<175 THEN LET B=B+1
 190 GOTO 110
With the loader routine entered, you now have the means to store the numbers, but we need to decide where to store them. The easiest place to store machine code, barring non-volatile memory, is in a REM statement. That’s the way I’ll do it here. Add this line:
9999 REM 12345678901234567890123456789012345678901234567890123456789012345678901234567890123456789012345678901234567890123456789012345678901234567890123456789012345678901234567890123456789012345678901234567890123456All that really matters is that the line contains exactly 206 characters after the REM. After entering the REM statement, you are ready to RUN the program. I suggest you use the FAST mode.
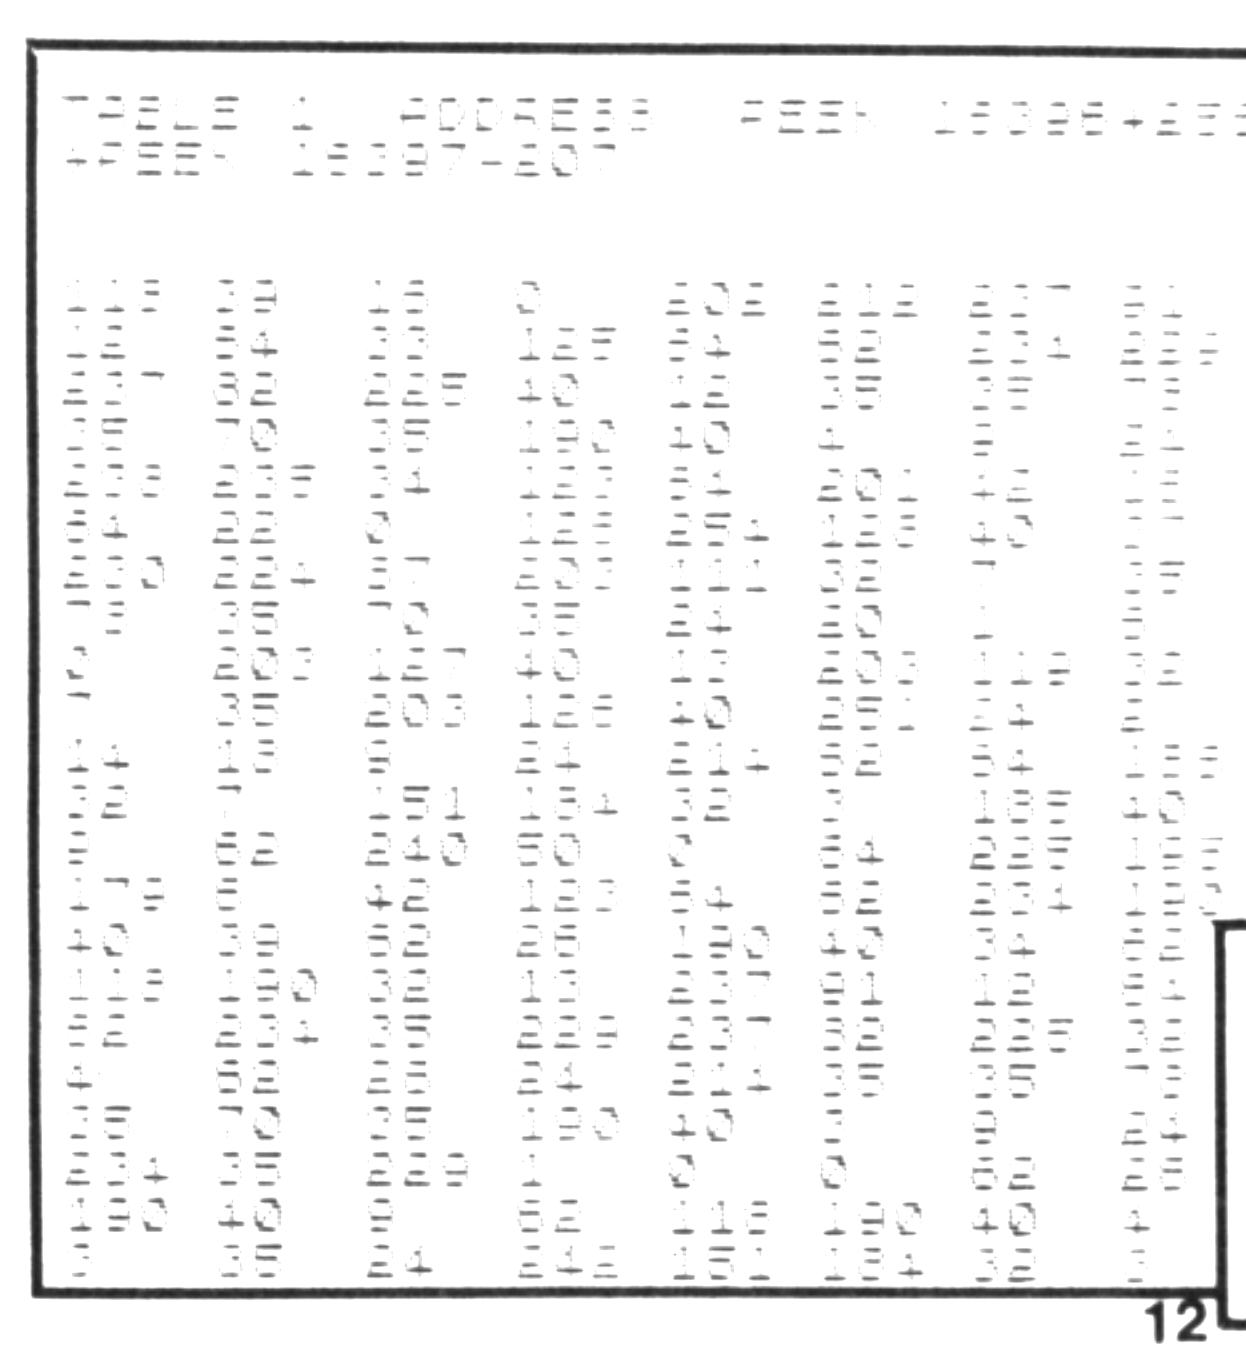
The first thing the loader does is prompt for a starting address. You should respond with PEEK 16396+256*PEEK 16397-207. This is the address of the text in the REM statement. After entering the address, you will have to wait while the screen fills. When the cursor appears in the top left corner (three inverse question marks), you are ready to start entering numbers. If you enter the first number in the table, the cursor will advance. The entered number will be left in the previously occupied space. Type in all the numbers in the first table, so that the screen looks exactly the same.
If you have decided to save your routine somewhere else in memory, this is for you. Instead of using the PEEK expression for the address, you need to decide upon an address you wish to use. Then, if you are using my loader, you need to subtract six from that address. That is because the first six numbers are not actually a part of the program. They are used to trick the routine into thinking that this particular REM statement is empty. That’s important since the program uses REM statements as DATA statements — it wouldn’t do to have the routine being read as data. To you these numbers are unnecessary, so you should skip past the first six before entering anything. You’ll find out how to do it later. Working things this way, your screen will still match the table. Only the first six numbers will be different.
If you make a mistake while entering a number, don’t worry, you can back up and re-enter the number correctly. To back up one space, enter the letter N. Repeat this until the cursor is on the offending number. Entering the correct number fixes the error. To get back where you left off, use the letter M. Entering an M advances you one space. This is how non-REM users can skip the first six numbers in the table. Notice that the letters M and N are on the same keys as the > and <. Use this as a simple reminder of which key to use.
After entering the last number in the first table, you’ll notice that the cursor doesn’t advance. Backing up one space will reassure you that the number is there. When the screen has been thoroughly checked and corrected, break out of the program by typing any letter other than M, N, A, B, C, X, and Y. Using Q for quit is the simplest way to remember how to break. If you break the program accidentally, just RUN it again. The numbers already entered will still be there.
When the first screen has been entered correctly, follow the same process for entering the second table. Non-REM users have no special instructions this time. Just add 176 to the address of the first table to get the address for the second table. For REM users, you need to enter the expression PEEK 16396+256*PEEK 16397-31. Only enter numbers up to where the table stops. This is very important to those using a REM statement; your computer would be very likely to crash if you change numbers further on.

Now that the numbers are all entered correctly, we may go on. You will notice that the REM statement looks very different. It should look exactly like this:

I cannot overstate the importance of having entered the numbers with no errors. When you are absolutely sure that everything is correct, we can move on. This is a word for the wise. When dealing with machine code in REM statements, ‘hands off’ is the best policy. Although I’ve been told you shouldn’t EDIT them, I’ve found that you can sometimes change the line number safely. In any case, never move the cursor past the REM. Any alteration of the text will change and ruin the routine it represents. You will also find that a REM statement used to document a REM statement holding machine code is very handy. Later on, when the routine is no longer fresh in your mind, you won’t have to run through a stack of old magazines to find out how to use your routine.
The next thing to do is to SAVE the loader program with the complete REM statement. SAVE this a couple of times to be sure that you have a good SAVE. Second, you need to remove the loader program line by line, so that only the REM statement remains. After erasing the loader, SAVE the REM statement on tape. Whenever you want to write a program using DATA-READ, you can LOAD it before writing the rest of the program.
In case you are wondering, there are two reasons for SAVEing the loader and REM statement together. First, if you did happen to let an error slip by, you can edit the REM without having to retype the entire loader. The second reason is similar. As I give you more routines each month, you will undoubtably find yourself wanting to use more than one routine in a single program. To do this, you will have to have all of the REM statements available in one SAVEd program. Each month, then, you will use the loader to enter additional REM statements with different machine code routines in them. Eventually, you will build up a good sized library of useful machine language routines that can be custom picked for a particular application. By SAVEing the loader with the REM statement, you won’t have to re-enter the loader next month when you want to expand your library.
Now that we have the program loaded, we can go on to the good stuff. First, I’ll give you the instructions on how to use the DATA-READ. Then, I’ll give you a very simple example in BASIC which you may or may not find necessary.
First off, we will discuss the DATA statement, or REM in this case. The first rule to remember is that all REM statements will be treated as DATA statements. Data is read, beginning from the smallest line number, sequentially through the whole program. The data itself may be made up of any character except CHR 118, CHR 254. and CHR 26, which are ENTER, REM, and “,” respectively. The comma separates individual data items in the REM statement. Consecutive commas represent data equivalent to an empty string. Note that if you wish to use REM statements as documentation, be sure that all the data-REMs precede any documentation-REMs used in the program.
Next on the list is the RESTORE statement. This command sets up the program so it will start reading data from the first REM statement in the BASIC program. You must RESTORE before reading data. If you don’t, you will get an error message R/<line number>. RESTORE is accessed by a USR statement. If your routine is stored in a REM statement at the end of a program, the correct syntax is RAND USR PEEK 16396+256* PEEK 16397-201. For those not using a REM statement, the USR should be followed by the beginning address of your routine.
READ also uses a USR statement, but is a bit more involved. All data is assumed to be string data, and can be returned in any string variable. You must specify which string the data is to be returned in by placing a LET <string variable>=”” before the READ. Failure to do this results in a $/<line number> error message. The actual READ statement will be RAND USR PEEK 16396+256* PEEK 16397-169 for those storing the routine in a 9999 REM statement. If you stored the program elsewhere, just add 32 to the address used in the RESTORE statement. If you attempt to READ when there is no more data available, you will get an R/<line number> error message. If your computer runs out of memory while inserting data into the string, you will get the standard 4/<line number> error message.
Since the READ routine returns data in a string, you will need to add one more statement to use numeric data: LET <numeric variable> = VAL <string variable>. While this makes the reading of numeric data longer, it was the simplest and shortest method of writing the routine. Another advantage of using this method is that numeric data may also be represented by any valid mathematical expression easily.
If you were dismayed by the length of the expression after the USR, here is a rather interesting solution. If you define two variables at the beginning of your program, things will look a lot nicer:
LET RESTORE=PEEK 16396+256* PEEK 16397-201
LET READ=RESTORE+32
If you do this, your RESTORE statement will be RAND USR RESTORE. Neat, huh? Likewise, your READ statement would use RAND USR READ.
Note that wherever I used RAND USR <address>, you may use any other valid USR statement. The RAND is not critical to the operation of RESTORE or READ, but it is the easiest way to use the USR function. The only time RAND will cause problems is if you are using RND. In this case, the RAND will effectively destroy the randomness of RND, and you will probably have to use a statement like LET <numeric variable> = USR <address>. Be sure, however, to use a variable that will cause no problems if it is altered.
I have spent a lot of time writing and rewriting this routine, therefore, I am confident in its quality. By using error checking, I have virtually eliminated the possibility of this routine causing a computer crash. Note, however, that you must be extremely careful when entering the RAND USR statement. You must never allow the address number to be incorrect. If it is wrong, you can almost count on a crash.
Here follows a short program that demonstrates what you can do with this DATA-READ and, also, how to do it:
  10 REM HELLO,12345,67890,,A+B
  20 LET RESTORE=PEEK 16396+256*PEEK 16397-201
  30 LET READ=RESTORE+32
  40 RAND USR RESTORE
  50 LET A$=""
  60 RAND USR READ
  70 PRINT A$
  80 LET B$=""
  90 RAND USR READ
 100 LET A=VAL B$
 110 PRINT A
 120 LET B$=""
 130 RAND USR READ
 140 LET B=VAL B$
 150 LET X$=""
 160 RAND USR READ
 170 PRINT LEN X$
 180 LET X$=""
 190 RAND USR READ
 200 PRINT X$;"=";VAL X$
If the computer crashes while running this program, you have made an error somewhere along the line. You will need to go back, find it, and correct it. Places to look are in the USR statement and in the machine code numbers.
For those who are genuinely interested, I can provide a complete assembly listing of this DATA-READ routine. The routine logic is thoroughly explained in the listing. Since this listing would be worthless to the ‘masses’, I have not included it here. If you would like a copy, please send fifty cents with your request. If you don’t want the listing, but have questions concerning this routine, just send a self-addressed stamped envelope to:
Kevin R. Bulgrien
LeTourneau College #1014
P.O. Box 7001
Longview, TX 75607
Tune in next month for another exciting episode of ‘Machine Code for the Masses’…
Note: Type-in program listings on this website use ZMAKEBAS notation for graphics characters.